The Hexie Butterfly – Tutorial is your ultimate guide to creating a stunning, quilt-inspired textile project that blends traditional English Paper Piecing (EPP) with modern aesthetic design. If you love working with fabric scraps, precise geometric shapes, and whimsical imagery, learning how to assemble a Hexie Butterfly is a fantastic way to elevate your crafting skills. This comprehensive guide will walk you through every step of the process, ensuring your hand-stitched creation looks polished, professional, and absolutely beautiful. Whether you plan to turn your finished butterfly into a standalone wall hanging, a decorative throw pillow, or a central motif for a large quilt block, this textile art tutorial provides all the foundations you need.
Crafting a Hexie Butterfly relies on the timeless technique of sewing hexagons together to form intricate shapes. By carefully selecting your fabric colors and arranging your hexies, you can mimic the natural symmetry and vibrant patterns found on real butterfly wings. This project is highly customizable, letting you experiment with bold contrasting prints, soft pastel palettes, or even upcycled fabrics like denim and linen. Because it requires minimal tools and can be done entirely by hand, it serves as an incredibly relaxing, portable craft that you can take with you anywhere.
In this step-by-step guide, we will break down the essential materials, the arrangement strategies, the stitching methods, and the finishing techniques needed to bring your fabric butterfly to life. We will also explore advanced tips to ensure your seams lie perfectly flat and your corners remain sharp. By following this English Paper Piecing project guide, you will master the geometric precision of hexagon sewing while embracing your creative freedom. Grab your fabric shears, choose your favorite colorful scraps, and let us dive straight into the beautiful world of hexagon quilting.
1. Preparing Your Materials and Hexagon Templates
Before sewing your first stitch, gathering the correct tools is crucial for achieving crisp lines and durable seams. For this project, you will need high-quality cotton quilting fabric, standard paper templates, a reliable fabric glue pen or basting thread, a fine hand-sewing needle, and strong polyester or cotton thread. Using the proper materials prevents the fabric from shifting, which ensures your hexagon edges meet perfectly.
The foundation of any great EPP project is the paper template. You can purchase pre-cut paper hexagons or print your own templates onto cardstock, making sure every single piece is cut with exact precision. For a standard Hexie Butterfly, using 1-inch or 0.75-inch hexagons works beautifully, as these sizes allow for intricate detail without becoming overly tedious to handle.
Once your paper templates are ready, you need to cut your fabric pieces. Always leave a generous 0.25-inch seam allowance around every side of your paper hexagon template. Cutting your fabric shapes precisely ensures you have enough material to fold over the paper edges during the next step, which is known as basting.
Basting is the process of temporarily securing your fabric around the paper template to hold its shape. You can achieve this by using a temporary fabric glue stick along the edges or by sewing long, loose basting stitches through the fabric and paper. Glue basting is much faster and highly popular among modern crafters, while thread basting is preferred by traditionalists who enjoy the classic hand-sewing process.
As you prepare your hexies, keep your fabric layout organized by sorting them into color groups. A typical butterfly design requires a distinct color for the body, a dominant color for the inner wings, and a complementary shade for the outer wing borders. Keeping your pieces sorted prevents confusion once you begin arranging the final pattern on your work surface.
Finally, ensure your sewing needle is thin and sharp, such as a size 9 or 10 milliners needle. Fine needles slip effortlessly through the folded fabric edges without leaving large holes or straining your hands. Pair your needle with a strong, low-lint thread that matches your background fabric or blends seamlessly with your colorful prints.
2. Designing and Arranging Your Hexie Butterfly Layout
The magic of creating a Hexie Butterfly lies entirely in the layout design. Before sewing the pieces together, you must lay your basted hexagons out on a flat surface or a design wall to visualize the final shape. This step allows you to play with color symmetry, balance your patterns, and make adjustments before making any permanent stitches.
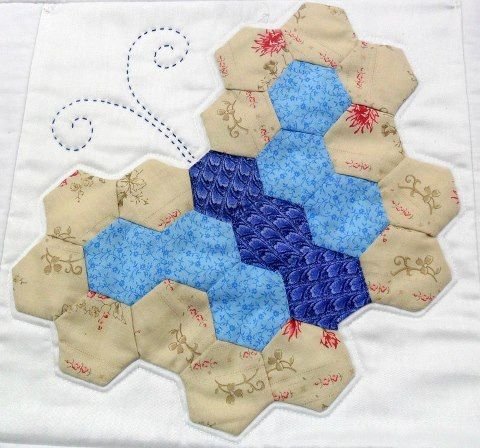
To build the classic butterfly shape, start by forming a central vertical row of hexagons, which will represent the butterfly body. Usually, a row of 4 to 6 hexagons in a dark or neutral solid fabric works best to ground the design. This central column acts as the anchor for attaching the left and right wing structures.
Next, you will build the upper and lower wings symmetrically on both sides of the central body column. The upper wings are typically larger and broader, requiring rows that expand outward before tapering back down. The lower wings are smaller and more rounded, which balances the overall weight of your textile composition.
Achieving perfect visual symmetry is vital when mimicking natural butterfly wings. Whatever fabric placement you choose for the left wing must be mirrored exactly on the right wing. Using contrasting fabric values—such as pairing deep navy blue prints with bright sunny yellows—will make your wing patterns pop dramatically.
Take a digital photograph of your finalized layout on your phone before picking up any pieces to sew. This reference photo is an invaluable tool that prevents you from accidentally misplacing a hexagon or flipping a color pattern while working. It is incredibly easy to lose track of placement once you begin picking up individual segments.
If you want an extra challenge, try incorporating fussy cutting into your wing layout design. Fussy cutting involves centering a specific motif from your fabric print—like a tiny flower, a geometric star, or an animal print—directly in the middle of individual hexagons. This advanced technique adds an extra layer of artistry and detail to your finished piece.
3. Stitching the Hexagons Together with Precision
With your design layout finalized, it is time to begin joining the hexagons using a classic whipstitch or ladder stitch. Pick up two adjacent hexagons from your layout, place them right sides together, and align the edges perfectly. You will be stitching along the very edge of the folded fabric, being careful not to sew through the paper templates.
Anchor your thread with a small knot hidden inside the seam allowance fold. Bring your needle through the absolute outer edge of both fabric pieces, catching only a few threads from each side. Pull the thread taut but not overly tight, as pulling too hard will cause your seams to puckering.
Space your stitches closely together, aiming for roughly 10 to 12 stitches per inch. Consistent spacing ensures that your seams remain strong and that the paper templates do not slip out of place prematurely. Work your way systematically across the aligned edge from one corner to the next.
When you reach a corner where multiple hexagons meet, secure the intersection with a small locking stitch or a tiny knot. This step reinforces the high-stress areas of your quilt block, ensuring the butterfly structure remains durable. Once an edge is joined, open the pieces flat to verify your alignment before moving to the next piece.
It is easiest to assemble your butterfly by joining individual rows first, and then sewing those completed rows together. Work outward from the central body column, attaching the inner wing rows before moving to the outer borders. This organized approach minimizes fabric distortion and helps maintain even tension across the entire project.
Keep checking your progress against your reference photograph regularly to ensure no pieces have accidentally rotated. If a hexagon is sewn upside down, simply use a seam ripper to carefully remove the incorrect stitches and re-sew the edge. Take your time during this assembly process, as precise hand-piecing creates an incredibly flat and professional finish.
4. Final Assembly, Appliqué, and Finishing Touches
Once all your hexagons are completely stitched together, your gorgeous butterfly motif will be fully formed. Before removing any paper templates, press the entire piece thoroughly with a hot, dry iron. Pressing sets your hand stitches into the fabric fibers and ensures all your outer perimeter folds remain crisp and sharp.
Carefully turn your piece over to the back side and begin removing the internal paper templates. If you thread basted, snip the basting threads to release the papers; if you glue basted, gently peel the fabric edges away from the cardstock. Leave the outer perimeter paper templates inside the edge hexies for now to maintain the butterfly’s boundary shape.
Decide how you would like to display your finished Hexie Butterfly motif. The most popular method is to appliqué the butterfly onto a larger background fabric background, such as a square piece of linen or white quilting cotton. Center your butterfly on the background fabric, pin it securely in place, and press it once more.
Using a hidden blind stitch or a neat topstitch, sew around the entire perimeter of your butterfly to attach it to the background. Once the motif is fully secured to the base fabric, you can reach underneath from the back or carefully slip out the final remaining perimeter papers. Your butterfly is now permanently anchored.
To add the final realistic details, consider embroidery hand-stitching to create the butterfly’s antennae and delicate legs. You can use dark embroidery floss and a simple stem stitch or backstitch to draw these lines directly onto your background fabric. Adding these small stitched details brings a wonderful sense of life and motion to the design.
Finally, give your completed textile art piece a beautiful press from the back side to avoid crushing your hand embroidery. You can now sandwich your top fabric with batting and backing to quilt it, finish it into a gorgeous pillow cover, or place it inside a wooden frame. Your beautiful hand-stitched creation is ready to be admired for years to come.
FAQ – Frequently Asked Questions
Do I have to use 100% cotton fabric for this project?
Yes, using 100% quilting cotton fabric is highly recommended for English Paper Piecing. Cotton fabric holds a crisp crease when pressed, does not stretch out of shape easily, and handles glue or thread basting beautifully. Avoid slippery synthetic materials or heavy fabrics if you are a beginner, as they can complicate the hand-sewing process.
When should I remove the paper templates from my hexies?
You should only remove the paper templates after all adjacent hexagons are completely sewn together and the entire piece has been well pressed with an iron. Removing the papers too early will cause the fabric edges to lose their shape, making it very difficult to join the remaining pieces accurately. Always leave the outer boundary papers intact until the butterfly is ready to be appliquéd.
Can I machine sew a Hexie Butterfly instead of hand sewing?
While English Paper Piecing is traditionally done entirely by hand, you can achieve a similar look using machine appliqué methods. However, joining traditional basted hexagons on a standard sewing machine is quite difficult due to the sharp geometric corners. Hand sewing provides the best precision, the flattest seams, and a relaxing crafting experience.
What thread thickness is best for sewing hexagons together?
A fine, strong thread ranging between 50-weight and 80-weight works best for this project. Finer threads blend into the fabric folds effortlessly, making your hand stitches practically invisible from the front side of your work. Polyester or strong cotton threads are excellent choices for ensuring long-lasting seam durability.
How do I wash my finished Hexie Butterfly item?
If your finished butterfly is appliquéd onto a functional item like a quilt or a pillow cover, you can wash it gently. Use cold water, a mild detergent, and a delicate washing cycle, or opt to hand wash the item. Lay the textile flat to dry completely, and iron carefully to restore the crisp shapes of the hexagons.
Conclusion
Mastering the Hexie Butterfly – Tutorial is a highly rewarding journey that allows you to transform simple geometric shapes into an extraordinary piece of textile art.
Throughout this guide, we have explored how to select and prepare your cotton fabrics, design a perfectly balanced layout, execute precise hand stitches, and apply the final finishing touches to your work. This classic crafting technique proves that with just a needle, thread, and some fabric scraps, you can create a stunning heirloom project.