Are you looking for a meaningful, quick, and beautiful handmade project to gift, sell, or keep? The Crochet Cross Keychain – Tutorial is the perfect solution, combining spiritual symbolism with everyday utility in a compact design. This versatile accessory makes a wonderful token for religious celebrations like baptisms, first communions, or weddings, and it is equally popular as a thoughtful, everyday gift for loved ones.
Crafting a crochet cross keychain is a fantastic way to utilize small scraps of yarn while practicing fundamental stitches that every yarn enthusiast should master. Whether you are an absolute beginner or an experienced crafter looking for a quick and rewarding afternoon project, this guide will walk you through every step of the process. By the end of this Crochet Cross Keychain – Tutorial, you will have a gorgeous, durable accessory ready to attach to your keys or backpack.
The beauty of this specific project lies in its simplicity and the room it leaves for personal creativity. You can customize your handmade crochet keychain with different yarn textures, vibrant colors, or even add beads and tassels to make it truly unique. In this comprehensive guide, we will cover the essential materials, provide a detailed step-by-step pattern, share expert assembly tips, and give you valuable advice on how to stiffen your finished work so it retains its shape forever.
1. Choosing the Right Materials for Your Crochet Cross
Selecting the proper supplies is the first and most critical step in ensuring your crochet cross keychain turns out beautifully and lasts for a long time. Because a keychain is handled frequently, tossed into bags, and dropped onto hard surfaces, you need a yarn that can withstand daily wear and tear. A 100% mercerized cotton yarn is highly recommended for this project because it offers excellent stitch definition, a beautiful subtle sheen, and superior durability compared to acrylic fibers.
For this specific Crochet Cross Keychain – Tutorial, we suggest using a sport weight or fingering weight yarn to keep the cross delicate and neatly proportioned. Pairing this yarn with a smaller crochet hook, such as a 2.0mm or 2.5mm hook, ensures that your stitches are tight and firm. Tight tension is essential for keeping the structural integrity of the cross so that the fabric does not warp or sag when attached to a heavy set of keys.
In addition to your yarn and hook, you will need a few essential crochet notions to complete the project smoothly. Gather a pair of sharp embroidery scissors, a sturdy tapestry needle for weaving in your yarn tails, and a metal keychain ring with a jump ring or lobster clasp. Having these materials ready on your crafting table will make the entire process seamless, enjoyable, and highly efficient.
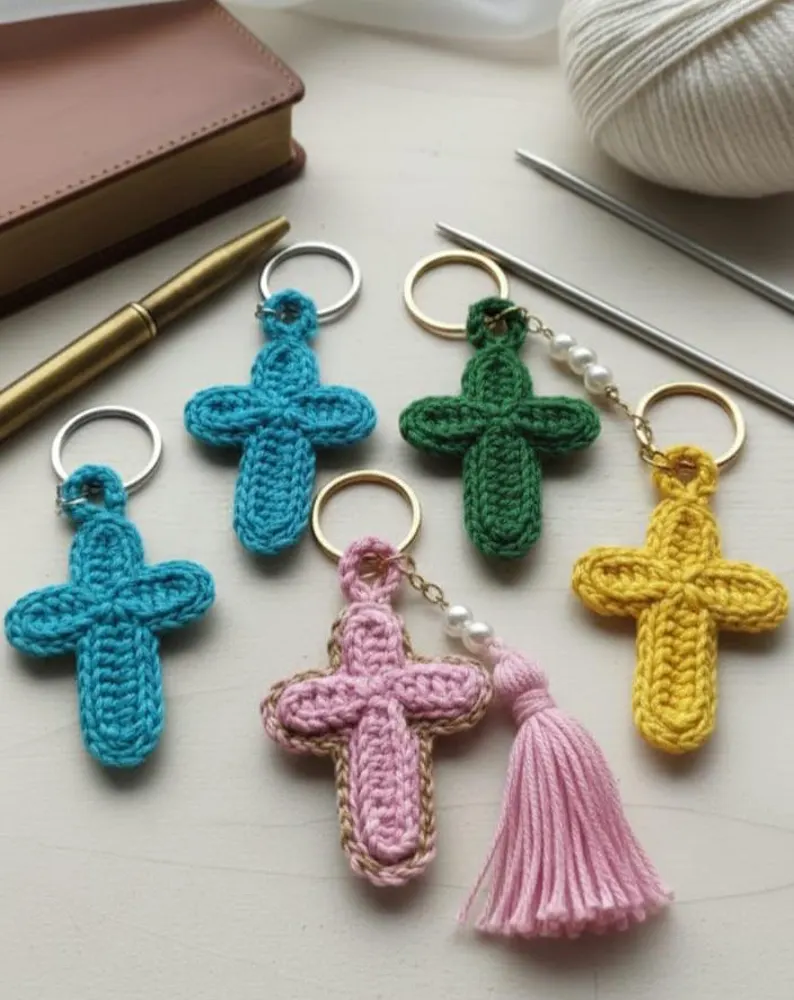
If you want to add an extra touch of elegance to your handmade cross charm, consider incorporating small wooden beads or a delicate tassel at the bottom of the cross. These small embellishments can elevate a simple project into a premium product that looks professional and boutique-ready. Always ensure that any added beads have a large enough center hole to fit your yarn through easily.
For those planning to sell these items at craft fairs or on digital platforms, selecting a cohesive color palette is a great way to attract customers. Classic shades like cream, soft beige, white, and pastel blue or pink are incredibly popular for religious events. However, do not hesitate to experiment with bold jewel tones or even multicolored variegated yarn to give your crochet keychains a modern, trendy flair.
Lastly, remember that the quality of your metal components matters just as much as your yarn selection. Opt for stainless steel or high-quality iron keychain rings that will not tarnish or bend easily over time. Investing a little extra care into choosing premium materials guarantees that your finished Crochet Cross Keychain – Tutorial results in a product you can be incredibly proud to share.
2. Step-by-Step Crochet Cross Pattern and Instructions
To begin the actual crafting process of our Crochet Cross Keychain – Tutorial, we will start by making a slip knot and creating the foundation chain. For a standard-sized cross, chain 16, ensuring that your tension remains consistent and not too loose. This initial chain acts as the central vertical spine of your cross, from which we will build the horizontal arms and the rest of the shape.
Working back down the chain, starting from the second chain from your hook, you will place one single crochet stitch into each of the next 5 chains. This establishes the top section of your vertical bar. When you reach the 6th chain, you will begin creating the first horizontal arm by chaining 6, then working single crochets back along that new chain towards the center.
Once you slip stitch back into the main central chain to secure the first arm, you will immediately chain 6 in the opposite direction to create the second horizontal arm. Just like before, work single crochets back down this chain until you reach the center intersection. Securing this intersection with a tight slip stitch is crucial for maintaining a sharp, clean cross geometric shape.
Now, continue working single crochets down the remaining stitches of the original foundation chain to complete the lower, longer section of the vertical bar. When you reach the very last chain, work three single crochets into that single space to create a smooth, rounded bottom edge. This technique prevents the bottom of your crochet cross from curling upward.
To give your cross a polished, professional look, you will now work a complete border of slip stitches all the way around the entire perimeter of the piece. As you navigate the sharp corners of the horizontal arms, place a chain-1 space at each outermost tip to keep the corners crisp and distinct. This border round adds thickness and hides minor imperfections in your tension.
When you arrive back at the very top of the cross where you started, join the round with an invisible join or a firm slip stitch. Cut your yarn, leaving a tail of approximately 6 inches, which you will use later for fastening. You have now successfully completed the main textile body of your Crochet Cross Keychain – Tutorial, and it is ready for finishing touches.
3. Assembling and Securing Your Keychain Hardware
The assembly phase is where your beautiful textile motif officially transforms into a functional, everyday Crochet Cross Keychain – Tutorial accessory. Before attaching any metal pieces, use your tapestry needle to carefully weave in the starting yarn tail through the back of your stitches. Make sure to pass the needle back and forth at least three times to prevent the yarn from unraveling during daily use.
Next, take the remaining top yarn tail and use it to secure your metal keychain ring directly to the top loop of the cross. Thread the yarn through the small jump ring attached to the keychain hardware, then pass it securely through the top center stitch of the cross. Repeat this looping motion three or four times to create a strong, reinforced connection that can handle pulling.
If you prefer a cleaner, more minimalist look, you can skip using the yarn tail and use jewelry pliers to open a metal jump ring instead. Slip the open jump ring directly through the top crochet stitch, slide the keychain loop onto the ring, and squeeze it firmly shut. Using pliers ensures that there are no gaps in the metal where the yarn could accidentally slide out.
For those who want to add extra decorations, this assembly stage is the perfect moment to attach a handmade yarn tassel or a decorative bead. You can tie a small tassel to the bottom loop of the cross, securing it with a double knot and hiding the ends inside the body of the cross. Beads can be threaded onto the top yarn tail before it is secured to the metal hardware.
Take a moment to inspect your work, pulling gently on the hardware to ensure that everything is tightly fastened and structurally sound. A loose knot or an un-woven tail can quickly ruin a gorgeous piece of work once it is tossed into a pocket with heavy keys. Taking an extra minute to double-check your security steps ensures your crochet keychain accessory remains intact for years.
If you are creating these items in large batches for commercial purposes, standardizing your assembly line will save you immense amounts of time. Complete all the crocheting first, then do all the weaving, and finally attach all the hardware in one focused session. This organized approach keeps your workspace clean and guarantees high quality control across every single crochet cross you produce.
4. Blocking and Stiffening Your Crochet Cross for Longevity
Because crochet fabric is naturally soft and flexible, a small item like a cross can easily lose its shape or curl up at the edges. To combat this and give your Crochet Cross Keychain – Tutorial a crisp, store-bought appearance, you must apply a fabric stiffening technique. Stiffening makes the cotton fibers rigid, allowing the cross to stay completely flat even when hanging from a bag.
There are several methods to stiffen crochet, but the most popular and accessible approach is using a mixture of standard clear school glue and water. In a small bowl, mix equal parts of clear glue and lukewarm water until the liquid is completely smooth and homogeneous. Submerge your completed crochet cross into the mixture, making sure the liquid thoroughly penetrates all the inner cotton fibers.
Gently squeeze out any excess liquid from the cross, being careful not to wring or twist the stitches out of shape. Place the damp cross onto a piece of foam blocking mat covered with plastic wrap or wax paper to prevent sticking. Use rust-proof sewing pins to pin down the tips of the cross arms, pulling them taut to create perfect symmetry.
Allow the pinned cross to air dry completely in a well-ventilated area away from direct sunlight, which usually takes between 12 to 24 hours. Once the piece is completely dry to the touch, carefully remove the sewing pins and lift the cross off the plastic wrap. You will find that your handmade crochet cross is now wonderfully rigid, flat, and resistant to bending.
An alternative method for stiffening is using a commercial fabric stiffener spray, which is widely available at most local craft supply stores. Simply pin your dry cross onto the blocking mat first, then spray a generous, even layer of the product over the surface. This method dries significantly faster than the glue mixture and is excellent for quick, last-minute projects.
Keep in mind that while stiffened crochet items are highly durable, they are generally not completely waterproof. Advise your friends, family, or customers to avoid submerging their crochet cross keychains in water or running them through a washing machine. If the keychain ever gets dirty, a gentle spot cleaning with a damp microfiber cloth is all that is required to keep it looking brand new.
Frequently Asked Questions
What is the best yarn type for a crochet cross keychain?
The best choice is 100% mercerized cotton yarn in a sport or fingering weight. Cotton offers superb stitch definition, does not fuzz up over time like acrylic, and is strong enough to handle the daily friction that keychains endure.
How long does it take to complete this crochet tutorial?
This is a very fast project, making it perfect for quick crafting sessions. An intermediate crocheter can complete one cross in about 15 to 20 minutes, while a beginner might take around 30 to 45 minutes to finish the stitching and assembly.
Do I absolutely have to stiffen the finished crochet cross?
While it is not mandatory, stiffening is highly recommended. Without stiffening, the arms of the cross will naturally curl and lose their shape over time due to handling. Stiffening keeps the accessory looking professional, flat, and visually appealing.
Can I sell items made from this Crochet Cross Keychain – Tutorial?
Yes, you are fully welcome to sell finished products made using this tutorial at local craft fairs, boutique shops, or online stores. Handmade keychains are highly profitable items because they require very little material investment but carry great sentimental value.
What size hook should I use if my stitches are naturally loose?
If you tend to crochet loosely, drop down a hook size to a 1.75mm or 2.0mm hook. Creating tight, dense stitches is essential for this project so that the interior structure remains firm and the finished piece does not look sloppy.
Conclusion
In this Crochet Cross Keychain – Tutorial, we have explored everything you need to create a gorgeous, durable, and meaningful accessory from scratch.
We covered the importance of selecting premium mercerized cotton yarn, followed a detailed step-by-step stitching pattern, learned how to securely attach metal hardware, and discussed the essential process of fabric stiffening for long-term durability. This project is an incredibly rewarding way to use up your yarn stash while creating a high-quality item that can be gifted or sold.