If you are looking for a meaningful, elegant, and versatile project to add to your crafting repertoire, this Crochet Cross Tutorial is exactly what you need. Creating a crochet cross is not only a fantastic way to sharpen your stitching skills, but it also leaves you with a beautiful, handmade piece that carries deep personal or spiritual significance. Whether you want to make a thoughtful gift for a baptism, a unique bookmark, a festive holiday ornament, or a beautiful piece of wall art, mastering this design is a rewarding journey that any crafter will enjoy.
The beauty of a crochet cross lies in its simplicity and the endless ways you can customize it. By changing your yarn weight, hook size, or embellishments, you can transform a simple crochet cross pattern into a delicate lace heirloom or a sturdy, rustic decoration. This comprehensive tutorial is designed to guide you through every single step of the process, ensuring that even if you are a beginner, you will feel confident and inspired from the very first loop to the final knot.
In this detailed Crochet Cross Tutorial, we will break down everything you need to know, from selecting the perfect materials to mastering the essential stitches. We will explore the historical connection of this craft, provide a clear step-by-step walkthrough, share expert tips for achieving flawless tension, and discuss creative ways to showcase your finished work. Grab your favorite hook, settle into a comfortable chair, and let’s dive into the wonderful world of crocheting these timeless symbols together.
1. Understanding the Essentials of the Crochet Cross Tutorial
Before you tension your yarn, it is essential to understand what makes a crochet cross so special. This project blends traditional crafting techniques with symbolic artistry, resulting in a piece that feels both historic and modern. By following a structured Crochet Cross Tutorial, you learn how to manipulate basic stitches to create clean geometric lines that intersect perfectly.
To get started with this tutorial, you need to gather your essential supplies, which include a high-quality crochet hook, your choice of yarn or embroidery thread, a pair of sharp scissors, and a tapestry needle for weaving in those loose ends. The beauty of this specific project is that it requires very little material, making it an excellent stash-buster for using up leftover yarn from larger projects.
For a delicate, traditional look, many crafters opting for a Crochet Cross Tutorial prefer using fine cotton thread (such as size 10) paired with a small steel hook (around 1.5mm to 2.25mm). This combination yields a crisp, lace-like crochet cross that is perfect for bookmarks or formal gifts. However, if you are a beginner, using standard worsted weight yarn and a 4.0mm hook will make the stitches much easier to see and handle.
Choosing the right color is another exciting step in this Crochet Cross Tutorial. While classic white, cream, and ecru are the most popular choices for religious occasions, do not be afraid to experiment with soft pastels, deep jewel tones, or even variegated yarns. The color you choose will set the overall mood of your finished crochet cross, allowing it to match your home decor or the personality of the recipient.
Texture also plays a massive role in the final outcome of your tutorial journey. A smooth, mercerized cotton yarn will give your crochet cross a slight sheen and incredible stitch definition, highlighting every chain and double crochet. On the other hand, a soft acrylic or wool blend will create a cozy, warm aesthetic that works beautifully for pocket charms or rustic holiday tree ornaments.
Ultimately, the goal of this introductory phase of our Crochet Cross Tutorial is to prepare your mind and your workspace for a mindful crafting session. When you understand the tools and materials you are working with, your stitches become more fluid, your tension remains consistent, and the entire creative process becomes a relaxing, therapeutic escape from the hustle and bustle of daily life.
2. Step-by-Step Stitch Guide for Your Crochet Cross
Now that your materials are ready, let’s begin the core practice of this Crochet Cross Tutorial. The foundation of almost every crochet cross begins with a simple slip knot and a series of starting chains, which determine the vertical length of the lower stem. For our standard design, you will chain a base row, ensuring your loops are uniform and not wound too tightly around the hook.
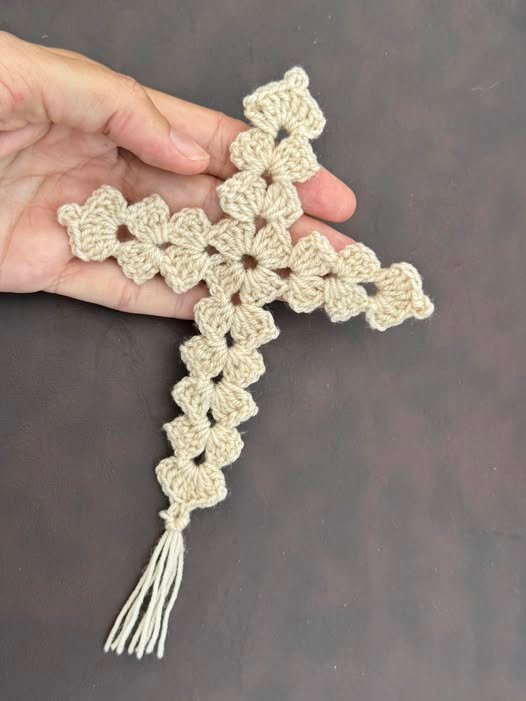
Once your base chain is established, you will work your way back up using basic stitches like the single crochet, half double crochet, or the classic double crochet, depending on how solid or airy you want the texture to be. This tutorial focuses on using the double crochet stitch because it creates a beautiful, traditional openwork pattern that closely resembles classic church lace while building height quickly.
The defining moment of any Crochet Cross Tutorial is creating the horizontal arms. To do this without cutting your yarn, you will extend a new chain outward from the main stem at a specific height, work your stitches across that new chain, and then repeat the process on the opposite side to maintain perfect symmetry. This ingenious technique keeps your project seamless and structural.
As you navigate the corners where the vertical stem and horizontal arms meet, pay close attention to your stitch placement. This Crochet Cross Tutorial recommends working tightly into the center intersections to prevent large, unsightly gaps from forming. Keeping your stitches compact in these transitional zones ensures that your completed crochet cross retains its distinct, iconic shape over time.
After completing both arms, you will finish the upper vertical section of the crochet cross by working a few short rows upwards from the center intersection. Once the top is complete, you can choose to work a decorative slip stitch or single crochet border completely around the entire perimeter of the piece, which instantly cleans up the edges and gives it a highly professional look.
To finalize the stitching portion of this Crochet Cross Tutorial, you will fasten off your yarn, leaving a tail of about six inches. Thread this tail onto your tapestry needle and carefully weave it back and forth through the dense parts of your stitches to secure it. Cutting the yarn too close to the knot without weaving can cause your hard work to unravel later, so take your time with this step.
3. Advanced Tips for Blocking and Perfecting Your Crochet Cross
Completing the stitches is only half the battle; the true magic of a professional Crochet Cross Tutorial lies in the post-production phase, specifically known as blocking. When you first finish crocheting, your cross might look a bit curled, distorted, or uneven around the edges. This is completely normal and happens due to the natural twist of the yarn and varying hand tension.
Blocking is the process of wetting or steaming your fabric to relax the fibers and set them into a permanent, perfect shape. For this Crochet Cross Tutorial, we highly recommend wet blocking. Submerge your finished crochet cross in lukewarm water mixed with a drop of gentle wool wash, let it soak for about ten minutes, and then gently squeeze out the excess water using a clean, dry towel.
Next, lay your damp crochet cross onto a foam blocking mat or a thick towel. Using rustproof T-pins, carefully pin the center of the cross down first, and then pull the arms and stem straight, pinning them securely in place. Refer to a ruler during this step of the tutorial to ensure that the horizontal arms are perfectly level and equal in length on both sides.
If you want your crochet cross to be rigid enough to hang on a wall or use as a stiff bookmark, you can apply a fabric stiffener or a homemade mixture of equal parts water and white craft glue during the blocking process. Dip the piece into the stiffening solution, squeeze out the excess, pin it precisely into shape, and let it dry completely for 24 to 48 hours.
Once the piece is fully dry and you remove the pins, you will be amazed at the transformation. The stitches will have opened up beautifully, the lines will be perfectly straight, and the overall lace pattern will look crisp and defined. This blocking step is what separates amateur projects from boutique-quality pieces, making it a vital component of our Crochet Cross Tutorial.
Always remember that patience is key when blocking your crochet cross. Rushing the drying process by using a high-heat hairdryer can warp synthetic fibers or damage delicate cotton threads. Let nature do its work in a well-ventilated room, and you will be rewarded with a gorgeous, durable keepsake that maintains its pristine geometric form for years to come.
4. Creative Ways to Use and Gift Your Finished Crochet Cross
Now that you have successfully completed this Crochet Cross Tutorial, you might be wondering how to display or share your beautiful creation. One of the most popular ways to use a thread crochet cross is as a personalized bookmark. You can attach a long, elegant tassel to the bottom stem or the top loop, allowing it to rest beautifully between the pages of a favorite book or Bible.
Another fantastic idea inspired by this tutorial is transforming your work into wearable jewelry. By using ultra-fine embroidery thread and a tiny lace hook, you can create a miniature crochet cross that can be stiffened, sealed, and attached to earring hooks, a charm bracelet, or a delicate silver chain for a completely unique, bohemian-style statement piece.
If you enjoy home decor, you can frame your blocked crochet cross against a contrasting fabric background, such as dark velvet or rustic burlap, inside a shadow box frame. This creates a striking piece of wall art that adds a touch of handmade warmth to any room, making it an incredible conversation starter when guests come to visit your home.
These handmade items also make deeply meaningful gifts for religious milestones such as baptisms, first communions, confirmations, weddings, or memorials. Gifting someone a piece made from this Crochet Cross Tutorial shows that you invested your time, energy, and love into creating something specifically for them, which carries far more sentimental value than any store-bought item ever could.
During the holiday season, you can easily adapt this tutorial to create beautiful Christmas tree ornaments. Simply add a loop of metallic silver or gold thread to the top of the crochet cross, thread a few shiny glass beads onto the hanger, and hang it on your tree where the holiday lights can shine through the open lace stitches beautifully.
Finally, do not hesitate to share your journey online; the global crafting community loves seeing variations of a classic Crochet Cross Tutorial. Post photos of your unique color combinations, ask for feedback in fiber arts forums, or teach a friend how to make one in person. Spreading the joy of crochet keeps this beautiful traditional art form alive for future generations to enjoy.
Frequently Asked Questions (FAQ)
What is the best yarn for a beginner attempting this crochet cross tutorial?
For beginners, it is highly recommended to start with a 100% cotton worsted weight yarn (Category 4) and a 4.0mm or 4.5mm crochet hook. This allows you to see your stitch anatomy clearly, practice your tension, and understand the construction of the arms and stem without struggling with tiny, slippery threads.
How do I make my crochet cross stiff so it doesn’t bend?
You can easily stiffen your finished project using commercial fabric stiffener, heavy laundry starch, or a simple DIY mixture of equal parts white school glue and water. Submerge your blocked piece in the solution, squeeze out the excess liquid, pin it flat into the correct shape on a blocking mat, and allow it to dry completely.
Can I add beads to my crochet cross pattern?
Yes, adding beads is a wonderful way to elevate your project! You can thread your chosen beads onto your yarn before you begin your starting chain. As you work through the tutorial, simply slide a bead up close to your hook right before completing a stitch to lock it securely onto the front face of your work.
How long does it take to complete one crochet cross?
Because this is a relatively small and compact project, an intermediate crocheter can easily complete one crochet cross in about 30 to 45 minutes. For beginners, it might take an hour or two to fully master the placement of the horizontal arms and the symmetry, making it an excellent, quick afternoon project.
Is this crochet cross project suitable for selling at craft fairs?
Absolutely! Handcrafted items with spiritual or elegant aesthetic appeal sell incredibly well at local craft fairs, church bazaars, and online shops like Etsy. Because they use very little yarn and can be completed quickly, they offer an excellent profit margin when packaged beautifully as bookmarks, ornaments, or pocket charms.
Conclusion
In summary, this Crochet Cross Tutorial has provided you with a complete, comprehensive roadmap to creating your very own beautiful, symmetrical, and meaningful fiber art piece.
We explored the essential tools and material selections needed for success, walked through the step-by-step stitch mechanics of building the stem and arms, unlocked the secrets of professional wet blocking and stiffening, and uncovered countless creative ways to gift or display your finished masterpiece. Crochet is a beautiful journey of patience and precision, and mastering this classic geometric symbol is a fantastic milestone for any passionate crafter.