If you are looking for a cozy, stylish, and rewarding DIY project, learning how to make a Crochet Hat – Tutorial is the perfect place to start. Crocheting your own headwear is not just a wonderful way to express your personal style, but it is also an incredibly therapeutic and relaxing hobby. Whether you want to create a warm winter beanie for yourself, a thoughtful handmade gift for a loved one, or simply want to expand your crafting skills, mastering the crochet hat is a fantastic milestone for crafters of all levels.
In this comprehensive guide, we are going to break down everything you need to know about creating a beautiful, well-fitting headpiece from scratch. You do not need to be an expert to follow along with this Crochet Hat – Tutorial, as we will guide you through the essential materials, the foundational stitches, and the step-by-step process of shaping your project. By the time you finish reading, you will have the confidence and knowledge needed to pick up a hook and start stitching your very own masterpiece.
To make this journey as smooth as possible, we have structured this guide around key concepts that every maker should understand. We will explore the best yarn types for crochet, how to choose the right crochet hook sizes, the core basic crochet stitches required, and a clear step-by-step crochet guide to bring it all together. Let’s dive in and discover how simple and enjoyable making a crochet hat can truly be.
1. Choosing the Best Yarn Types for Crochet Hats
When starting your project, selecting the right yarn types for crochet is the most crucial decision you will make. The fiber content directly impacts how warm your crochet hat will be, how it feels against your skin, and how easy it is to wash. Beginners often find that medium-weight yarn is the easiest to work with because it allows you to see your stitches clearly.
Acrylic yarn is one of the most popular yarn types for crochet because it is affordable, widely available, and comes in a massive variety of colors. It is also machine washable, which makes it incredibly practical for everyday wear. However, some lower-quality acrylics can feel a bit scratchy, so it is always a good idea to feel the skein before purchasing.
If you are looking for ultimate warmth and a premium feel, wool is an excellent choice among traditional yarn types for crochet. Wool offers natural insulation and elasticity, which helps your crochet hat retain its shape over time. For those with sensitive skin, superwash merino wool is a fantastic option because it is incredibly soft and less likely to cause irritation.
Cotton yarn is another option, though it is less common for warm winter beanies. Cotton lacks the elasticity of wool or acrylic, but it is highly breathable and durable, making it perfect for lightweight, spring-themed crochet hat designs. Mixing fibers, such as a wool-acrylic blend, often gives you the best of both worlds: softness, durability, and warmth.
The thickness of the yarn, also known as the yarn weight, is just as important as the fiber itself. For a standard Crochet Hat – Tutorial, a number 4 worsted weight yarn or a number 5 bulky weight yarn is highly recommended. These weights work up quickly, keeping you motivated as you watch your handmade creation grow row by row.
Ultimately, understanding yarn types for crochet allows you to customize your project to suit any season or style. Always check the yarn label for care instructions and recommended hook sizes before making your final selection. Taking the time to choose the perfect yarn ensures that your finished headwear will be comfortable, beautiful, and long-lasting.
2. Understanding Crochet Hook Sizes and Materials
Once you have selected your yarn, the next step in our Crochet Hat – Tutorial is understanding crochet hook sizes and how they affect your work. The size of your hook determines the tension and drape of your fabric. If your hook is too small, your stitches will be tight and stiff; if it is too large, your crochet hat will be loose and full of gaps.
Crochet hooks are measured in millimeters or by United States letter and number designations. When looking at crochet hook sizes, you will generally find that worsted weight yarn pairs beautifully with a 5.0 mm (H-8) or 5.5 mm (I-9) hook. Bulky yarns will require larger hooks, often ranging from 6.0 mm (J-10) up to 8.0 mm (L-11).
The material of the hook also plays a significant role in your overall crafting experience. Aluminum hooks are incredibly popular because they are slick, lightweight, and allow the yarn to glide effortlessly. They are fantastic for fast stitching, though some beginners find them a bit slippery when first practicing a Crochet Hat – Tutorial.
Ergonomic hooks, which feature thick rubber or plastic handles, are highly recommended for larger projects like a crochet hat. These handles provide a more comfortable grip, reducing hand fatigue and preventing cramps during long crafting sessions. Investing in a good ergonomic hook can make your making experience significantly more enjoyable.
Wooden and bamboo hooks offer a completely different feel, providing more grip and friction than metal options. This extra grip is wonderful when working with slippery yarn types for crochet, as it prevents your loops from falling off accidentally. They also feel warm in your hands and offer a quiet, soothing clicking sound as you work.
Always remember that the suggested crochet hook sizes on yarn labels are just recommendations. Everyone crochets with a slightly different natural tension, so you may need to adjust your hook size up or down to achieve the perfect fit. Checking your gauge before diving into the main project is the best way to ensure success.
3. Mastering the Basic Crochet Stitches for Success
Before jumping into the full project layout, you need to familiarize yourself with the basic crochet stitches that form the foundation of our design. Fortunately, you do not need to know dozens of complex techniques to make a gorgeous crochet hat. Mastery of just two or three fundamental stitches will allow you to create endless variations of beautiful headwear.
The first essential technique you must learn is the slip knot and the foundation chain, which acts as the starting point for almost every project. From there, the single crochet is the most straightforward of the basic crochet stitches. It creates a dense, tight fabric that is excellent for keeping out cold winter winds, making it ideal for the brim of your crochet hat.
Next, the half double crochet is a true favorite among makers for this specific Crochet Hat – Tutorial. It provides a beautiful texture that is slightly taller than a single crochet but tighter than a double crochet. It strikes the perfect balance, offering excellent warmth while allowing the fabric of your beanie to drape naturally and comfortably.
The double crochet is another classic option among basic crochet stitches that works up incredibly fast. Because it is a taller stitch, it allows you to finish your project in record time. While it creates a slightly more breathable fabric, you can pair it with a smaller hook to keep the stitches close together for maximum warmth.
To give your headpiece a professional finish, learning how to work into the back loops only is a fantastic technique. This simple variation of basic crochet stitches creates a ribbed effect that looks exactly like traditional knitting. Using this ribbing for the brim ensures that your finished project stretches comfortably over your head and stays securely in place.
By practicing these basic crochet stitches on a small scrap piece of yarn first, you will build the muscle memory needed for the actual project. Once your stitches look even and consistent, you are fully prepared to move forward. Relax, take your time, and enjoy the rhythm of the yarn moving through your fingers.
4. Step-by-Step Crochet Guide for a Perfect Hat
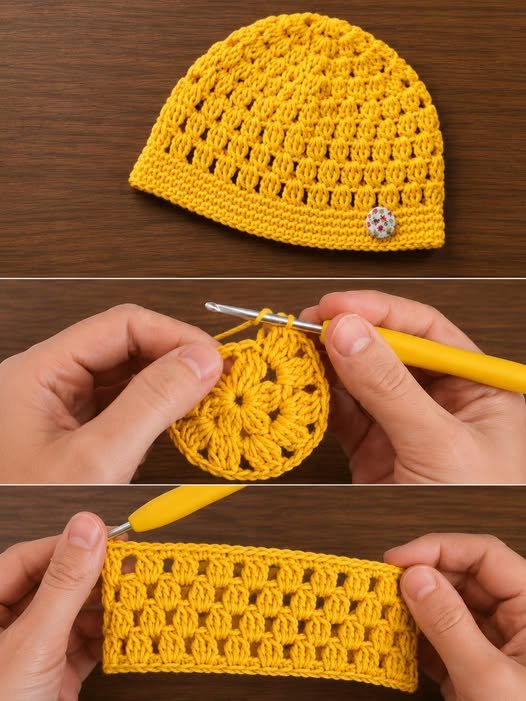
Now that you have your materials and have practiced your stitches, it is time for the core step-by-step crochet guide. The easiest way for a beginner to make a crochet hat is to stitch a simple flat rectangle and then seam it together. This method eliminates the need to work in confusing circles and ensures a perfect fit every single time.
To begin this Crochet Hat – Tutorial, create a slip knot and chain a length that matches the desired height of your hat, usually around 11 to 12 inches for a standard adult size with a folded brim. Turn your work and begin making half double crochet stitches into each chain across. Make sure to count your stitches to keep your edges perfectly straight.
For the subsequent rows of our step-by-step crochet guide, you will work your stitches exclusively into the back loops only of the previous row. This creates the beautiful, stretchy ribbed texture we discussed earlier. Continue repeating this pattern row after row until the piece is long enough to wrap comfortably around your head.
Once your rectangle reaches the correct length, fasten off your yarn, leaving a very long tail for sewing. Fold the rectangle in half so that the short ends meet, and use a yarn needle to sew those edges together. This creates a tube of fabric that will quickly transform into your final crochet hat.
Next, thread your yarn needle along the top open edge of the tube, weaving the yarn in and out of the fabric every half-inch. Once you have gone all the way around, pull the yarn tail firmly to gather the top of the tube tightly together, closing the hole completely. Tie a secure knot to hold it in place.
To finalize your project, weave in any remaining loose yarn tails using your needle so they are completely hidden from view. Turn the piece right-side out, fold up the bottom brim, and your project is officially complete. You have successfully followed this step-by-step crochet guide to create a stunning, functional piece of handmade fashion.
Frequently Asked Questions (FAQ)
How long does it take for a beginner to finish a crochet hat?
For a beginner following a standard Crochet Hat – Tutorial, it typically takes between 3 to 6 hours to complete the project. As you become more comfortable with the basic crochet stitches and your hook control improves, you will find that you can easily finish a complete beanie in a single evening.
Which yarn weight is best for winter hats?
A worsted weight (number 4) or bulky weight (number 5) yarn is highly recommended for winter headwear. These weights provide the ideal balance of thickness, warmth, and ease of use, ensuring your project works up quickly while keeping you fully protected from the cold.
How do I know what size to make the hat?
The easiest method is to measure the circumference of the head with a tape measure. When following our step-by-step crochet guide, simply make your stitched rectangle about 1 to 2 inches smaller than the actual head measurement, as the ribbed fabric stretches significantly to create a perfect fit.
Can I add a pom-pom to the top of my hat?
Absolutely! Adding a pom-pom is a wonderful way to personalize your project. You can easily make a matching pom-pom out of your leftover yarn types for crochet using a cardboard template, or you can purchase a trendy faux-fur pom-pom and sew it securely to the gathered top of your beanie.
Why is my crochet hat turning out too stiff?
If your fabric feels stiff and inflexible, it usually means your stitching tension is too tight or your hook is too small. To fix this, try relaxing your hands as you work, or swap out your tool for one of the larger crochet hook sizes to create a softer, more flexible drape.
Conclusion
In this Crochet Hat – Tutorial, we have covered all the fundamental elements required to create a beautiful, cozy, and perfectly styled beanie from scratch.
By understanding the unique properties of various yarn types for crochet, choosing the appropriate crochet hook sizes, and mastering a few basic crochet stitches, you now possess the skills needed to tackle this project with complete ease. Our straightforward step-by-step crochet guide demonstrates that you do not need complex patterns to achieve professional, store-quality results right from the comfort of your own home.