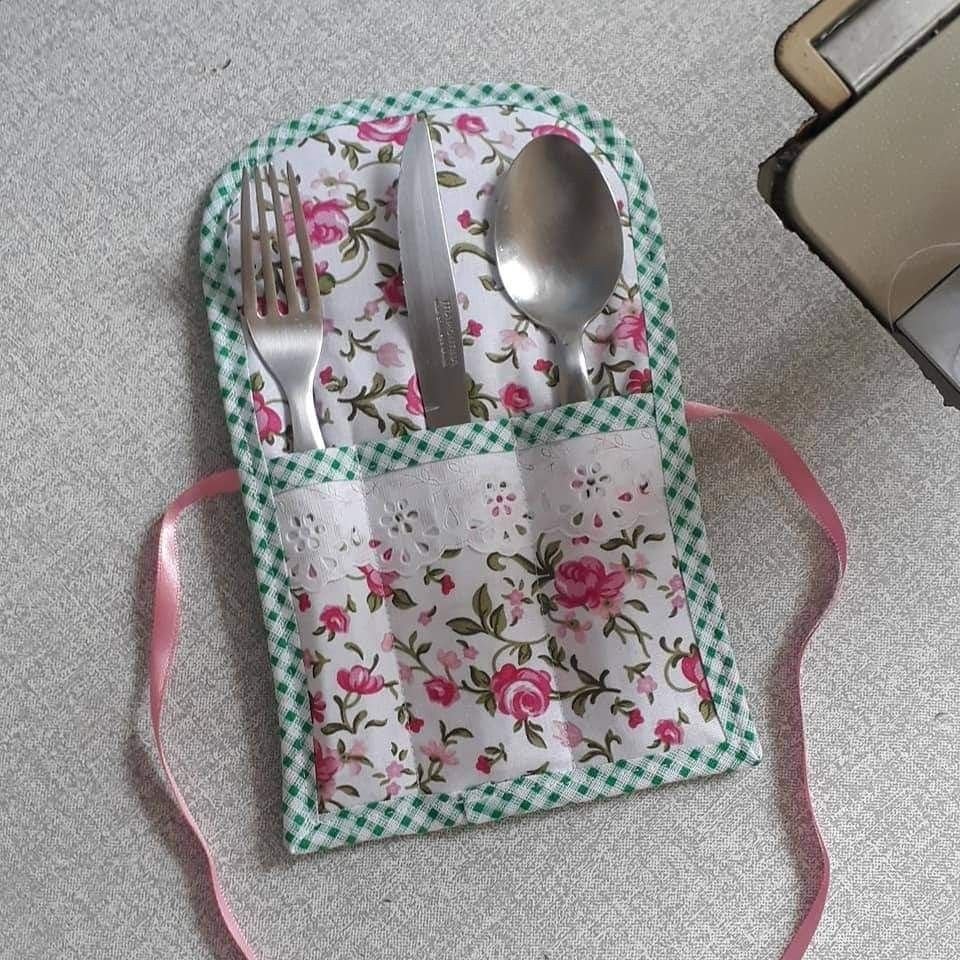
A Fabric Cutlery Holder – Tutorial is exactly what you need if you want to elevate your dining table decor while embracing a more sustainable, eco-friendly lifestyle. Whether you are hosting a festive holiday dinner, preparing for a cozy family picnic, or simply trying to keep your kitchen drawers beautifully organized, a handmade fabric cutlery holder adds an undeniable touch of warmth and personality. Making your own table accessories allows you to choose your favorite colors, repurpose scrap fabrics, and create something that is both incredibly functional and aesthetically pleasing.
This step-by-step sewing guide is designed to help crafters of all skill levels navigate the process with absolute ease, ensuring a professional finish that looks like a high-end boutique find. Investing your time in a DIY fabric cutlery holder not only saves money but also gives you complete creative freedom over your dining presentation. By selecting durable, washable textiles, you can create a reusable accessory that stands the test of time, reducing the reliance on disposable paper alternatives and bringing a charming, authentic feel to every single meal.
In this comprehensive fabric silverware pouch tutorial, we will explore the exact materials you need, the precise measurements required, and the best techniques to achieve flawless stitching. You do not need an advanced sewing setup to follow along; a basic machine, some essential notions, and a passion for handmade kitchen accessories are more than enough to get started. Let us dive into the creative process and transform simple pieces of cloth into stunning, practical organizational pieces that your guests will admire.
1. Choosing the Best Materials for Your Fabric Cutlery Holder
Selecting the right textiles is the foundational step to ensuring your handmade project is both durable and easy to maintain over time. For an everyday fabric cutlery holder, tightly woven natural fibers like 100% cotton, linen, or lightweight canvas are the absolute best options. These materials handle frequent washing exceptionally well, hold their shape after ironing, and are structurally stable enough to withstand the sharp edges of forks and knives.
If you love sustainable crafting, you can easily implement upcycled fabric projects by repurposing old denim jeans, durable cotton shirts, or leftover canvas scraps from previous quilting adventures. Heavyweight materials like denim add a rustic, modern farmhouse charm to your table setting while offering incredible resistance to wear and tear. Mixing a sturdy exterior fabric with a colorful, patterned cotton lining creates a beautiful visual contrast that elevates the overall design.
In addition to your main textiles, incorporating a layer of fusible interfacing is a fantastic secret technique to give your sewing organizational items a crisp, professional structure. Interfacing prevents the pouch from becoming floppy, ensuring it lays flat on the table and keeps its neat shape even after multiple trips through the washing machine. You will also want to choose high-quality polyester threads that match or intentionally contrast with your chosen design.
Before you begin cutting your pieces, it is highly recommended to pre-wash all your fabrics to prevent any unwanted shrinking or color bleeding later on. Ironing your materials thoroughly after washing ensures that your measurements remain perfectly accurate during the cutting phase. Taking these extra preparation steps guarantees that your finished project will maintain its exact dimensions and vibrant colors for a very long time.
When planning your design aesthetic, consider the specific occasions you want to target, such as holiday themes, summer picnics, or elegant minimalist dinners. Choosing neutral tones allows for maximum versatility across different seasons, while bright floral prints or geometric patterns can instantly liven up a casual backyard barbecue. The choice of material truly defines the character and longevity of your final piece.
To complete your preparation kit, gather a sharp pair of fabric shears, a rotary cutter, a cutting mat, a clear quilting ruler, and plenty of sewing pins or sewing clips. Having the correct crafting tools ready by your side makes the entire workflow seamless and highly enjoyable. Once your materials are washed, pressed, and selected, you are officially ready to move on to the precise cutting and preparation stage.
2. Step-by-Step Cutting and Assembly Guide
Precision cutting is the absolute key to achieving symmetrical lines and beautiful corners in any DIY sewing tutorial. For a standard individual utensil pouch, you will need to cut two contrasting fabric rectangles measuring 12 inches by 6 inches for the main body and the lining. Additionally, cut a matching piece of lightweight fusible interfacing to the exact same dimensions to provide that necessary structural stability.
Once your rectangles are cut, fuse the interfacing to the wrong side of your exterior fabric piece using a hot iron according to the manufacturer’s instructions. Next, prepare the pocket section by cutting another set of rectangles measuring 8 inches by 6 inches from both your main and lining fabrics. This specific pocket piece is what will safely cradle your forks, knives, and spoons inside the finished holder.
To assemble the pocket, place the two pocket rectangles right sides together and stitch along the top edge using a standard one-quarter-inch seam allowance. Flip the fabrics right side out so the beautiful prints face outward, press the top seam perfectly flat with your iron, and topstitch close to the edge for a clean finish. This topstitched edge will serve as the visible opening of your interior silverware pocket.
Now, lay your main exterior fabric piece flat on your workspace with the right side facing upward. Align the prepared pocket piece at the bottom short edge of the main fabric, ensuring all the raw side and bottom edges match up perfectly. Pin or clip these layers securely in place to prevent any shifting during the next crucial steps of the assembly process.
Next, take your main lining rectangle and place it directly on top of the assembled unit, right sides together, sandwiching the pocket securely in the middle. Pin around all four outer edges, making sure to mark a small 2-inch opening along one of the long sides. This intentional gap is absolutely vital, as it will allow you to turn the entire project right side out after sewing.
Stitch around the entire perimeter using a consistent seam allowance, carefully pivoting at each corner, but remember to leave the marked 2-inch gap completely unstitched. Clip the excess fabric from the corners close to the stitches to reduce bulk, which helps you achieve sharp, professional points. Reach through the opening, gently turn the entire pouch right side out, push the corners out neatly, and give it a thorough press.
3. Essential Sewing Techniques for a Professional Finish
Achieving a high-end, boutique-quality look on your fabric cutlery holder relies heavily on implementing smart finishing techniques during the final stages of production. Topstitching is one of the most effective ways to elevate your work, as it secures the turned edges, closes the turning gap seamlessly, and adds an attractive structural border. Run a neat line of stitches roughly one-eighth of an inch away from the entire outer edge of the pouch.
To ensure your topstitching looks flawlessly straight, use the edge of your presser foot as a reliable visual guide against the folded fabric edge. Maintaining a steady, moderate machine speed helps you keep perfect control, especially when navigating over the thicker layers where the pocket is attached. If your sewing machine struggles with bulk, gently turning the handwheel over the thickest seams can prevent skipped stitches or broken needles.
Another incredible technique to maximize the utility of your handmade kitchen accessories is creating custom vertical divider slots within the main pocket. By sewing one or two straight vertical lines from the bottom edge to the top of the pocket, you can divide the space into specific compartments. This prevents your heavy metal silverware from clanking together, shifting around, or falling out when the holder is moved.
When sewing these vertical divider lines, always remember to backstitch securely at the beginning and especially at the very top edge of the pocket pocket opening. The pocket opening experiences the highest amount of stress and friction as cutlery is repeatedly inserted and removed over time. Reinforcing this specific area with extra backstitches prevents the seams from pulling apart or fraying during everyday use.
For those who want to take their fabric silverware pouch tutorial a step further, adding a closure mechanism like a decorative button, a snap, or a matching fabric tie is an excellent option. A closure allows you to roll or fold the holder into a compact bundle, which is incredibly convenient for travel, camping, or packing school lunches. You can easily stitch a ribbon into the side seam during the main assembly phase to create an effortless wrap-around tie.
Lastly, never underestimate the transformative power of a final steam press once all your machine stitching is completely finished. Ironing sets the stitches permanently into the fiber of the fabric, flattens out any minor puckering, and gives the textile a crisp, retail-ready appearance. Taking pride in these small details is what truly separates an amateur craft project from a stunning piece of textile art.
4. Creative Ways to Personalize and Use Your Cutlery Pouches
One of the most rewarding aspects of mastering this fabric cutlery holder – tutorial is the sheer amount of creative customization options available to you. You can easily adapt the dimensions of the pattern to accommodate larger serving utensils, specialized steak knives, or even lightweight reusable bamboo travel sets. Altering the shape of the top flap into a gentle curve or a sharp triangle completely changes the stylistic vibe of the final piece.
For festive seasonal celebrations, consider choosing specific themed fabrics like elegant holly prints for Christmas, rustic oranges for Thanksgiving, or pastel florals for Easter. You can also add beautiful embellishments such as delicate cotton lace trim across the pocket edge, vintage buttons, or even intricate hand embroidery. Adding a monogrammed initial onto the front pocket turns a simple utensil organizer into a deeply meaningful, personalized gift for weddings or housewarmings.
These versatile fabric pouches are not strictly limited to storing silverware at home; they serve as phenomenal tools for organizing various everyday items. They are the perfect size for holding artist paintbrushes, makeup brushes, crochet hooks, or essential drawing pencils neatly inside a larger travel bag. The soft fabric lining protects delicate items from getting scratched, while the compact layout keeps everything organized and accessible.
If you love hosting outdoor gatherings, these holders are an absolute game-changer for keeping your outdoor dining tables perfectly organized against unexpected gusts of wind. You can pre-pack each pouch with a napkin and a full set of utensils, making it incredibly easy for guests to grab their own setup at a self-serve buffet. It streamlines the hosting experience while making your backyard barbecue feel intentionally designed and sophisticated.
For those interested in building a thriving creative business, these items make wonderful, high-margin inventory for local craft fairs or online boutique shops. They utilize small amounts of material, allowing you to efficiently clear out your scrap fabric bins while producing highly marketable, eco-friendly products. Packaging them in coordinated sets of four or six with a simple twine ribbon creates an irresistible presentation for eco-conscious shoppers.
Ultimately, this project is a wonderful stepping stone into the broader world of sustainable living and mindful crafting. It proves that you do not need complex patterns or expensive materials to create something genuinely beautiful, useful, and kind to the planet. By experimenting with different textures, patterns, and placements, you can continue to refine your skills and expand your handmade collection.
Frequently Asked Questions
Can I wash these fabric cutlery holders in a washing machine?
Yes, you can absolutely wash them in a standard washing machine, especially if you constructed them using durable 100% cotton or linen textiles. To keep them looking brand new for as long as possible, wash them on a gentle cycle with cold water and similar colors, then reshape them and lay them flat to air dry. A quick press with a hot steam iron after drying will easily restore their original crisp, professional shape and structure.
What type of interfacing is best suited for this specific project?
A lightweight to medium-weight fusible woven or non-woven interfacing is absolutely ideal for this type of table accessory. Avoid using extremely stiff heavy-duty interfacing, as it will make turning the project right side out unnecessarily difficult and create bulky, awkward corners. The main goal of the interfacing here is simply to add a subtle layer of crispness and prevent the cotton fabric from wrinkling too easily during handling.
How can I modify this pattern to include a built-in napkin holder?
Modifying the design to hold a cloth napkin is incredibly simple and only requires adding a few extra inches to the overall width of your initial fabric cuts. Alternatively, you can cut your main pocket piece slightly wider and create a wider dedicated vertical divider slot specifically designed to slide a folded fabric napkin right alongside the silverware. This keeps your entire table setting beautifully contained within one single cohesive pouch.
Is this sewing project suitable for absolute beginners?
Yes, this is an exceptional project for absolute beginners because it involves sewing straight lines and introduces fundamental concepts like seam allowances, turning fabrics, and topstitching. It requires minimal material investment, gives instant gratification, and helps new crafters build immense confidence in handling fabric layers and machine adjustments.
Can I use upcycled materials like old jeans to make these pouches?
Repurposing old denim jeans, canvas bags, or sturdy flannel shirts is a fantastic, eco-friendly approach that adds wonderful texture and durability to your project. Denim is highly resilient against the sharp tines of forks and knives, making it an excellent exterior choice. Just ensure your sewing machine is equipped with a heavy-duty jeans needle (size 90/14 or 100/16) to glide through the thick denim layers easily.
Conclusion
In conclusion, learning how to create your own gorgeous table accessories with this fabric cutlery holder – tutorial is an enjoyable, highly rewarding process that effortlessly combines functionality with artistic expression.
Throughout this guide, we have covered the importance of selecting durable materials, the steps for precise cutting, the techniques for flawless topstitching, and the endless ways to personalize your finished pieces. This simple project is a wonderful way to reduce waste, organize your home, and showcase your unique personal style right on the dining table.