Crochet Heart Bracelet – Tutorial is your gateway to creating a charming, handmade accessory that combines elegance with a personal touch. Whether you are looking to craft a thoughtful gift for a loved one or want to add a romantic flair to your own jewelry collection, this Crochet Heart Bracelet – Tutorial provides all the steps necessary to achieve a professional finish. Many people find that working on small-scale projects like this is the perfect way to master tension and precision while producing something truly beautiful in a short amount of time.
In this comprehensive Crochet Heart Bracelet – Tutorial, we will explore the specific materials and techniques required to turn simple strands of yarn into a wearable piece of art. The beauty of a crochet heart lies in its versatility; you can easily adjust the size by changing your hook size or selecting a different thread weight. By following this guide, you will learn how to maintain consistent stitches and ensure your bracelet is both durable and comfortable for daily wear.
Mastering the Crochet Heart Bracelet – Tutorial also involves understanding the flow of repetitive patterns and how to seamlessly join individual motifs. Throughout this article, we will delve into the SEO-friendly methods of construction, ensuring that each loop and pull-through contributes to a sturdy structure. From choosing the right vibrant colors to finishing your ends with a tapestry needle, every detail matters when you are aiming for high-quality handmade jewelry that stands out in a crowded marketplace.
1. Essential Materials for Your Crochet Heart Bracelet – Tutorial
The foundation of any successful project starts with the right supplies, and this Crochet Heart Bracelet – Tutorial is no exception. To begin, you will need a high-quality cotton lace yarn or a fine embroidery thread to ensure the hearts remain delicate and defined. Using a mercerized cotton is highly recommended because it offers a slight sheen and prevents the jewelry from fraying over time.
Selecting the correct crochet hook is the next vital step in our Crochet Heart Bracelet – Tutorial. For fine threads, a steel hook ranging from 1.25mm to 1.50mm is usually ideal to keep your tension tight and the stitches crisp. If your hook is too large, the heart shape may appear loose or lose its definition, which is something we want to avoid for a professional look.
In addition to your yarn and hook, you should have a pair of sharp embroidery scissors nearby. Clean cuts are essential when finishing your Crochet Heart Bracelet – Tutorial to prevent the thread from unraveling. Since we are working with small scales, a fine-tipped pair of scissors allows for greater precision when navigating near the delicate stitches of your handmade accessory.
Don’t forget to include a tapestry needle with a small eye in your kit for this Crochet Heart Bracelet – Tutorial. Weaving in ends is a critical part of the finishing process, ensuring that your bracelet doesn’t come apart during wear. A blunt-tipped needle is often preferred as it glides between the fibers without splitting the yarn, keeping the integrity of your crochet work intact.
Fastenings are another consideration for a functional Crochet Heart Bracelet – Tutorial. You might choose to use a lobster claw clasp, a button, or simply create braided ties using the leftover yarn tails. Adding jewelry hardware can elevate the piece from a simple craft to a high-end boutique item, making it more appealing for those who enjoy DIY fashion.
Finally, consider using stitch markers if you are planning to make a long chain of hearts. While each heart motif is relatively small, keeping track of your turning chains and join points ensures that the Crochet Heart Bracelet – Tutorial remains symmetrical. Having all these crafting essentials ready will make the process much smoother and more enjoyable as you create your masterpiece.
2. Step-by-Step Instructions for the Heart Motif
To start the core of our Crochet Heart Bracelet – Tutorial, you will begin by creating a magic ring or a small foundation chain. This center point is where all your stitches will originate, forming the rounded tops of the heart. If you choose a magic circle, make sure to pull it tight after the first round to close any gaps in the center of the motif.
The first half of the heart in this Crochet Heart Bracelet – Tutorial typically involves a series of treble crochet (tr) and double crochet (dc) stitches. These taller stitches provide the height needed for the “humps” of the heart. By working multiple stitches into the same base loop, you create the necessary curve that defines this romantic shape in your crochet jewelry.
As we transition to the bottom point of the heart, the Crochet Heart Bracelet – Tutorial shifts toward shorter stitches. You will likely use half-double crochets (hdc) followed by a single treble crochet at the very tip to create that iconic sharp point. Consistency in your tension here is key; if the point is too rounded, the heart may look more like a circle or an oval.
Working back up the second side of the heart mirrors the first side, ensuring perfect symmetry. In this Crochet Heart Bracelet – Tutorial, you will repeat the double crochet and treble crochet sequence in reverse order. This balanced approach is what gives the crochet heart its professional and aesthetic appeal, making it perfect for a repeatable bracelet pattern.
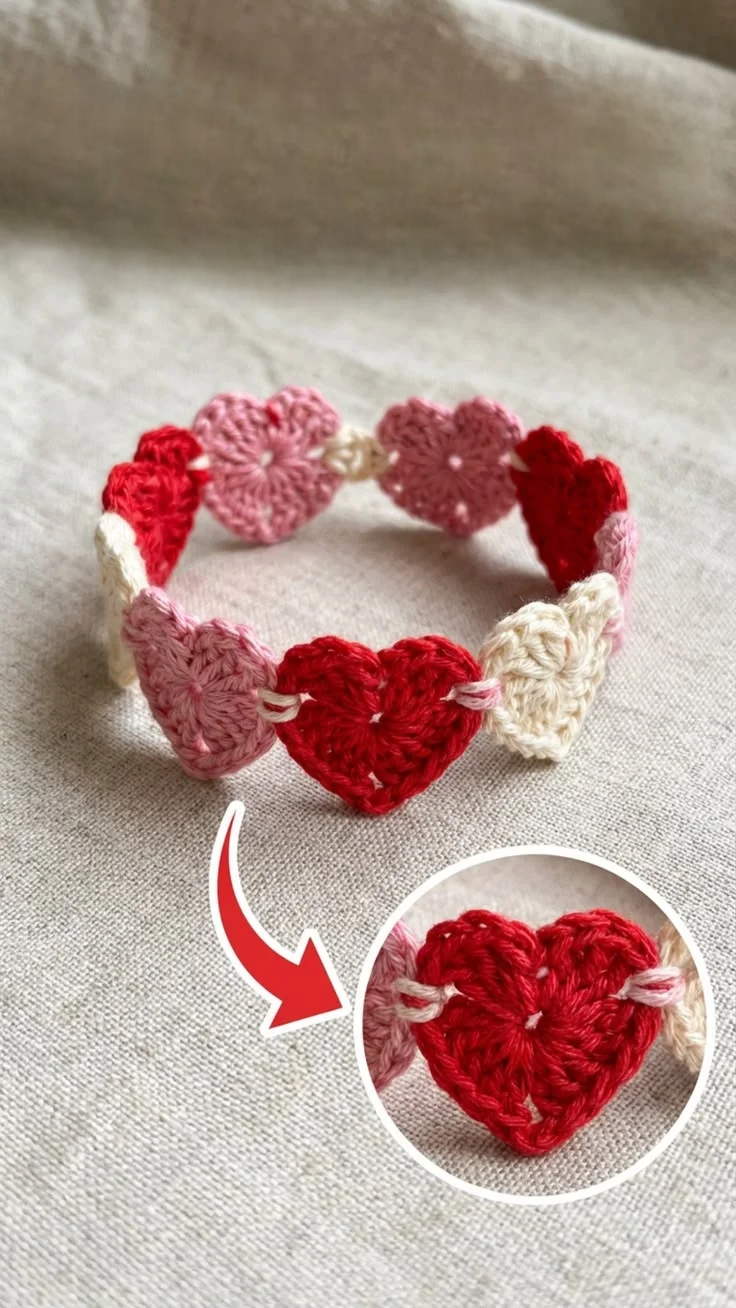
Once the stitches are complete, you will finish the motif by working a slip stitch (sl st) into the center of the magic ring. This slip stitch pulls the entire shape together, creating the “dip” at the top of the heart. This specific technique is a hallmark of a well-executed Crochet Heart Bracelet – Tutorial, as it provides the most recognizable silhouette.
To turn these individual shapes into a bracelet, you can either crochet them in a continuous row or join them later. Our Crochet Heart Bracelet – Tutorial suggests the continuous method, where you chain a specific number of links between each heart. This creates a sturdy connection that mimics a metal chain, providing strength and flexibility to the finished jewelry piece.
3. Customizing Your Bracelet Size and Style
One of the best features of this Crochet Heart Bracelet – Tutorial is how easily it can be adapted for different wrist sizes. To determine the length, simply measure your wrist and subtract about half an inch to account for the clasp. Because crochet fabric can stretch slightly over time, a snugger fit is usually better than one that is too loose for your handmade accessory.
You can also experiment with color theory within this Crochet Heart Bracelet – Tutorial. While red and pink are traditional choices for hearts, using ombre yarn or variegated thread can create a stunning visual effect. Alternating colors for each heart motif is another way to make your bracelet unique and perfectly suited to your personal style preferences.
For those who want a more “boho” look, this Crochet Heart Bracelet – Tutorial can be enhanced with beads. You can slide seed beads onto your thread before you start and then pull them into the stitches as you work. Placing a single bead at the tip of each heart adds weight and a touch of sparkle, elevating the design significantly.
If you prefer a wider cuff-style bracelet, you can use the Crochet Heart Bracelet – Tutorial to make multiple strands. By joining two or three rows of hearts side-by-side, you create a more substantial piece of jewelry. This is a great way to practice joining techniques and create a bold statement piece that showcases your crocheting skills.
The closure you choose for your Crochet Heart Bracelet – Tutorial also impacts the final style. A wooden button offers a rustic, natural feel, while a silver-plated toggle clasp looks more refined and modern. Consider who will be wearing the bracelet and choose a fastening method that is both secure and easy to operate with one hand.
Lastly, blocking your work is a professional tip included in this Crochet Heart Bracelet – Tutorial. By lightly dampening the finished bracelet and pinning it into shape on a blocking mat, you ensure the hearts stay flat and don’t curl. This simple step makes a world of difference in the drape and overall quality of your crochet project, ensuring it looks store-bought.
4. SEO Tips and Best Practices for Craft Bloggers
If you are following this Crochet Heart Bracelet – Tutorial to create content for your own website, understanding SEO is vital. You should always use alt-text for your images, describing the crochet stitches and the color of the yarn. This helps search engines understand your tutorial and makes your content accessible to those using screen readers.
Internal linking is another powerful SEO tool to use alongside this Crochet Heart Bracelet – Tutorial. If you have other guides on basic crochet stitches or how to read patterns, make sure to link to them. This keeps readers on your site longer, which signals to Google that your crafting content is valuable and authoritative.
When writing your own version of a Crochet Heart Bracelet – Tutorial, focus on long-tail keywords. Instead of just targeting “crochet,” try phrases like “easy crochet jewelry for beginners” or “free heart crochet pattern.” These specific terms have less competition and are more likely to attract users who are looking for exactly what you are offering.
Engagement is a key metric for SEO, so encourage your readers to interact with your Crochet Heart Bracelet – Tutorial. Ask them to share photos of their finished bracelets on social media or leave a comment below. High engagement levels can improve your search engine rankings, helping more people find your creative tutorials online.
Structure your content using headers (H2 and H3) just as we have done in this Crochet Heart Bracelet – Tutorial. This makes the text “scannable” for readers who are looking for specific information, such as the materials list or finishing instructions. A well-organized article is much more likely to be favored by Google’s algorithms.
Finally, ensure your Crochet Heart Bracelet – Tutorial is mobile-friendly. Many crafters follow patterns on their phones or tablets while they work. If your site is hard to navigate on a mobile device, users will leave quickly, which can hurt your SEO. Keeping your images optimized and your text readable is essential for a successful digital publishing experience.
FAQ: Common Questions About the Crochet Heart Bracelet – Tutorial
What is the best yarn for a crochet bracelet?
For the Crochet Heart Bracelet – Tutorial, we recommend using Size 10 cotton thread. It provides the best structure and won’t get “fuzzy” like wool or acrylic might when worn against the skin.
Is this tutorial suitable for absolute beginners?
Yes! This Crochet Heart Bracelet – Tutorial uses basic stitches like the chain, single crochet, and double crochet. If you know the fundamentals, you can easily complete this project in an afternoon.
How do I prevent the bracelet from stretching?
To keep your Crochet Heart Bracelet – Tutorial in shape, use a smaller hook than what is recommended on the yarn label. A tighter tension creates a denser fabric that is less likely to lose its form over time.
Can I wash my crochet bracelet?
Absolutely. Since this Crochet Heart Bracelet – Tutorial uses cotton, you can hand-wash it in cool water with a mild detergent. Let it air dry flat to ensure it maintains the correct size and shape.
How can I make the heart shapes stiffer?
If you want the hearts in your Crochet Heart Bracelet – Tutorial to be very firm, you can use a fabric stiffener spray or a mixture of water and craft glue. Apply it lightly to the back of the bracelet and let it dry completely.
What if my heart motif looks lopsided?
Symmetry is key in the Crochet Heart Bracelet – Tutorial. Count your stitches carefully on both sides of the heart. Often, a lopsided look is caused by an extra stitch or a difference in tension between the left and right sides.
Conclusion
This Crochet Heart Bracelet – Tutorial has covered everything from the essential tools and materials to the fine details of stitch construction and SEO optimization.
We have explored how to create a beautiful heart motif, how to customize your jewelry for different styles, and how to ensure your handmade items last for years to come. By following these steps, you now have the knowledge to create a variety of bracelets that are as unique as you are.