The Crochet Tulip Stitch – Tutorial is one of the most delightful ways to bring a touch of nature and texture to your yarn projects, offering a repetitive yet rewarding pattern that looks far more complex than it actually is. If you have been looking for a way to elevate your blankets, scarves, or baby items with a floral flair, mastering the Crochet Tulip Stitch is an absolute game-changer for your crafting repertoire. This specific stitch creates a row of “stems” and “leaves” topped with colorful “petals,” resulting in a dense, cozy fabric that feels substantial and looks professionally finished.
Learning through a Crochet Tulip Stitch – Tutorial allows you to experiment with color theory, as the beauty of this design lies in the contrast between the green foundations and the vibrant blossom colors you choose. Whether you are a seasoned pro or a curious beginner, the rhythm of creating these little flowers is incredibly meditative and satisfying. In this guide, we will break down the mechanics of the stitch, ensuring you understand exactly how to place your hook to achieve that signature 3D floral effect.
As we dive into this Crochet Tulip Stitch – Tutorial, it is important to remember that consistency in tension is key to making your tulips pop uniformly across the row. We will explore the best yarn weights, hook sizes, and color transitions to make your work stand out. By the end of this article, you will have all the knowledge necessary to start your own garden-inspired project, turning simple skeins of yarn into a masterpiece of texture and design that follows the best crochet practices.
1 Understanding the Basics of the Crochet Tulip Stitch – Tutorial
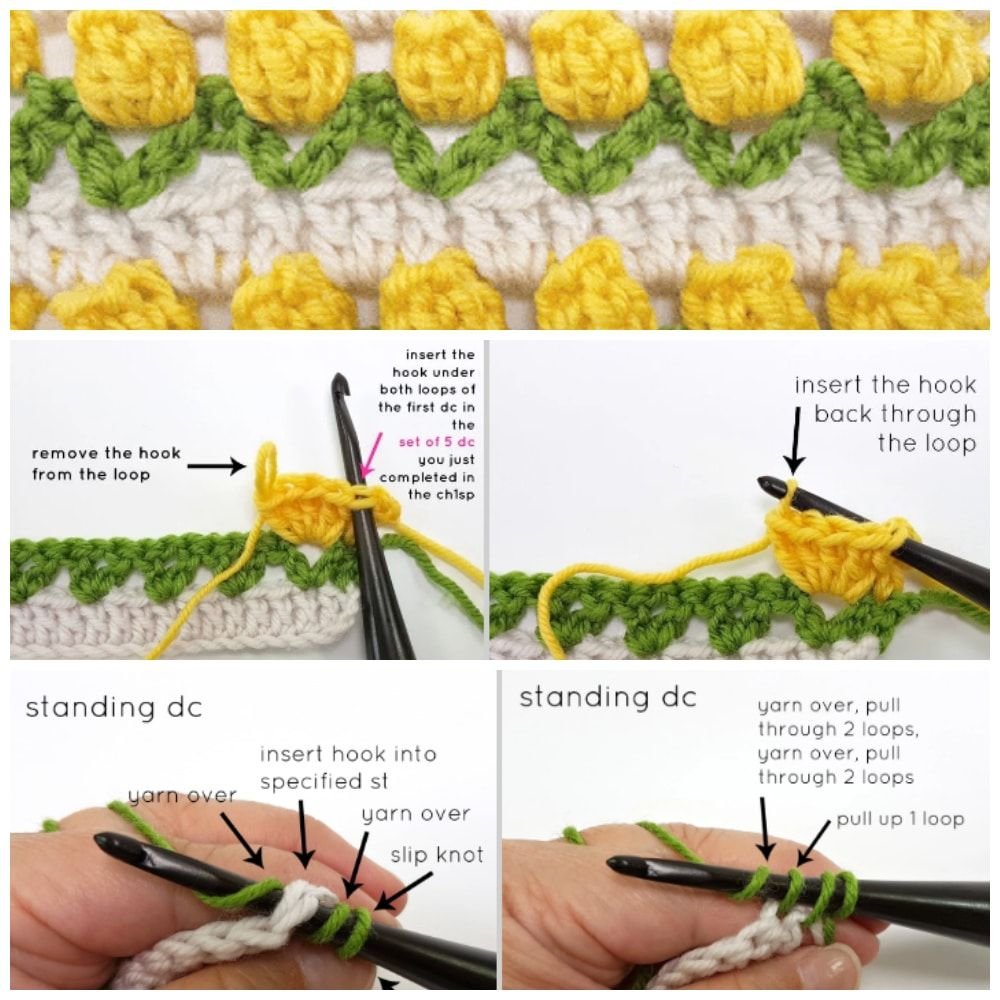
The Crochet Tulip Stitch – Tutorial begins with understanding that this pattern is essentially a variation of the V-stitch and the puff stitch or cluster stitch. To create the look of a flower, we use a three-row repeat system where the first row acts as a base, the second row creates the “V” shaped leaves, and the third row creates the rounded tulip bud. This structural approach is what gives the stitch its famous botanical appearance.
When starting your Crochet Tulip Stitch – Tutorial, you need to work with a specific stitch multiple. Most patterns require a multiple of 3 + 1, which means your starting foundation chain should be divisible by three, then you add one extra chain at the very end to ensure the edges are straight. Getting this math right at the beginning prevents lopsided projects and ensures your tulips line up perfectly.
Choosing the right yarn weight is a vital part of this Crochet Tulip Stitch – Tutorial. While you can use any yarn, a medium weight (worsted) cotton or acrylic yarn is often recommended for beginners because it provides excellent stitch definition. If the yarn is too fuzzy or dark, it can be difficult to see where to insert your hook for the “petals,” which are worked directly into the “V” spaces of the previous row.
The “leaf” portion of the Crochet Tulip Stitch – Tutorial is typically worked in green yarn using a double crochet V-stitch. You will work a double crochet, a chain space, and another double crochet all into the same stitch. This creates the “fork” or “V” that cradles the flower bud, providing the necessary support and visual contrast that makes the tulips look like they are growing from a vine.
For the “flower” part of our Crochet Tulip Stitch – Tutorial, we move on to a cluster of double crochet stitches. To get that rounded, plump look of a tulip, you will work several unfinished double crochets into the chain space of the green “V” and then pull the yarn through all loops at once. This creates a popcorn or cluster effect that sits beautifully on top of the green leaves.
Finally, a crucial tip in this Crochet Tulip Stitch – Tutorial is the use of a background color. Usually, a neutral shade like white or cream is used for the rows between the flowers to make the colors “pop.” This creates a clean, crisp look that allows the floral texture to take center stage without the colors bleeding into one another or looking cluttered.
2 Essential Materials for Your Crochet Tulip Stitch – Tutorial
To follow this Crochet Tulip Stitch – Tutorial effectively, you will need a few basic supplies that every crocheter should have in their kit. First and foremost is a high-quality crochet hook. For worsted weight yarn, a 5.0mm (H) hook is the standard, but if you tend to crochet tightly, you might want to move up to a 5.5mm hook to ensure the tulips remain soft and drape well.
The yarn selection is the most fun part of any Crochet Tulip Stitch – Tutorial. You will need at least three colors: a green for the stems/leaves, a variety of bright colors (pinks, purples, or yellows) for the tulips, and a neutral color for the base rows. Using mercerized cotton can give your project a slight sheen that mimics the natural waxy texture of real tulip petals.
Don’t forget the small but essential tools mentioned in this Crochet Tulip Stitch – Tutorial. You will need a pair of sharp embroidery scissors and a yarn needle (also known as a tapestry needle). Since this stitch involves frequent color changes, you will have several yarn tails to weave in at the end, and a blunt-tipped needle makes this process much smoother and more secure.
Stitch markers are highly recommended for this Crochet Tulip Stitch – Tutorial, especially for beginners. It is easy to lose track of the first or last stitch of a row when working with different colors and textures. Placing a marker in the turning chain of each row ensures your edges stay perfectly vertical, preventing your blanket or scarf from becoming an accidental trapezoid.
Another helpful tool for your Crochet Tulip Stitch – Tutorial is a row counter. Because the pattern relies on a specific sequence (base, leaves, flowers), it is easy to get distracted and forget which row you are on. A simple digital counter or even a piece of paper and a pen will help you maintain the rhythm of the floral pattern without having to recount your rows constantly.
Lastly, consider having a measuring tape handy during your Crochet Tulip Stitch – Tutorial. This stitch can be a bit of a “yarn eater,” meaning it uses more yarn than a standard flat stitch. Measuring your progress helps you estimate if you have enough yarn to finish the project or if you need to purchase an extra skein of your chosen tulip colors before you get halfway through.
3 Step-by-Step Instructions for the Crochet Tulip Stitch – Tutorial
The first technical step in our Crochet Tulip Stitch – Tutorial is creating the foundation. Start with your neutral yarn and chain a multiple of 3 + 1. Work a row of single crochet or double crochet across the entire chain. This provides a stable “ground” for your flowers to grow from and makes it much easier to work the subsequent rows of the stitch pattern.
Next in our Crochet Tulip Stitch – Tutorial, switch to your green yarn to create the leaves. You will skip two stitches, then in the third stitch, work (1 double crochet, chain 1, 1 double crochet). Repeat this across the row. These “V” shapes are the foundation for your blossoms, and keeping your chain spaces consistent here is vital for the final look.
Now comes the “flower” row of the Crochet Tulip Stitch – Tutorial. Switch to your blossom color (like pink or red). In each chain-1 space of the green “V” from the row below, you will work a 3-double crochet cluster. This means you start three double crochets but leave the last loop of each on the hook, then yarn over and pull through all four loops to close the “tulip bud.”
To separate the rows of flowers in this Crochet Tulip Stitch – Tutorial, you will usually switch back to your neutral background color. Work a row of half double crochet or double crochet across the top of the flower row. Be sure to place your stitches into the top of the clusters and the spaces between them to maintain the correct stitch count throughout your project.
As you progress through the Crochet Tulip Stitch – Tutorial, pay attention to the turning chains. Typically, a chain 3 counts as your first double crochet. If your edges look “bumpy,” try using a standing double crochet instead. This advanced technique keeps the sides of your work looking clean and professional, which is a hallmark of high-quality handmade crochet.
The final step of the sequence in our Crochet Tulip Stitch – Tutorial is simply repeating these rows until your project reaches the desired length. You can choose to do “fields” of the same color or alternate colors for every row of tulips to create a rainbow garden effect. The versatility of this stitch is what makes it a favorite among crochet designers worldwide.
4 Expert Tips and Troubleshooting for the Crochet Tulip Stitch – Tutorial
One common issue people encounter during a Crochet Tulip Stitch – Tutorial is the “curling” of the edges. This usually happens because the cluster stitches are slightly wider than the base stitches. To fix this, ensure you are not chaining too tightly between your tulips. A relaxed tension will allow the flowers to sit flat against the background, resulting in a much better fabric drape.
Another tip for a successful Crochet Tulip Stitch – Tutorial involves color changes. To make the transition seamless, always change your yarn color on the last pull-through of the final stitch of the previous row. This prevents the old color from “bleeding” into the first stitch of the new row, keeping your stems and petals distinct and vibrant.
If you find that your flowers look “flat” rather than “puffy,” this Crochet Tulip Stitch – Tutorial suggests increasing the number of double crochets in your cluster. Instead of a 3-dc cluster, try a 4-dc or 5-dc cluster. This will use more yarn, but it will make the tulips stand out in a beautiful, three-dimensional way that catches the light and adds tactile interest.
Managing ends is a big part of the Crochet Tulip Stitch – Tutorial. Since you are changing colors every row, you will have many yarn tails. To save time, you can “carry” the neutral yarn up the side of the work if you are making a border later. However, for the green and flower colors, it is best to cut them and weave the ends in as you go to avoid a tangled mess at the end.
In this Crochet Tulip Stitch – Tutorial, we also recommend “blocking” your finished piece. Blocking involves pinning your damp crochet work into the correct shape and letting it dry. This process opens up the stitches and levels out the tension, making the tulip rows look perfectly aligned and professional. It is the secret step that separates hobbyists from experts.
Lastly, don’t be afraid to experiment with different yarn textures in your Crochet Tulip Stitch – Tutorial. While smooth yarns show the stitch best, using a slightly fuzzy mohair for the flowers can give them a soft, organic look. Just remember that the more “hairy” the yarn, the harder it is to undo mistakes, so practice the stitch rhythm with scrap yarn first.
FAQ – Frequently Asked Questions
1. Is the Crochet Tulip Stitch suitable for beginners? Yes! While it looks intricate, it only requires knowledge of basic stitches like the chain, double crochet, and clusters. Following a clear Crochet Tulip Stitch – Tutorial makes it very manageable for those who have mastered the basics.
2. How much yarn does this stitch use? The Crochet Tulip Stitch is considered a “yarn eater” because of the cluster stitches used to make the flower buds. Expect to use about 20-30% more yarn than you would for a standard solid double crochet project.
3. Can I use this stitch for a baby blanket? Absolutely. In fact, it is one of the most popular choices for baby blankets because the textured floral pattern provides a wonderful sensory experience for infants, and it looks beautiful in nursery pastels.
4. How do I change colors without making a mess? The best way is to change the color during the final yarn over of the last stitch of a row. This ensures the new color starts fresh at the beginning of the next row. Weaving in ends as you go is also a vital tip from any Crochet Tulip Stitch – Tutorial.
5. Why is my work widening as I go? This usually happens if you are accidentally adding extra stitches in the spaces between the tulips. Always count your stitches at the end of each row to ensure you are maintaining the same stitch multiple you started with.
6. Can I work this stitch in the round? Yes, but it requires some adjustments to the stitch counts and how you join your rounds. Most people prefer working it in flat rows for blankets and scarves, but it can be adapted for hats or cowls with a bit of practice.
Conclusion
Mastering the Crochet Tulip Stitch – Tutorial opens up a world of creative possibilities, allowing you to “plant” a permanent garden into your yarn crafts. We have covered everything from the foundational math of stitch multiples to the delicate art of creating cluster blossoms and managing frequent color changes.
By following these structured steps, you can create breathtakingly beautiful items that carry the charm of springtime all year round. Whether you use it for a small dishcloth or a large heirloom afghan, the Tulip Stitch remains a timeless favorite in the crochet community.