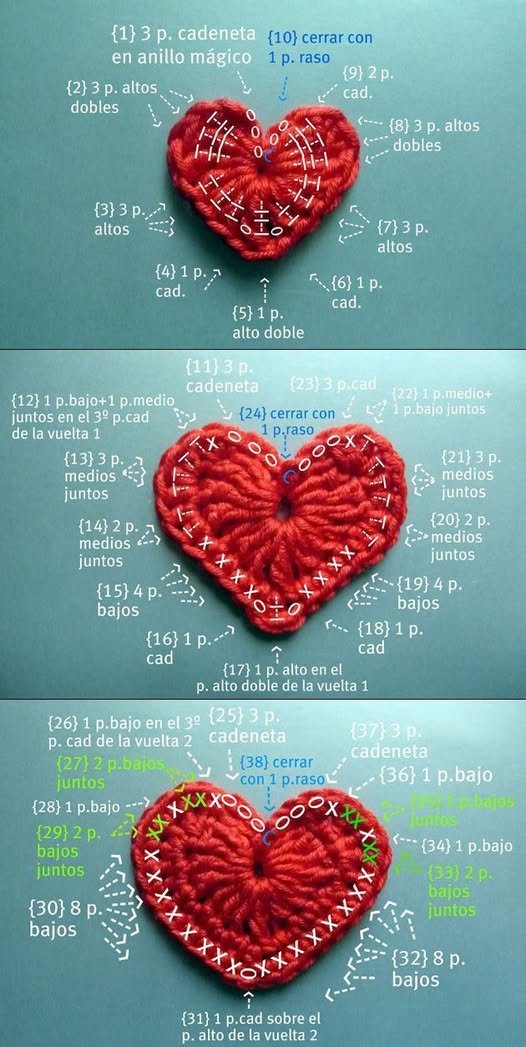
Crochet Heart – Tutorial Creating a handmade symbol of love and affection is one of the most rewarding projects you can undertake with a hook and yarn. Whether you are looking to embellish a gift, create a festive garland, or simply practice your tension, learning how to make a crochet heart is a fundamental skill that every enthusiast should master. This tutorial is designed to guide you through the process with ease, ensuring that your finished piece looks professional and heartfelt.
In the world of fiber arts, the Crochet Heart – Tutorial stands out because of its incredible versatility and the emotional connection it fosters. These small, plush tokens can be used for Valentine’s Day decorations, wedding favors, or even as comfort items for charity. By following a well-structured crochet pattern, you can transform a simple strand of cotton or acrylic into a 3D shape that carries a message of care and creativity.
Optimizing your workspace is the first step toward a successful Crochet Heart – Tutorial experience. Gathering the right crochet supplies, such as an ergonomic hook, high-quality yarn, and a pair of sharp embroidery scissors, makes the process smoother and more enjoyable. As we dive into the technical details, remember that patience is key when working on the curves of the heart, as this is where the magic of the handmade craft truly comes to life.
1. Essential Materials for Your Crochet Heart – Tutorial
To begin this Crochet Heart – Tutorial, you must first select the appropriate yarn weight for your desired outcome. If you want a small, dainty heart, a fingering weight yarn or crochet thread works best. For a larger, more substantial heart that could serve as a coaster or a plushie, a worsted weight yarn is the standard choice for most DIY projects.
Selecting the correct crochet hook size is equally vital for maintaining the structural integrity of your work. Most yarn labels provide a recommended hook size, but for a heart that holds its shape well, you might choose a hook slightly smaller than suggested. This technique creates a tighter stitch tension, ensuring that any stuffing used in a 3D crochet heart does not peek through the gaps.
Don’t forget the small but necessary tools that complete your crochet kit. You will need a tapestry needle (also known as a yarn needle) to weave in your ends securely so the heart doesn’t unravel. A stitch marker can also be incredibly helpful if you are working in continuous rounds, helping you keep track of where each layer of your heart pattern begins and ends.
The color choice is where your personal style shines through in this Crochet Heart – Tutorial. While classic red and pink are traditional favorites, variegated yarn can create a beautiful, multi-toned effect without extra effort. Consider using cotton yarn for items that need to be washed frequently, or acrylic yarn for a soft, budget-friendly option that comes in every shade imaginable.
Safety and finishing touches often involve polyester fiberfill if you intend to make your heart stuffed. This lightweight stuffing is hypoallergenic and gives the heart a lovely “squish” factor that is perfect for amigurumi hearts. Make sure you have enough on hand before you start the closing rounds, as it is difficult to add more volume once the final stitches are pulled tight.
Finally, keep a measuring tape nearby if you are aiming for a specific size. Understanding gauge is an advanced part of any Crochet Heart – Tutorial, but for decorative items, it is often less critical than for garments. As long as your stitches are consistent, your heart will look beautiful and symmetrical, reflecting the hard work you put into your creative hobby.
2. Understanding the Basic Stitches and Techniques
The foundation of our Crochet Heart – Tutorial relies on a few “bread and butter” stitches that every beginner should know. The magic ring (or magic circle) is the preferred way to start, as it allows you to pull the center tight, leaving no hole in the middle of your heart. If you find the magic ring tricky, a simple chain-2 start can also serve as your base.
The single crochet (sc) is the workhorse stitch for this project, providing a dense fabric that is perfect for shaping. In this tutorial, you will learn how to use the single crochet increase to expand the width of the heart’s “humps” and the single crochet decrease to taper the bottom into a sharp point. Mastering these transitions is what gives the heart its iconic, recognizable silhouette.
For those who want a faster result or a more decorative edge, the double crochet (dc) and treble crochet (tr) are often used in flat heart patterns. These taller stitches allow you to create height quickly, forming the rounded tops of the heart in just one or two rows. Understanding the height difference between these crochet stitches is crucial for achieving the correct proportions in your handcrafted design.
Slip stitches (sl st) play a decorative and functional role in the Crochet Heart – Tutorial. They are used to join rounds invisibly and to create the “dip” at the top center of the heart. By placing a slip stitch between the two rounded sections, you define the shape and prevent it from looking like a simple circle or an oval, ensuring a professional finish.
Another technique to keep in mind is the invisible decrease. Unlike the standard decrease, which can leave a small bump, the invisible version is worked only in the front loops of the stitches. This is a favorite trick in the crochet community for making hearts that look smooth and factory-finished, even though they are 100% handmade by you.
Reading a crochet chart or written instructions can be intimidating, but this tutorial breaks it down into manageable steps. Pay close attention to the stitch count at the end of each row; losing or adding a single stitch can make the heart lopsided. Keeping your tension even throughout the project is the secret to a heart that lies flat and looks symmetrical from every angle.
3. Step-by-Step Guide to Shaping the Heart
The first phase of the Crochet Heart – Tutorial involves creating the two upper lobes. You will essentially create two small “cups” by working in the round, increasing your stitch count gradually to achieve a dome shape. Once both lobes are finished, you will join them together using a series of joining stitches, which marks the widest part of your heart.
After joining the lobes, the tutorial moves into the body of the heart. You will work around the entire circumference of both joined sections, which creates a large opening. This is the stage where the piece starts to look less like two circles and more like a cohesive crochet project. It is vital to ensure there are no gaps at the junction where the two lobes meet.
As you move down the body, the Crochet Heart – Tutorial focuses on the tapering process. By consistently placing decreases at the sides or the center (depending on the specific pattern style), the heart begins to narrow. This creates the classic “V” shape. If you are making a stuffed heart, remember to start adding your fiberfill when you are about two-thirds of the way finished.
Refining the point of the heart is the most satisfying part of the tutorial. The final few rounds involve rapid decreases until only a few stitches remain. To get a very sharp point, you might finish with a chain-1 and a long tail. Using your yarn needle, you can then weave the tail through the remaining loops and pull tight, creating a crisp, clean bottom edge.
Throughout this Crochet Heart – Tutorial, it is helpful to pause and “block” your work with your fingers. Since yarn is flexible, you can manually adjust the stitches to sit where they should. If one lobe looks slightly larger than the other, a bit of gentle tugging can often balance the symmetrical shape without needing to frog (unravel) your hard work.
The final step in shaping is the invisible join for the top. Instead of a bulky knot, using a needle join creates a seamless edge that is nearly impossible to detect. This attention to detail elevates your crochet heart from a simple craft to a high-quality gift. Following these steps ensures that your Tutorial results in a masterpiece you can be proud of.
4. Finishing Touches and Creative Variations
Once the main structure of your Crochet Heart – Tutorial is complete, it’s time to think about embellishments. You can add a scalloped border using a contrasting color to give the heart a vintage, lace-like appearance. This is done by working multiple stitches into a single space, creating a “shell” effect that frames the heart shape beautifully.
If you are using these hearts for a crochet garland, you can easily connect them by crocheting a long foundation chain and joining each heart at the lobes. This is a popular way to use the results of this tutorial for nursery decor or holiday parties. You could even alternate colors or sizes of the hearts to add visual interest to your home decor.
For those interested in personalized gifts, consider embroidering a name or a date onto the surface of the heart. Using a contrasting thread and a basic backstitch, you can turn a simple crochet heart into a cherished keepsake. This works best on hearts made with a tighter stitch, providing a stable canvas for your embroidery work.
Another fun variation mentioned in this Crochet Heart – Tutorial is the use of beads or sequins. You can slide beads onto your yarn before you start crocheting and drop them into place as you work. This adds a bit of sparkle and texture, making the heart perfect for Christmas ornaments or handmade jewelry like earrings or pendants.
Don’t be afraid to experiment with different yarn textures. Using a fuzzy “velvet” yarn or a chunky “chenille” yarn can create a very different look and feel compared to standard cotton. While these yarns can be harder to see the stitches in, the resulting plush heart is incredibly soft and trendy, often seen in modern amigurumi tutorials.
Lastly, the Crochet Heart – Tutorial concludes with the proper way to weave in ends. A common mistake is cutting the yarn too short, which can lead to the heart coming apart after use. Always leave a tail of at least 6 inches and weave it back and forth through the stitches in different directions to lock the yarn in place, ensuring your craft project lasts for years to come.
FAQ: Common Questions About the Crochet Heart – Tutorial
What is the best yarn for a beginner starting this tutorial?
For beginners, a medium-weight (category 4) cotton or acrylic yarn in a light, solid color is best. This allows you to see your stitch definition clearly, making it easier to count rounds and identify where to insert your hook during the Crochet Heart – Tutorial.
How long does it take to complete one heart?
Depending on your skill level and the size of the heart, a single project can take anywhere from 15 minutes to an hour. Small, flat hearts are very quick, while 3D amigurumi hearts require more time for stuffing and decreasing.
Can I make these hearts without a magic ring?
Yes! You can start by chaining 2 and working all of your first-round stitches into the second chain from the hook. While the magic ring provides a tighter center, the chain-2 method is a perfectly valid alternative for any Crochet Heart – Tutorial.
My heart looks more like a circle; what am I doing wrong?
This usually happens if the increases and decreases aren’t placed correctly or if the “dip” at the top isn’t deep enough. Ensure you are using a slip stitch or a very short stitch (like a single crochet) in the center of the lobes and taller stitches at the peaks to define the shape.
How do I make the heart bigger or smaller?
The easiest way to adjust the size is by changing your hook size and yarn weight. Use a larger hook and bulky yarn for a giant heart, or a tiny hook and lace thread for a miniature version. The pattern logic remains the same regardless of the scale.
Conclusion
In this Crochet Heart – Tutorial, we have covered everything from the essential crochet tools and materials to the intricate details of shaping and finishing.
We explored how basic stitches like the single crochet and magic ring form the foundation of this project, and how SEO-friendly techniques like proper tension and invisible joins can elevate the quality of your work. By following the four main sections of this guide, you now have the knowledge to create beautiful, symmetrical hearts that can be used for everything from DIY home decor to heartfelt gifts for loved ones.