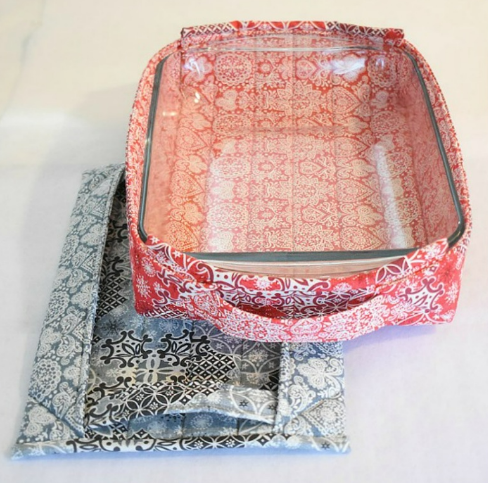
The Fabric Hot Meal Basket – Tutorial is your ultimate guide to creating a functional yet stylish kitchen accessory that combines practicality with handmade charm. If you have ever struggled to transport a piping hot casserole dish to a potluck or wanted to keep your family dinner warm while waiting for everyone to gather, this project is the perfect solution. Beyond being a simple utility item, a fabric hot meal basket adds a touch of personality to your kitchen and serves as a thoughtful, eco-friendly gift for friends and family who love to cook.
Mastering this Fabric Hot Meal Basket – Tutorial requires only basic sewing skills and a few specific materials designed to handle heat. In this comprehensive guide, we will walk through the selection of the right insulating materials, the importance of cotton batting, and the step-by-step assembly process to ensure your carrier is both safe and durable. By the end of this article, you will not only have a beautiful hot meal basket but also the confidence to customize your designs with different patterns and sizes to fit various dish dimensions.
Optimizing your sewing projects for efficiency is key, and this Fabric Hot Meal Basket – Tutorial is designed to be a weekend-friendly task that yields professional results. We will focus on heat-resistant fabrics, sturdy handles, and quilt-as-you-go techniques that make the construction process seamless. Whether you are a seasoned seamstress or a beginner looking for a rewarding first project, this tutorial provides all the necessary details to create a high-quality insulated food carrier that stands the test of time and temperature.
1. Choosing the Right Materials for Your Fabric Hot Meal Basket
Selecting the appropriate outer fabric is the first step in ensuring your basket looks great. For a Fabric Hot Meal Basket – Tutorial, I highly recommend using 100% cotton fabric. Synthetic fibers like polyester can melt if they come into contact with extreme heat, so sticking to natural fibers is a safety priority for any insulated kitchen accessory.
The core of your basket is what provides the temperature retention, often referred to as thermal batting or Insul-Bright. This specialized material features hollow fibers and a reflective metallized film that bounces heat back to the source. Incorporating this into your sewing project ensures that your meals stay warm for significantly longer periods during transport.
In addition to the thermal layer, adding a layer of cotton batting provides the necessary structure and cushioning. This extra loft makes the fabric basket feel substantial and protects your hands from the heat of the dish. When following this Fabric Hot Meal Basket – Tutorial, remember that the combination of cotton and thermal layers is what creates a professional-grade barrier.
Don’t overlook the importance of heavy-duty thread. Since this basket will be carrying the weight of glass or ceramic dishes, using a strong polyester or cotton-wrapped thread is essential for seam integrity. Reinforced stitching ensures that your handmade meal carrier doesn’t fail at the handles when you are carrying a heavy lasagna or roast.
Your choice of notions and tools will also impact the final result. You will need a rotary cutter, a quilting ruler, and wonder clips instead of pins. Clips are particularly useful here because the layers of insulation and batting can become quite thick, making traditional pins difficult to use without bending or damaging the fabric.
Finally, consider the aesthetic design of your fabric. Choosing vibrant prints or classic farmhouse patterns can turn a functional tool into a kitchen statement piece. In this Fabric Hot Meal Basket – Tutorial, we emphasize that while function is paramount, the beauty of DIY sewing is the ability to match your kitchen decor perfectly.
2. Measuring and Cutting Your Fabric Pieces Accurately
The secret to a perfectly fitting Fabric Hot Meal Basket – Tutorial project lies in the precision of your initial cuts. You must measure your most frequently used casserole dish or baking pan before cutting your fabric. Add at least two inches to the length and width to account for the “loft” of the batting and the seam allowances.
Once you have your dimensions, you will need to cut two pieces of main fabric, two pieces of lining fabric, and two pieces of thermal insulation. Consistency is vital; if your cuts are off by even a quarter inch, the basket may sit crookedly. Use a self-healing cutting mat to ensure your edges are perfectly square and professional.
For the handles of your fabric hot meal basket, cut two strips of fabric measuring approximately 4 inches wide by 18 inches long. You can reinforce these with fusible interfacing to give them extra grip and prevent them from stretching over time. Sturdy handles are a hallmark of a well-executed Fabric Hot Meal Basket – Tutorial.
If you are planning to make a round meal basket, the cutting process involves creating a circular template. You can use a large compass or even a kitchen lid as a guide. Regardless of the shape, the principle remains the same: ensure your batting layers match your fabric layers exactly to avoid cold spots in the insulation.
Marking your fabric is another crucial step in this Fabric Hot Meal Basket – Tutorial. Use a water-soluble fabric pen or tailor’s chalk to mark the center points and the locations where the handles will be attached. These markings act as a roadmap during the sewing phase, preventing errors that are hard to fix later.
Before moving to the sewing machine, do a “dry fit” by stacking your layers. This allows you to see if the fabric weight and the insulation thickness will play nicely together. A successful Fabric Hot Meal Basket – Tutorial depends on this preparation, ensuring that your machine can handle the bulk of the combined materials.
3. Sewing the Layers and Integrating the Thermal Shield
The assembly phase of the Fabric Hot Meal Basket – Tutorial begins with quilting your fabric to the batting. This step prevents the internal layers from shifting or bunching up during use or washing. A simple straight-line quilting or a diamond grid pattern works best to secure the Insul-Bright and cotton layers to the outer fabric.
When sewing through multiple thick layers, it is highly recommended to use a walking foot on your sewing machine. A walking foot feeds the top and bottom layers of the fabric basket through the machine at the same rate, preventing the “shoving” effect that often happens with thick insulated projects.
To attach the handles, fold your prepared strips lengthwise, raw edges inward, and topstitch along both sides. Position them on the main fabric according to your marks and baste them in place. In this Fabric Hot Meal Basket – Tutorial, we suggest “box stitching” the handles (a square with an X inside) for maximum weight-bearing strength.
Joining the lining fabric to the exterior requires placing the pieces right sides together. Sew around the perimeter, leaving a 5-inch gap for turning. Because the thermal insulation is stiff, take your time navigating the corners. Keeping a consistent seam allowance is the key to a sharp, professional-looking hot food carrier.
After sewing, clip the corners to reduce bulk before turning the basket right side out. Use a turning tool or a chopstick to gently push the corners out. This part of the Fabric Hot Meal Basket – Tutorial is where you finally see the structure of your handmade kitchen gear come to life.
The final step in assembly is the topstitching. Close the turning gap and sew a decorative yet functional line of stitching around the entire top edge of the basket. This not only seals the opening but also gives the Fabric Hot Meal Basket – Tutorial a crisp finish that keeps the lining from rolling toward the outside.
4. Finishing Touches and Safety Tips for Use
Now that the main structure is complete, you can add personal touches like fabric labels, embroidery, or decorative buttons. However, in this Fabric Hot Meal Basket – Tutorial, we must emphasize that any embellishments should be heat-safe. Avoid plastic beads or delicate lace that might shrink or melt when exposed to a hot baking dish.
It is important to understand the limitations of your fabric hot meal basket. While the insulated lining is excellent at retaining heat, it is not fireproof. Never place the basket inside a microwave or an oven. Always ensure your dish has cooled slightly (wait about 2-3 minutes after removing it from the oven) before placing it inside the fabric carrier.
For maintenance, most fabric baskets created following this Fabric Hot Meal Basket – Tutorial can be machine washed on a gentle cycle. Use cold water and air dry to preserve the integrity of the thermal film inside. Keeping your carrier clean ensures it remains a hygienic tool for transporting your favorite homemade meals.
If you find that your basket is a bit too large for certain dishes, you can create a matching fabric insert or a small pillow filled with rice to take up the extra space. This helps maintain the thermal vacuum and keeps smaller containers from sliding around during transit, a handy tip for any DIY sewing enthusiast.
Consider making a series of these baskets in different sizes. A small fabric basket is perfect for warm rolls or bread, while a large insulated carrier is ideal for family-sized casseroles. Using the techniques from this Fabric Hot Meal Basket – Tutorial, you can build a complete set of thermal kitchen coordinates.
Finally, always test your handles before heading out. Give them a firm tug to ensure the reinforced stitching is holding well. Your Fabric Hot Meal Basket – Tutorial project is now ready to hit the road, keeping your food delicious and warm while you share your culinary creations with the world.
FAQ – Frequently Asked Questions
Can I use regular polyester batting for this project?
While you can, it won’t provide the same heat retention as thermal insulation like Insul-Bright. For a true hot meal basket, the specialized heat-reflective layer is highly recommended to keep food at a safe temperature.
How do I clean my fabric hot meal basket if food spills inside?
Since we recommend 100% cotton fabric, you can usually spot clean with mild detergent or machine wash on a delicate cycle. Avoid high heat in the dryer, as it can damage the insulated lining.
Is this project suitable for a complete sewing beginner?
Yes! This Fabric Hot Meal Basket – Tutorial is designed for all levels. The most “difficult” part is sewing through thick layers, which can be easily managed by using a walking foot and a sharp denim needle.
Can I use this basket for cold foods too?
Absolutely. The thermal barrier works both ways. It will help keep your potato salad or cold desserts chilled during a summer picnic just as well as it keeps a casserole warm.
What size dish does this tutorial cover?
This guide provides a general method. You should always measure your specific dish and add seam allowances to ensure a custom fit for your most-used kitchenware.
Conclusion
Creating your own kitchen accessories is a rewarding journey, and this Fabric Hot Meal Basket – Tutorial provides you with all the steps needed to succeed.
We have covered the essential heat-resistant materials, the importance of precise cutting, and the specialized sewing techniques like using a walking foot to handle bulk. By focusing on quality cotton fabrics and sturdy construction, you now have a tool that is both beautiful and highly functional for any social gathering.