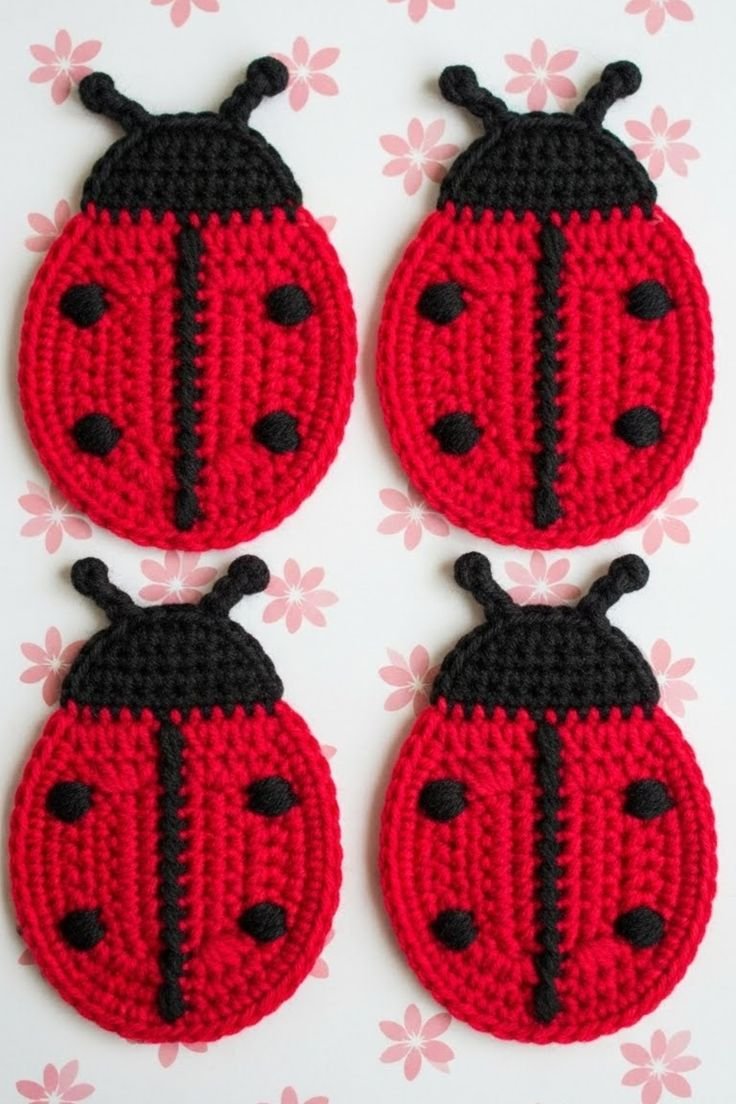
Bring warmth, whimsy, and a touch of nature into your home with this delightful Crochet Ladybug Coaster – Tutorial, designed to help you create the perfect handmade drink mat. If you love functional crafts that double as adorable home decor, making a crochet ladybug coaster is a fantastic project that connects creativity with everyday utility. This step-by-step guide is structured to assist crafters of all skill levels in mastering the stitches required to bring these vibrant little beetles to life. Whether you are setting down a hot morning coffee or a refreshing iced tea, these charming red and black coasters will protect your wooden surfaces while bringing a cheerful smile to anyone who visits your living space.
The beauty of a handmade yarn project lies in its versatility, and this comprehensive Crochet Ladybug Coaster – Tutorial ensures you can achieve flawless results on your very first try. Using basic crochet techniques like the magic ring, single crochet, and strategically placed color changes, you will watch a simple circle transform into a beautiful, spotty ladybug. Crafting your own home accessories allows you to control the quality of the materials, ensuring that your finished coasters are thick, absorbent, and durable enough to withstand daily wear and tear. Plus, they make incredibly thoughtful, unique gifts for housewarmings, birthdays, or spring-themed parties.
As we dive deep into this Crochet Ladybug Coaster – Tutorial, you will discover that working on small-scale projects is one of the best ways to sharpen your needlework skills without feeling overwhelmed. Small circular motifs require focus on stitch counts and tension, which naturally elevates your overall crafting proficiency for future, larger designs. By choosing the right materials, such as 100% cotton yarn, you guarantee that your finished mats are not only visually stunning but also highly practical for absorbing condensation. Let’s explore the essential materials, core techniques, and structural steps required to complete this gorgeous, nature-inspired crochet pattern successfully.
1. Essential Materials and Yarn Selection for Your Coaster
Selecting the proper materials is the foundational step for ensuring your drink mats are both beautiful and durable. For a project like this, choosing a high-quality 100% cotton yarn in vibrant red, solid black, and a touch of white is highly recommended. Cotton is the absolute best fiber for drink accessories because it handles heat exceptionally well, washes easily, and absorbs moisture far better than synthetic acrylic alternatives.
To match the thickness of your chosen thread, a 4.0 mm crochet hook (or a size G hook) is typically ideal for standard medium-weight cotton. Working with a slightly smaller hook than usual helps create tight, dense stitches, which prevents liquids from leaking through the gaps onto your tables. Keeping your tension consistent ensures that the round body stays completely flat instead of curling upward like a small bowl.
In addition to your main yarn skeins and hook, you will need a few essential notions to finish the job neatly. A sharp pair of scissors is necessary for clean cuts, and a sturdy yarn needle is crucial for weaving in those loose ends securely. You will also find that a temporary stitch marker is incredibly helpful for tracking the beginning of your continuous rounds without losing your place.
2. Step-by-Step Stitch Guide and Core Techniques
To begin the construction of your vibrant insect mat, you will want to start by forming a classic magic ring with your bright red yarn. This clever technique allows you to pull the center loop completely closed, eliminating any unwanted holes right in the middle of your work. Inside this adjustable loop, you will work your initial round of basic stitches to establish the circular base.
As you progress into the second and third rounds, mastering the concept of a standard crochet increase becomes vital for keeping the coaster flat. An increase simply means working two stitches into a single loop from the previous row, which expands the circumference evenly. Maintaining an accurate stitch count during these early stages prevents the edges from ruffling or distorting as the circle expands.
When you reach the final perimeter of the main body, it is time to execute a clean color change to join the sleek black yarn. Smooth transitions are achieved by drawing the new color through the very last two loops of the previous stitch right before you complete it. This method ensures that the transition looks seamless, professional, and completely natural to the naked eye.
3. Adding the Iconic Ladybug Details and Spots
No beetle-inspired creation is complete without its signature markings, which give the project its unmistakable character and charm. Once your main red circle is finished, you will use your tapestry needle and a strand of black thread to stitch a straight vertical line right down the middle. This simple embroidery step instantly creates the visual illusion of two separate, delicate wings.
For the distinct spots, you have two creative options depending on your personal preference and current comfort level with the needle. You can crochet tiny black circles separately using a simple round of single stitches and then sew them onto the wings securely. Alternatively, you can use a basic surface slip stitch technique to embroider the dark spots directly onto the red fabric.
To give your insect a lifelike appearance, you will fashion a small black semi-circle along the top edge to serve as the head. Working directly into the edge of the red circle allows you to build the head shape seamlessly without creating bulky seams. For an extra touch of whimsy, you can add two tiny white embroidered dots to represent bright, shining eyes.
4. Blocking and Finishing Your Handmade Drink Mat
Once all the embroidery is completed and the facial details are firmly in place, you must focus on the crucial finishing touches. Use your blunt needle to meticulously weave all remaining loose yarn tails through the back of the dense stitches to prevent unraveling. Hiding these loose ends on the underside keeps the top surface looking pristine, clean, and professional for display.
To elevate the overall quality of your work, taking the time to perform a process known as wet blocking is highly recommended. Simply submerge your finished mat in lukewarm water, gently squeeze out the excess moisture with a towel, and pin it flat onto a foam board. Allowing it to dry completely in this position relaxes the fibers and ensures a perfectly flat, uniform circular shape.
If you plan on gifting or selling these beautiful items, consider adding a thin layer of fabric stiffener or attaching a round piece of felt to the bottom. A felt backing hides any messy embroidery knots on the reverse side while adding an extra layer of tabletop protection. Your finished piece is now ready to bring a joyful pop of color and handmade elegance to your home decor.
Frequently Asked Questions
What is the best type of yarn to use for a crochet coaster?
The absolute best choice for making drink accessories is 100% cotton yarn. Cotton fiber is highly absorbent, meaning it will easily catch any condensation dripping from cold glasses. It is also heat-resistant, making it perfect for hot coffee mugs, and it holds its shape beautifully over time compared to stretchy acrylic fibers.
Why is my crochet coaster curling up at the edges?
Curling usually happens due to tight stitch tension or incorrect stitch counts during the increasing rounds. If your hook size is too small, the fabric can become overly stiff and pull inward. Try loosening your grip slightly, switching to a larger hook size, or double-checking your pattern to ensure you are increasing consistently.
Can I wash these ladybug coasters if they get stained?
Yes, if you used quality cotton yarn, your coasters can be easily cleaned. It is best to wash them by hand in cool water with a mild detergent to protect the delicate embroidered details. Lay them completely flat on a clean towel to air dry so they retain their perfectly round shape without shrinking.
How do I prevent a visible seam when changing colors?
To achieve a completely seamless look, introduce the new color during the final pull-through of the very last stitch in your old color. This technique ensures the loop sitting on your hook is already the new color when you begin the next round, preventing any unsightly color bleeding or jagged transitions.
Is this project suitable for absolute beginners?
Yes, this project is highly beginner-friendly because it relies on fundamental stitches like the magic ring, chain stitch, and single crochet. Because the project is compact and small, it allows novices to practice shaping circles and switching colors without committing to a massive, time-consuming blanket or sweater.
Conclusion
In summary, this Crochet Ladybug Coaster – Tutorial has provided you with all the essential steps, from selecting the ideal absorbent cotton yarn to mastering the structural increases and adding the whimsical embroidered wing details.
Creating these cheerful mats is an excellent, productive way to utilize your yarn remnants while crafting something highly functional and visually delightful. We would love to hear your thoughts on this project, so please leave your sincere opinion and any creative suggestions you might have in the comments section below!