When you embark on the journey of creating your own accessories, there is a unique sense of pride that comes with completing a project from scratch, which is exactly why this My Handmade Bag – Tutorial will guide you through every step of crafting your own stylish and durable tote. Making a personal accessory allows you to express your individuality while ensuring that the final product matches your exact functional needs. Whether you are an experienced crafter or stepping into the world of DIY textiles for the very first time, this guide is designed to make the entire process rewarding, seamless, and incredibly fun.
The beauty of a custom project lies entirely in the details and the conscious choices you make along the way. In a world dominated by fast fashion and mass-produced items, choosing to build something with your own two hands is a refreshing, sustainable alternative that connects you deeper to the art of creation. By selecting your own textiles, focusing on structural durability, and dedicating time to the craft, you create an item that tells a beautiful story. This comprehensive guide will ensure you walk away not just with a beautiful new accessory, but also with enhanced skills that you can apply to future endeavors.
As we dive into this comprehensive My Handmade Bag – Tutorial, we will explore how to select the right textiles, master essential construction methods, and apply gorgeous finishing touches. We will break down every phase of the construction process so you can follow along at your own comfortable pace without feeling overwhelmed. Prepare your workspace, gather your creative energy, and let’s transform raw materials into a functional masterpiece that you will be proud to carry everywhere you go.
1. Choosing the Best Sustainable Materials for Your Project
Selecting the right textile is the foundational step of our My Handmade Bag – Tutorial because the fabric determines both the look and the longevity of your finished piece. Opting for sturdy, eco-friendly options like heavy cotton canvas, linen, or even upcycled denim fabric gives your project an excellent structural base. Utilizing old jeans or leftover textile scraps is an amazing way to practice sustainable crafting while giving a second life to materials that might otherwise go to waste.
When you choose to work with upcycled denim fabric, you are inheriting a material that is already broken in, full of character, and incredibly resilient. You can look through your closet for old jeans that no longer fit or visit local thrift stores to find affordable source material for your craft blog projects. This deliberate choice reduces environmental waste and ensures that your final accessory has a unique, beautiful texture that mass-produced items simply cannot replicate.
Beyond the main outer body, you also need to consider the interior structural support, which is often achieved by adding a lightweight cotton lining fabric. A contrasting interior color not only looks highly professional but also makes it significantly easier to find your keys and small items inside the finished pouch. Don’t forget to gather strong polyester threads, a heavy-duty sewing needle, and comfortable straps made from cotton webbing or durable vegan leather.
Preparing your textiles correctly before making a single cut is a fundamental rule in the world of professional handicrafts. If you are using new cotton or linen fabrics, always pre-wash them to prevent unexpected shrinking later on when you wash your finished accessory. If you are working with salvaged pieces from old jeans, press them thoroughly with a hot iron to remove wrinkles and ensure your pattern measurements remain completely accurate.
Organization is key to maintaining an enjoyable workflow, so set aside a clean, dedicated workspace where you can arrange your tools neatly. You will need sharp fabric shears, a rotary cutter, a self-healing cutting mat, a clear quilting ruler, and plenty of sewing pins or fabric clips. Having these essential tools within arm’s reach prevents frustration and helps you maintain high precision during the critical cutting phase.
Ultimately, the materials you select reflect your personal commitment to mindful consumption and creative expression. By merging functional utility with eco-conscious textiles, you set the stage for a truly remarkable DIY experience that feels authentic and rewarding. Once your materials are washed, ironed, sorted, and ready, you can confidently move forward into the exciting phase of measuring and cutting your pattern pieces.
2. Step-by-Step Cutting and Structural Preparation
The secret to a perfectly symmetrical and professional-looking accessory lies in the accuracy of your initial measurements and cuts. For this standard tote design, you will need to cut two large matching rectangles for the outer body, measuring 16 inches wide by 18 inches tall. Repeat this exact process for your inner lining fabric, ensuring that all edges are perfectly straight and corners form precise 90-degree angles.
If you are incorporating upcycled denim fabric from old jeans, you might need to piece smaller sections together using a patchwork technique to achieve the required dimensions. This extra step actually adds immense visual appeal, creating a beautiful geometric mosaic that highlights your dedication to sustainable crafting. Embrace the natural seams, pockets, and color variations of the old garment to give your piece an authentic, artistic aesthetic.
To give your accessory a sturdy structure that stands up on its own rather than collapsing, consider applying a layer of fusible interfacing to the wrong side of your outer panels. Interfacing acts as a hidden support system, reinforcing the textile and preventing it from distorting over time under the weight of daily items. Simply iron the interfacing onto your main fabric pieces following the manufacturer’s temperature instructions.
Next, we need to create a boxed bottom, which is a classic design element that allows the finished item to sit flat and hold wider objects comfortably. To do this, use your fabric marker and ruler to cut out a small 2-inch square from the two bottom corners of both outer panels and both lining panels. This simple geometric modification will completely transform a flat, two-dimensional pouch into a spacious, professional three-dimensional tote.
Now it is time to measure and prepare the handles or shoulder straps, which bear the entire physical weight of the contents you will carry. Cut two equal lengths of cotton webbing or matching fabric strips, with an ideal length of 25 inches each for a comfortable over-the-shoulder fit. If making fabric straps, fold the raw edges inward and stitch down both long sides to eliminate fraying and maximize tensile strength.
Take a final moment to inspect all your cut pieces, verifying that your outer panels, interior linings, and handles are uniform and free of uneven edges. Double-checking your dimensions right now saves substantial time and prevents mistakes once you begin running the materials through your sewing machine. With your perfectly measured and stabilized pieces ready, you are fully prepared to start assembling the main body of your project.
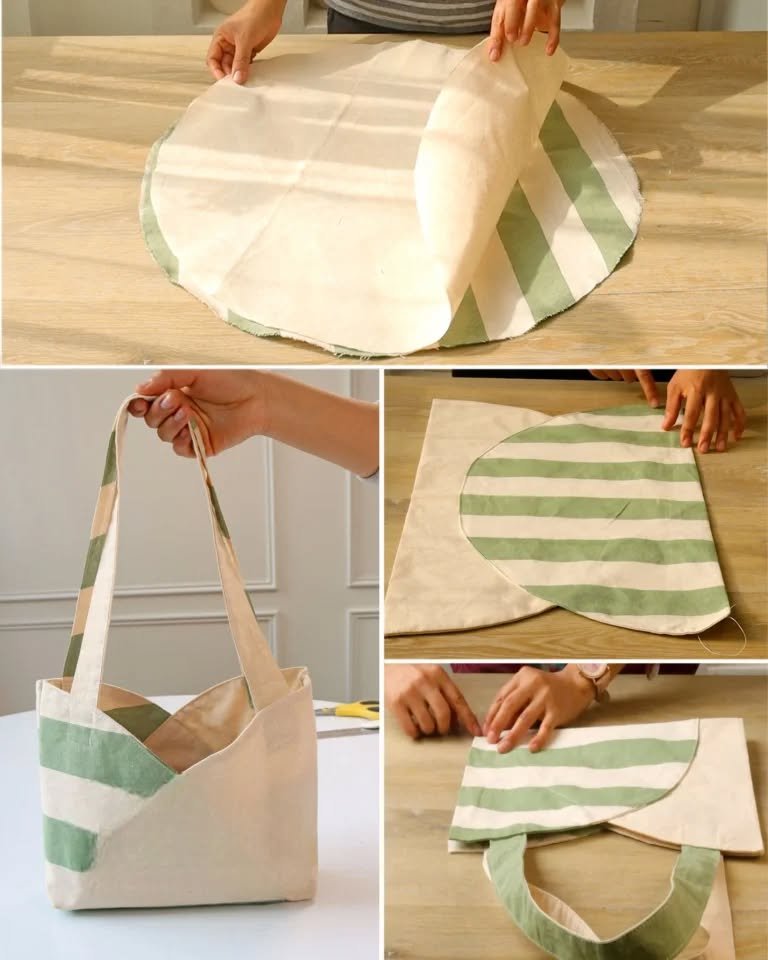
3. Stitching the Main Body and Assembling the Components
With all components prepped, we move into the assembly phase of our My Handmade Bag – Tutorial, where your loose fabric panels finally begin taking shape. Place your two outer panels together with their right sides facing each other, securing the left, right, and bottom edges securely with fabric clips. Using a standard half-inch seam allowance, sew along these three edges, making sure to leave the top opening and the corner cutouts completely unstitched.
To ensure your creation can withstand heavy daily use, always backstitch securely at the beginning and the absolute end of every single seam you sew. This simple habit locks the threads in place, preventing the seams from unraveling over time when the item is loaded with heavy books or groceries. Once the three main sides are secure, press the raw seam allowances open with your iron to reduce internal bulk.
Now, let’s form that beautiful boxed bottom by pulling the front and back fabric layers away from each other at the corner cutouts. Flatten the cut opening so that the side seam aligns perfectly with the bottom seam, creating a straight horizontal line across the corner. Pin this newly formed edge securely and sew across it using a straight stitch, repeating the exact process on both sides to give your base its depth.
Repeat this entire assembly sequence for your interior lining fabric pieces, but with one critical modification that is vital for the turning process. Along the bottom edge of the lining assembly, leave a deliberate 4-inch opening unstitched right in the center of the seam. This unsewn gap will serve as the magic portal through which you will pull the entire structure right-side out later on.
Next, temporarily turn your outer shell right-side out so you can position your prepared shoulder straps in their final resting places. Measure 4 inches inward from each side seam along the top raw edge, pinning the ends of the straps securely to the right side of the fabric. Ensure your straps are not twisted or looped incorrectly, and baste them down using a quick, temporary stitch a quarter-inch from the edge to hold them firmly.
Now, slide the right-side-out outer shell completely inside the wrong-side-out lining assembly, making sure the right sides of both layers are touching. Align the top raw edges perfectly, matching the side seams carefully, and pin or clip the entire perimeter securely. You now have a neat fabric sandwich with the straps safely tucked away between the two primary layers, ready for the final structural perimeter stitching.
4. Final Seaming, Turning, and Professional Finishing Touches
Sew a continuous line of stitches completely around the top circular perimeter of your assembled layers, securing the outer fabric, handles, and lining together. Because you are sewing through multiple thick layers, especially if you chose heavy upcycled denim fabric, sew slowly and steady your machine. Feel free to run an extra row of reinforcing stitches directly over the strap attachment points to provide maximum durability.
Once the top perimeter is fully sewn, reach your hand through the 4-inch opening you left at the bottom of your interior lining. Carefully grasp the outer fabric and gently pull it through the opening, turning the entire structure right-side out like a magic trick. Work the corners out gently using a blunt turning tool or a chopstick so they look sharp, crisp, and beautifully defined.
Tuck the raw edges of the 4-inch lining opening inward by a quarter-inch so they form a neat, flush line that blends seamlessly with the seam. You can quickly stitch this opening closed using your machine very close to the edge, or sew it by hand with an invisible ladder stitch for a flawless finish. Once closed, push the entire lining assembly down inside the outer body of your beautiful new accessory.
Press the top edge of your tote thoroughly with an iron, rolling the seam slightly inward so the lining remains completely hidden from the outside. To give your project a polished boutique appearance, topstitch a crisp line a quarter-inch below the upper edge around the entire perimeter. This topstitching looks gorgeous, flattens the upper seam, and adds immense structural integrity to the handle connections.
If you want to elevate your design further, consider adding personalized embellishments like magnetic snaps, decorative buttons, or a custom fabric label. You can share your unique design modifications on your own craft blog or social media pages to inspire other members of the global DIY community. Documenting your creative journey helps build a supportive network of makers who appreciate the patience involved in fine handicrafts.
Give your completed piece a final, thorough steam press to remove any remaining creases and set the stitches beautifully into place. Step back and admire your incredible work—you have successfully transformed loose textiles into a highly functional, sturdy, and eco-friendly masterpiece. Your accessory is now fully prepared to accompany you on daily adventures, market trips, or to be gifted to someone special.
Frequently Asked Questions (FAQ)
What is the best type of fabric for a beginner making a handmade bag?
For beginners, medium to heavy-weight woven fabrics like cotton canvas, duck cloth, or denim are ideal because they are stable, don’t slip while sewing, and hold their shape well. Avoid lightweight silks, sheer polyesters, or stretchy knits for your first few projects, as they require advanced handling and stabilization techniques.
Can I complete this project without a sewing machine?
Yes, you can absolutely complete this entire project by hand using a strong backstitch and durable thread. While hand-sewing will take significantly more time and patience, it allows for incredible precision and results in a highly authentic, sturdy piece that carries a wonderful historical charm.
How do I care for and clean my handmade tote bag?
Care instructions depend heavily on the materials you selected, but generally, cotton canvas and upcycled denim can be safely machine washed on a gentle cycle with cold water. To maintain the crisp structure and prevent any shrinkage of the internal interfacing, it is highly recommended to line dry the item and iron it while slightly damp.
How can I make my handmade bag water-resistant?
You can make your finished item water-resistant by applying a specialized fabric wax (like beeswax or paraffin wax) to the exterior canvas or denim, buffing it thoroughly into the fibers with heat. Alternatively, you can spray the completed exterior with a commercial fabric protector spray designed for outdoor gear to repel water stains.
Conclusion
In this comprehensive My Handmade Bag – Tutorial, we have explored the entire rewarding process of creating a custom, sustainable accessory completely from scratch. We covered everything from selecting robust textiles like upcycled denim fabric from old jeans to mastering structural reinforcement, creating an elegant boxed bottom, and executing flawless professional topstitching.
By choosing the path of sustainable crafting and diving into traditional handicrafts, you have created a reliable, stylish item that serves as a beautiful testament to your personal creativity and practical skills.