
Crochet peacock feathers tutorial projects are currently taking the fiber arts world by storm, offering a vibrant burst of color and a touch of natural elegance to any crafting repertoire. There is something truly mesmerizing about the way the deep blues, rich emeralds, and brilliant golds come together to mimic one of nature’s most spectacular displays. Whether you are an experienced fiber artist or a curious beginner looking to expand your skill set, learning how to create these intricate motifs will elevate your handmade projects to a whole new level of artistry.
In this comprehensive guide, we will dive deep into everything you need to know about creating your own stunning pieces using our crochet peacock feathers tutorial. We will explore the best yarn choices, break down the essential stitches, and provide you with a step-by-step roadmap to ensure your finished feathers look impeccably professional. By mastering this specific motif, you will unlock endless creative possibilities, allowing you to incorporate these eye-catching designs into home decor, wearable fashion, and unique accessories.
As you embark on this creative journey, you will find that the secret to a perfect feather lies in color tension and precise stitch placement. This crochet peacock feathers tutorial is designed to guide your hooks smoothly through each distinct layer of the feather’s “eye” to the sweeping outer standard stitches. Prepare your materials, find a cozy crafting spot, and let’s explore how to transform simple strands of yarn into a breathtaking, textured masterpiece that captures the true essence of a peacock’s beauty.
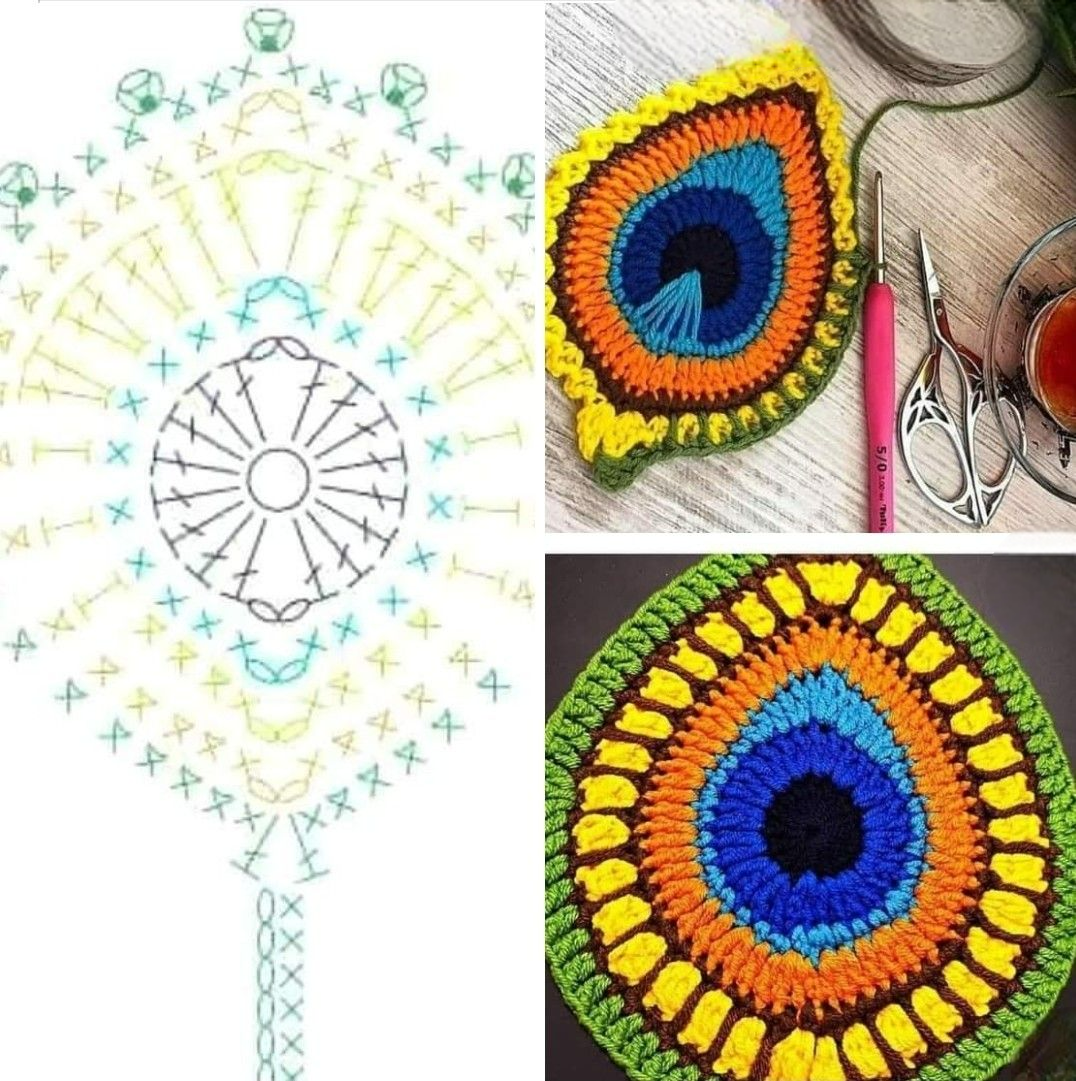
1. Choosing the Perfect Yarn and Color Palette
Selecting the right materials is the foundational step of our crochet peacock feathers tutorial because the visual impact relies heavily on color interaction. To achieve that iconic, iridescent look, you should look for vibrant jewel tones in four distinct shades: deep royal blue for the center, bright teal or turquoise for the inner ring, rich emerald green for the body, and a metallic gold or bronze for the outer accent border.
The weight of your yarn also plays a massive role in the final drape and definition of your crochet peacock feathers tutorial project. A sport weight or lightweight mercerized cotton yarn is highly recommended for this specific pattern because it offers excellent stitch definition and a slight natural sheen that mimics real feathers. Cotton yarn also ensures that the intricate stitches hold their shape over time without stretching or warping out of place.
If you prefer a softer texture, a high-quality acrylic or a wool blend in fingering weight can also yield beautiful results for your crochet peacock feathers tutorial motifs. The slight halo of wool can give the finished motif a softer, more organic appearance, which works wonderfully if you plan to join multiple pieces together for a cozy afghan or a decorative shawl.
Texture is just as important as color when you are working on a crochet peacock feathers tutorial. Avoid highly variegated yarns that change colors too quickly or unpredictably, as they can muddy the distinct sections of the peacock eye and obscure your hard work. Solid, rich colors will always give you the crispest, most recognizable feather pattern.
When choosing your crochet hook to accompany your yarn for this crochet peacock feathers tutorial, opt for a size slightly smaller than what the yarn label recommends. This practice creates tight, neat stitches that prevent the stuffing or background colors from peeking through, giving your feather a professional, high-end finish.
Lastly, make sure to organize your yarn skeins before you begin crocheting to make color transitions seamless. Keeping your working yarns untangled will save you a lot of time and frustration, allowing you to focus entirely on the rhythm of the stitches and the beautiful progression of your handmade crochet peacock feathers tutorial art piece.
2. Essential Stitches and Technique Mastery
Before diving directly into the pattern of our crochet peacock feathers tutorial, it is essential to familiarize yourself with the core stitches that give the feather its unique, tear-drop shape. You will actively use a combination of basic stitches, ranging from the short single crochet to the tall treble crochet, to create the natural gradient of height within the motif.
The foundation of the feather eye in this crochet peacock feathers tutorial begins with a magic ring, which allows you to pull the center perfectly closed, leaving no visible gaps. From there, you will work a series of stitches into the loop, gradually increasing their height to start forming the characteristic oval shape of the peacock feather.
Working with multiple color changes means you will need to master the seamless color change technique to make your crochet peacock feathers tutorial look flawless. Always introduce the new color on the final pull-through of the last stitch of the previous row, ensuring that the loops on your hook match the section you are about to create.
Another vital technique highlighted in this crochet peacock feathers tutorial is working into the back loops only (BLO) for certain rounds. This advanced method creates a raised ridge on the surface of your work, adding a wonderful three-dimensional texture that replicates the layered look of real bird plumage.
Managing your yarn tails is another crucial aspect of mastering this crochet peacock feathers tutorial. We highly recommend crocheting over your loose ends as you transition between colors, which minimizes the amount of weaving in you have to do with a tapestry needle once your beautiful motif is completed.
Regularly check your stitch count at the end of every round of your crochet peacock feathers tutorial to ensure the symmetry of the design remains intact. Because the shape is asymmetrical by nature, a single missed stitch can throw off the alignment of the outer edges, causing the feather to buckle or warp.
3. Step-by-Step Instructions for the Feather Eye
Now we will begin the core section of our crochet peacock feathers tutorial by creating the stunning center eye of the feather. Start by making a magic ring with your deep royal blue yarn, chain one, and work six single crochet stitches directly into the ring before pulling the tail tightly to close the central circle.
For the second round of this crochet peacock feathers tutorial, switch to your vibrant teal yarn during the last slip stitch of the previous round. Work two half double crochets into the first two stitches, followed by two double crochets into the next two stitches, and finish with two treble crochets in the remaining stitches to create the elongated shape.
The third round introduces the emerald green yarn, which expands the body of our crochet peacock feathers tutorial motif and emphasizes the classic tear-drop form. You will work a series of increases around the curved top of the stitch architecture, balancing single crochets at the narrow base and taller double crochets at the wider apex.
As you progress through this stage of the crochet peacock feathers tutorial, you will notice the fabric naturally beginning to take on a beautiful, stylized teardrop appearance. Keep your tension even and relaxed, ensuring that the taller stitches do not become loose or sloppy, as this will affect the overall structural integrity.
Introduce your gold or bronze yarn for the fourth round of the crochet peacock feathers tutorial to create the brilliant, shimmering frame that makes peacock feathers so famous. Work a row of clean single crochets all the way around the perimeter, placing three stitches into the very top loop to form a sharp, clean point.
To finish the main body section of this crochet peacock feathers tutorial, fasten off your yarn securely, leaving a moderate tail for weaving. Gently press the piece flat with your fingers to ensure it sits evenly without curling up at the edges, setting the stage perfectly for the final decorative border details.
4. Creative Ways to Use Your Finished Motifs
Once you have completed your first piece using this crochet peacock feathers tutorial, you will quickly realize how versatile these beautiful motifs truly are. One popular way to utilize them is by sewing them onto plain canvas tote bags, denim jackets, or decorative throw pillows to instantly add a touch of bohemian flair.
You can also use this crochet peacock feathers tutorial to create stunning, lightweight jewelry pieces by using embroidery floss and a tiny steel crochet hook. Adding a couple of metallic beads and attaching standard earring hooks to the top point results in an elegant, boutique-quality accessory that makes an amazing handmade gift.
For home decor enthusiasts, joining multiple motifs from this crochet peacock feathers tutorial can result in an absolutely breathtaking table runner or a dramatic wall hanging. You can arrange the individual feathers in a overlapping, cascading pattern on a wooden dowel to mimic the magnificent tail of a real peacock.
If you love making holiday decorations, these motifs from our crochet peacock feathers tutorial can easily be converted into unique Christmas tree ornaments or festive garlands. Simply add a small hanging loop of golden thread to the top point of each completed feather, and you have an instant heirloom-quality holiday accent.
Another highly creative application for this crochet peacock feathers tutorial is integrating the motifs into a larger blanket or afghan project. You can applique the finished feathers onto simple, neutral-colored granny squares, creating a sophisticated and textured blanket that stands out as a true centerpiece in any room.
Ultimately, the only limit to what you can create with this crochet peacock feathers tutorial is your own imagination. Whether you make a single feather to use as a stylish bookmark or craft dozens of them for a large-scale artistic installation, you are engaging in a beautiful, rewarding expression of modern fiber art.
Frequently Asked Questions (FAQ)
What is the best yarn weight for a crochet peacock feather?
The best yarn weight for a crochet peacock feathers tutorial project is typically a sport weight (Category 2) or a lightweight dk weight (Category 3) mercerized cotton. This type of yarn provides crisp stitch definition, keeps the motif flat, and offers a beautiful, subtle sheen that perfectly matches the natural luster of real feathers.
How do I prevent my peacock feathers from curling at the edges?
If your motifs are curling, it usually means your tension is too tight or you missed an increase stitch along the outer edges. To fix this within the crochet peacock feathers tutorial, ensure you are placing multiple stitches into the turning points, and consider blocking your finished pieces using a steam iron or wet blocking techniques to flatten them out completely.
Can a beginner tackle this crochet peacock feathers tutorial?
Yes, an adventurous beginner can absolutely complete this crochet peacock feathers tutorial! While it uses a variety of stitches and frequent color changes, the pattern relies on basic crochet geometry. Taking your time, counting your stitches carefully, and practicing seamless color changes beforehand will guarantee your success.
How many colors do I need to make an authentic peacock feather?
To achieve the classic, recognizable look described in this crochet peacock feathers tutorial, you will need at least four colors: a deep royal blue for the center eye, a bright turquoise or teal for the secondary ring, a rich emerald green for the main body, and a bright gold, bronze, or yellow for the outer framing border.
How do I weave in so many ends neatly?
The most efficient way to manage yarn tails in this crochet peacock feathers tutorial is to crochet over your loose ends as you work each new round. When you introduce a new color, lay the old tail along the top of the previous row and work your new stitches right over it for a few centimeters before snipping the excess off safely.
Conclusion
In this comprehensive guide, we have explored the vibrant art of creating exquisite fiber art through our structured crochet peacock feathers tutorial.
We covered everything from choosing the ideal jewel-toned mercerized cotton yarns to mastering the essential stitch heights and three-dimensional techniques required to give your feathers their signature teardrop shape. Additionally, we discussed a multitude of creative ways to implement these motifs into gorgeous home decor, statement jewelry, and wearable fashion accessories that showcase your personal style.