
Rainbow Patchwork Skirt – Tutorial is the ultimate guide you need to create a vibrant, joyful, and sustainable addition to your handmade wardrobe. If you love working with colorful fabric scraps and want to build a truly unique garment, mastering the art of a rainbow patchwork skirt is the perfect weekend project. Patchwork fashion has taken the world by storm, blending nostalgic charm with modern indie aesthetics, and creating a spectrum of colors makes it even more magical.
This comprehensive rainbow patchwork skirt tutorial is designed for sewists of all skill levels, whether you are a complete beginner or an experienced quilter looking to transition into apparel design. By recycling leftover fabric or choosing an array of bright new cotton quarters, you can craft a piece of clothing that reflects your personality. Beyond being a beautiful fashion statement, this project embraces the ethos of slow fashion, allowing you to reduce textile waste while building a gorgeous, durable wardrobe.
Throughout this guide, we will break down the entire process step-by-step, ensuring you achieve a professional finish with maximum structural integrity. From selecting the perfect fabric gradient to mastering the waistband and hemline, every single detail is covered. Grab your sewing machine, organize your colorful fabric stash, and let us dive into this creative journey together.
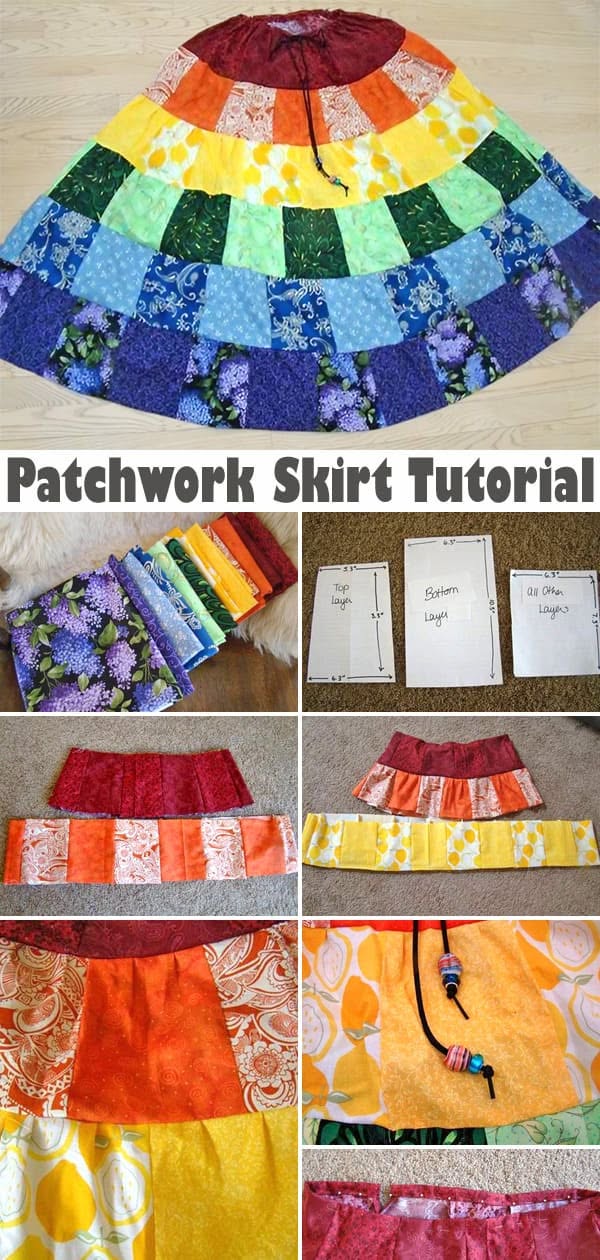
1. Selecting and Preparing Fabrics for Your Rainbow Patchwork Skirt
Before cutting into your materials, selecting the right textiles is crucial for the drape and longevity of your garment. For a rainbow patchwork skirt, lightweight to medium-weight woven cotton fabrics, such as quilting cotton, linen, or lawn, work best because they hold their shape well during piecing. You will want to gather scraps or fat quarters that cover the classic spectrum: red, orange, yellow, green, blue, indigo, and violet.
Pre-washing your fabrics is a vital step that you should never skip when making apparel. Since you are combining multiple different fabrics into one garment, they need to shrink beforehand; otherwise, your skirt might distort during its first wash. Wash your colorful fabrics with a color-catching sheet to prevent the darker or brighter pigments from bleeding into the lighter shades.
Once your fabrics are completely dry, press them thoroughly with a hot iron using plenty of steam. Crisp, flat fabric is infinitely easier to measure and cut accurately, which is the secret to perfect patchwork alignment. Spending time on preparation ensures that your final seams will match up smoothly without puckering.
Organization is your best friend when working with a multi-colored gradient layout. Group your pressed fabrics by color family into distinct piles so you can easily visualize the transition from one shade to the next. This step will help you plan the exact sequence of your rainbow patchwork skirt design.
When calculating fabric yardage, consider the fullness and length you want for your final garment. If you are using small scraps, ensure you have enough total surface area to cover your pattern pieces plus seam allowances. A good rule of thumb is to have slightly more fabric than you think you need to account for miscuts.
Finally, think about the weight consistency of your collected pieces. Mixing a heavy denim fabric with a super thin silk can cause the seams to pull and sag awkwardly over time. Sticking to a uniform weight across all your colored squares or rectangles will give your skirt a beautiful, even flow when worn.
2. Cutting Techniques and Fabric Layout Planning
Accurate cutting is the foundational bedrock of successful patchwork construction. To achieve clean lines for your rainbow patchwork skirt, it is highly recommended to use a rotary cutter, a self-healing cutting mat, and a clear acrylic quilting ruler. These tools allow you to cut multiple layers of fabric simultaneously with absolute precision.
Decide on the geometric shape of your patchwork pieces, such as squares, rectangles, or long vertical strips. For this rainbow patchwork skirt tutorial, we will focus on a classic square grid layout, cutting our pieces into uniform 5-inch squares. Remember that a standard 1/4-inch seam allowance will reduce the visible size of each square to 4.5 inches.
Once your squares are cut, clear a large floor space or a big table to act as your design wall. Lay out your squares in a beautiful gradient pattern, shifting smoothly from warm reds and oranges into cool blues and purples. Take your time arranging the pieces until the visual flow feels perfectly balanced and harmonious to your eyes.
Step back from your layout or take a quick digital photo of it with your smartphone. Looking at the arrangement through a screen changes your perspective and helps you instantly spot any clashing colors or layout mistakes. Once you are completely satisfied with the color progression, stack your rows in order and label them with sticky notes.
When planning the layout, keep the grainline of the fabric in mind to ensure the skirt stretches correctly around your body. The lengthwise grain should generally run vertically down the skirt to provide stability and prevent the garment from stretching out of shape over time. Paying attention to this detail ensures professional, long-lasting results.
If you are incorporating patterned fabrics alongside solid colors, try to distribute the prints evenly across the rows. Mixing small florals, polka dots, and solids within each color band adds wonderful visual texture and depth to your rainbow patchwork skirt. Precision at this stage makes the actual assembly phase an absolute breeze.
3. Assembling the Patchwork Panels and Sewing the Rows
With your pieces neatly stacked and labeled, it is time to move to the sewing machine to bring your colorful canvas to life. Set your machine to a standard straight stitch with a medium stitch length, and use a high-quality cotton or polyester thread. Always use a consistent 1/4-inch seam allowance to ensure all your intersections line up perfectly.
Begin by sewing the individual squares of each horizontal row together, placing the fabric right sides facing. Sew Row 1 from left to right, then Row 2, and continue until all your individual rows are assembled into long fabric strips. Gently chain-piece the pairs to save time and thread during the construction process.
Pressing your seams correctly is the ultimate secret to flat, professional-looking patchwork panels. Press the seam allowances of Row 1 to the right, and the seam allowances of Row 2 to the left. This alternating technique allows your seams to “nest” beautifully together when you sew the horizontal rows to one another.
Pin the rows together carefully, matching every single intersecting seam exactly by nesting the alternating seam allowances. Use plenty of fine sewing pins to keep the fabric from shifting as it passes under the presser foot. Sew the rows together slowly, removing the pins just before you reach them to avoid breaking your needle.
Once the front and back panels of your rainbow patchwork skirt are fully assembled, give them a final, thorough press on the wrong side. Check all your intersections from the front to make sure they meet accurately. Do not worry if a few corners are slightly off; the overall impact of the rainbow gradient will look magnificent regardless.
Now, stay-stitch along the top edge of your assembled panels about 1/8-inch away from the raw edge. This quick step prevents the pieced fabric from stretching out of shape while you manipulate it to add the waistband. Your beautiful patchwork fabric sheets are now ready to be transformed into a wearable garment.
4. Finishing the Waistband Hemline and Construction Details
Transforming your flat patchwork panels into a functional, comfortable skirt requires a proper waistband and a clean, durable hem. For an easy, beginner-friendly fit, an elastic waistband casing is an exceptional choice that accommodates body changes beautifully. Measure your waist and cut a piece of 1-inch wide elastic to a comfortable length, adding one inch for overlap.
Fold down the top raw edge of your skirt panel by 1/4 inch and press, then fold it down again by 1.25 inches to create the casing. Edgestitch along the bottom fold, leaving a small 2-inch opening at the back to insert your elastic. Use a safety pin to guide the elastic through the tunnel, sew the elastic ends together securely, and close the opening.
Distribute the fabric gathers evenly around the elastic waistband by stretching it out a few times. To prevent the elastic from twisting inside the casing during wear or washing, stitch vertically through the casing and elastic at the side seams. This simple professional touch keeps your rainbow patchwork skirt looking neat and comfortable permanently.
With the waistband finished, try the skirt on in front of a mirror to determine your ideal final length. Patchwork skirts look fantastic at any length, from a playful mini style to a flowing, bohemian maxi skirt length. Use a fabric chalk marker to mark your desired hemline evenly all the way around the bottom circumference.
Trim any excess fabric, leaving 1 inch of allowance for finishing the bottom edge elegantly. Fold the hem up by 1/2 inch, press, fold another 1/2 inch to completely enclose the raw edges, and press again. Topstitch the hem closely to the upper folded edge with a matching or contrasting decorative thread color.
Give your completed rainbow patchwork skirt one last pressing to set all the final stitches beautifully. Snip any remaining loose threads and inspect your seams to ensure everything is secure. Your gorgeous, custom-made wearable art piece is officially complete and ready to be styled with your favorite tops.
FAQ
Can a beginner sew this rainbow patchwork skirt?
Yes, this project is highly suitable for beginners because it utilizes basic straight stitching and simple geometric cutting. The elastic waistband eliminates the need for complex zipper installations or buttonholes, making it an excellent introductory apparel project.
What is the best type of fabric to use for this project?
High-quality quilting cotton is the absolute best choice for a rainbow patchwork skirt due to its stability, ease of handling, and vast array of vibrant colors. You can also use linen, cotton lawn, or lightweight chambray as long as the fabric weights are relatively uniform.
How do I wash and care for my handmade patchwork skirt?
To preserve the bright colors and seam strength, wash your skirt in cold water on a gentle cycle with a mild detergent. Using a color catcher sheet during the first few washes is highly recommended, and you should line dry the garment to prevent shrinkage.
Can I make this skirt using old denim jeans or clothing scraps?
Absolutely! Upcycling old clothing scraps or soft denim is a fantastic, sustainable way to build a unique textured skirt. Just ensure the repurposed fabrics are clean, pressed, and not overly worn out or thin in important structural areas.
How do I calculate how many squares I need to cut?
First, determine the widest part of your hips and the desired length of the skirt. Divide your hip measurement by the finished size of your squares to find out how many squares you need per row, adding extra fullness for gathers, and repeat for the total rows needed.
In this rainbow patchwork skirt tutorial, we explored the complete creative process of crafting a stunning, colorful garment from scratch. We covered how to select and prepare the ideal cotton fabrics, how to plan an eye-catching gradient layout, and the best techniques for sewing precise patchwork panels. Finally, we walked through creating a comfortable elastic waistband and sewing a clean, professional hemline to finish the project. This sewing adventure allows you to showcase your personal style while practicing sustainable crafting habits that elevate your skills.