There is nothing quite like slipping your feet into a pair of warm, handmade crochet slippers, especially after a long, exhausting day. Making your own footwear is one of the most rewarding projects you can undertake, combining the therapeutic art of stitching with practical, everyday comfort. Whether you are looking to create a thoughtful, heartfelt gift for a loved one or simply want to treat your own feet to some well-deserved luxury, mastering a crochet slippers tutorial is the perfect way to elevate your crafting skills while producing something incredibly functional.
The beauty of diving into a crochet slippers tutorial lies in its immense versatility and accessibility for crafters of all levels. You do not need a massive workspace or overly expensive equipment to get started; with just a few basic tools, a skein of durable yarn, and a bit of patience, you can design footwear that perfectly matches your personal style and foot shape. From chunky, thick boots designed for freezing winter nights to lightweight, breathable loafers for the warmer months, the design possibilities are virtually endless when you understand the core fundamentals of footwear construction.
In this comprehensive guide, we are going to walk you through every single step of the process, ensuring you have all the knowledge required to complete your project with total confidence. We will cover everything from selecting the right materials and mastering the essential stitches to assembling the pieces and adding professional, slip-resistant finishes to your soles. Grab your favorite hook, find a comfortable place to sit, and let’s explore how this detailed crochet slippers tutorial can help you transform simple strands of yarn into the coziest footwear you have ever owned.
1. Choosing the Right Materials for Your Crochet Slippers Tutorial
Selecting the perfect yarn is the absolute foundation of any successful footwear project. When you are following a crochet slippers tutorial, you need to look for a yarn that offers a balance between softness and durability. Wool blends are excellent for winter warmth, while acrylic yarn is highly popular because it is budget-friendly, widely available, and incredibly easy to machine wash.
The weight of your yarn also plays a massive role in how your crochet slippers will look and feel. Using a bulky or super bulky weight yarn is highly recommended for beginners because it allows the project to work up incredibly fast. Thicker yarn also naturally creates a plush, cushioned sole that provides extra comfort when walking on hard floors.
Do not overlook the importance of matching your hook size to the chosen yarn weight. For a standard crochet slippers tutorial, using a hook that is slightly smaller than what the yarn label recommends can actually be a clever trick. This specific technique creates tighter, denser stitches, which prevents the footwear from stretching out too much over time.
Comfort and safety should always go hand in hand when making handmade footwear. Since these items will be worn on various flooring surfaces, you will want to think about adding a non-slip backing to the finished soles. Options like puff paint, silicone spray, or stitching on leather soles will ensure your handmade creations are safe to wear on slippery tile or wood.
Before you begin chaining your first stitches, it is vital to have all your notions organized. Alongside your yarn and hook, you will need a sturdy tapestry needle for weaving in ends, a pair of sharp scissors, and several stitch markers. Stitch markers are especially crucial in a crochet slippers tutorial because they help you keep track of your increases and decreases accurately.
Lastly, take a moment to measure the feet of the person who will be wearing the final product. Handmade footwear is highly customizable, and knowing the exact length and width of the foot allows you to adjust your row counts perfectly. Taking this extra step guarantees a snug, comfortable fit that will not easily slide off the heel while walking.
2. Essential Stitches and Techniques for Handmade Footwear
Mastering the foundational stitches is the next exciting step in our crochet slippers tutorial. The single crochet stitch is the absolute workhorse of footwear construction because it creates a tight, dense fabric with minimal gaps. This dense structure is exactly what you want for crochet slippers to ensure they trap warmth effectively and retain their shape.
Another fantastic option often utilized in a crochet slippers tutorial is the half double crochet stitch. This particular stitch offers a wonderful compromise, as it is slightly taller than a single crochet but still maintains a firm, solid texture. It allows your project to progress a bit quicker while still offering the durability required for everyday wear.
Understanding how to increase and decrease stitches correctly is what gives your footwear its actual shape. To contour the toe area, you will learn to work multiple stitches into a single space, creating a smooth, rounded front. Conversely, decreasing stitches around the heel or ankle helps taper the fabric so the slipper hugs the foot securely.
Working in the back loops only is a brilliant technique that adds a beautiful ribbed texture to your project. Many crafters love using this method when transitioning from the sole to the sides of the foot, or when creating a cozy, fold-over ankle cuff. The ribbed texture provides a lot of natural stretch, allowing the footwear to conform perfectly to different foot shapes.
Maintaining an even stitch tension is absolutely critical when you are working on a crochet slippers tutorial. If your tension is too loose, the footwear will become floppy, lose its structure, and wear out much faster. If it is too tight, the fabric will lack flexibility, making it difficult and uncomfortable to slip your feet into the finished piece.
The golden rule of making any footwear is to always create your second piece immediately after finishing the first one. It is incredibly easy to forget slight adjustments or tension changes if you wait too long between pieces. Working them back-to-back ensures that your pair of crochet slippers will turn out perfectly symmetrical and identical in size.
3. Step-by-Step Construction Guide for Beginners
To begin the actual making process of this crochet slippers tutorial, we always start by constructing the foundation sole. You will begin by making a slip knot and crocheting a central foundation chain that roughly matches the length of the foot minus the toes. From there, you will work in continuous rounds, increasing at both ends to create an oval shape.
As your sole grows, you will use stitch markers to identify exactly where the heel and the toe sections split. To mimic the natural anatomy of a human foot, you can use shorter stitches like single crochet for the heel and taller stitches like double crochet for the wider toe area. This subtle shaping trick makes a massive difference in how comfort is distributed.
Once your sole reaches the desired width, it is time to build up the sides of your crochet slippers. You will stop increasing altogether and simply work even rows of stitches around the entire perimeter of the sole. This lack of increasing will naturally cause the edges to curl upward, instantly forming the vertical walls of your footwear.
The most magical part of any crochet slippers tutorial is shaping the toe box where your toes will rest. By implementing strategic decreases across the front half of your work over the next few rows, the fabric will quickly pull together. This creates a beautifully enclosed, cozy pocket that securely covers the front of the foot.
After the toe section is fully formed, you will continue working back and forth around the remaining stitches to build up the heel. Once the heel reaches the correct length to match your sole, you can fasten off your yarn, leaving a long tail. You will then use your tapestry needle to neatly seam the back of the heel together using a mattress stitch.
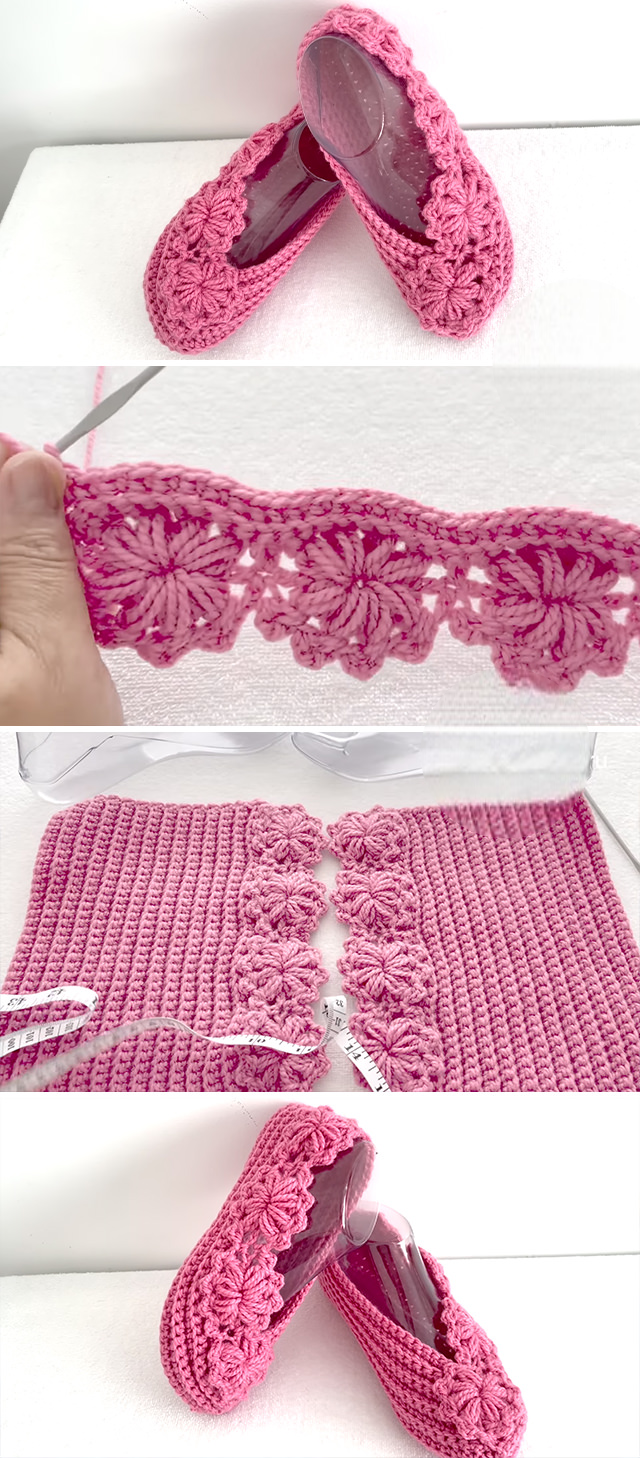
With the main structure fully completed, you can now add a gorgeous decorative border around the ankle opening. A row of reverse single crochet, also known as the crab stitch, creates a stunning, polished edge that looks highly professional. Once your border is complete, meticulously weave in all remaining yarn tails to secure your hard work.
4. Customizing and Custom Fitting Your Finished Project
One of the greatest joys of finishing a crochet slippers tutorial is the ability to customize the design to express your unique personality. You can easily experiment with vibrant color changes, creating playful stripes or a sophisticated color-blocked look. Mixing different yarn shades is also a fantastic way to utilize leftover yarn scraps from your crafting stash.
If you prefer a more modern aesthetic, you can adapt your crochet slippers into trendy ankle boots. To achieve this look, simply continue crocheting in rounds around the ankle opening instead of fastening off after seaming the heel. You can build this cuff as high as you like, creating a slouchy, ultra-warm bootie style.
Adding charming embellishments is another wonderful way to elevate the final look of your handmade footwear. You can crochet small decorative flowers, festive holiday applique shapes, or attach fluffy yarn pom-poms to the toe boxes. For a more classic, rustic vibe, consider adding a large wooden button to the side of the ankle cuff.
If you happen to live in a home with chilly hardwood or linoleum floors, extra insulation is an absolute game-changer. You can crochet a second set of identical soles and stitch them together with the main piece, trapping a layer of warm felt in between. This dual-sole technique provides incredible cushioning and makes your crochet slippers feel like walking on clouds.
Proper care and maintenance will ensure that the beautiful items you made using this crochet slippers tutorial last for many years. Always check the specific care instructions on your yarn label before throwing your footwear into the washing machine. Air drying your slippers flat on a clean towel is always the safest method to prevent any unwanted shrinking or distortion.
Never be afraid to adjust a pattern as you go to get the absolute perfect fit for your specific feet. Everyone’s feet are wonderfully unique, and the beauty of crochet is that it is incredibly forgiving and easy to customize. With the valuable skills you have gained today, you are now fully equipped to keep the feet of your entire family warm and cozy all year round.
Frequently Asked Questions (FAQ)
What type of yarn is best for making long-lasting crochet slippers?
For maximum longevity and durability, a high-quality wool blend or a premium 100% acrylic yarn is generally the best choice. Footwear experiences a significant amount of friction and wear against floors, so you want a fiber that can withstand rubbing without pilling excessively. Acrylic is highly favored because it can be easily washed in a machine, while wool offers unparalleled natural warmth and breathability.
How do I stop my handmade slippers from being too slippery on flat floors?
There are several highly effective ways to make your crochet slippers completely non-slip. You can apply small dots or lines of commercial puff paint, liquid silicone, or hot glue directly to the bottom of the finished soles and let it dry completely. Alternatively, you can sew pre-cut leather, suede, or non-slip fabric patches onto the soles for a very professional and durable finish.
How do I choose the correct size when working through a crochet slippers tutorial?
The most accurate method is to measure the actual foot length in centimeters or inches from the back of the heel to the tip of the longest toe. Because crochet fabric naturally stretches significantly with regular wear, it is always best to make your slippers about half an inch smaller than the actual foot measurement. This ensures that as the yarn relaxes over time, the footwear will still fit snugly without sliding off.
Can a total beginner successfully complete this footwear project?
Yes, absolutely. While constructing footwear might look intimidating at first glance, it is actually built using very basic stitches like the single crochet and half double crochet. As long as you understand how to count your stitches accurately and know how to do simple increases and decreases, you can easily complete a basic crochet slippers tutorial. Starting with thick, bulky yarn will also make the process much easier to visualize.
Why do my two finished slippers look completely different from one another?
This is an incredibly common issue that usually happens due to a natural change in your stitching tension. Your tension can vary depending on your mood, how tired you are, or even how tightly you are holding your hook. To prevent this from happening, it is highly recommended to crochet both pieces within a short time frame, using the exact same hook, and keeping a detailed written log of your row counts.
Conclusion
We hope you thoroughly enjoyed exploring this comprehensive crochet slippers tutorial and feel inspired to create your very own cozy footwear.
Throughout this article, we have covered all the vital steps necessary for success, including selecting durable yarn varieties, mastering foundational stitches, following a step-by-step assembly guide, and applying safe, non-slip finishes. By understanding these core principles, you can confidently craft beautiful, custom-fit footwear that offers the perfect blend of warmth, comfort, and personal style for yourself or your loved ones.