A Basic Crocheted Hat- Tutorial is the absolute perfect way to dive into the wonderful world of yarn crafts, offering a rewarding project that you can easily finish in just one afternoon. Whether you are looking to create a cozy accessory for yourself, craft a thoughtful handmade gift for a loved one, or generate engaging new content for your crafting website, mastering this fundamental skill is an essential milestone. The beauty of learning how to make a classic beanie lies in its incredible versatility, as the very same foundational steps can be adapted to fit anyone from a newborn baby to an adult.
When you dive into this comprehensive Basic Crocheted Hat- Tutorial, you will quickly discover that you do not need a massive vault of complex skills or expensive equipment to achieve a beautiful, professional-looking result. With just a single skein of your favorite yarn, a matching hook, and a little bit of patience, you can transform a simple strand of fiber into a stylish, functional winter essential. This particular guide is carefully structured to support stitchers of all backgrounds, ensuring that you feel completely confident and inspired from the very first loop to the final knot.
As we progress through every single stage of this Basic Crocheted Hat- Tutorial, we will explore the core materials, foundational techniques, and structural steps required to build a flawless hat from the crown downward. By focusing on clean stitch definitions, proper tension control, and consistent round increases, you will gain a deeper intuitive understanding of how crochet geometry works in the round. Grab your materials, settle into your favorite crafting chair, and let us explore the step-by-step process of creating a beautiful handmade masterpiece together.
1. Selecting the Perfect Materials for Your Basic Crocheted Hat
Choosing the proper yarn is the absolute first step to success when working through this Basic Crocheted Hat- Tutorial, as the weight and texture directly influence your final size. For absolute beginners, a worsted weight yarn (often classified as medium weight number four) is highly recommended because it is incredibly easy to see and handle. Opting for smooth, light-colored acrylic, wool, or a balanced blend will make tracking your stitches significantly simpler throughout the project.
Your choice of hook is just as vital as your fiber selection, and it should always complement the specific yarn thickness you have selected. A standard 5.0 mm (H-8) or 5.5 mm (I-9) aluminum crochet hook is generally the ideal companion for worsted weight yarn, allowing for smooth movements. Utilizing an ergonomic hook can also dramatically reduce hand fatigue, ensuring your crafting experience remains thoroughly enjoyable from start to finish.
In addition to your primary yarn and hook, you will want to gather a few essential notions to keep by your side while working. A reliable stitch marker is completely indispensable for tracking the exact beginning of each continuous round without losing your place. You will also need a sharp pair of scissors to trim your working yarn and a sturdy yarn needle to weave in your loose ends later.
Understanding how your material choices impact the overall drape and warmth of the finished beanie will give you complete creative control over your future projects. Acrylic fibers offer incredible durability and easy machine-washing, making them wonderful for everyday wear and busy families. On the other hand, natural wool provides superior insulation and breathability, which is excellent for freezing winter climates.
Before starting, always check the manufacturing label on your skein of yarn to verify the recommended hook sizes and care instructions. Ensuring that your tools match the industry standards prevents your stitches from becoming far too loose or frustratingly tight. Taking these few moments to prepare your workspace properly sets a strong foundation for an enjoyable, stress-free crafting session.
As you become more comfortable with the steps in this Basic Crocheted Hat- Tutorial, you can experiment with fun variegated colorways or self-striping cakes. However, for your very first attempt, sticking to a solid, vibrant color will help you visually master the anatomy of each stitch. Once your workspace is organized and your materials are neatly arranged, you are fully prepared to begin stitching.
2. Mastering the Foundation and Crown Increases
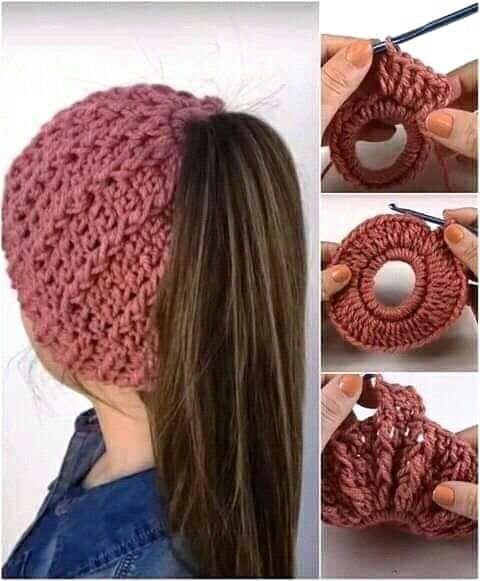
Every successful project built from this Basic Crocheted Hat- Tutorial starts at the very top of the crown and expands outward using structured mathematical increases. You can begin your circle by either forming a traditional slip knot and chaining four loops, or by utilizing the magic ring technique for a seamless finish. The magic ring is highly favored by modern makers because it allows you to pull the center completely closed, leaving zero gaps.
Once your initial ring is securely formed, you will work your very first round of stitches directly into the center of that loop. For a standard medium-sized adult beanie using double crochet stitches, starting with eleven or twelve stitches in the first round is standard practice. Secure the end of this introductory round by slip stitching into the top of your very first stitch, or use a marker for continuous rounds.
The second round requires you to place two complete stitches into every single stitch from the previous round, effectively doubling your total count. This deliberate doubling technique expands the diameter of your circle evenly, keeping the top of your cap perfectly flat rather than cone-shaped. Consistency in your tension during this specific stage is vital to ensuring a smooth, beautifully balanced crown.
For the third round, you will establish a rhythmic pattern by working one single stitch into the first space, followed by two stitches in the next. This alternating pattern of increases ensures the circle continues to expand at a mathematically perfect rate to prevent warping or buckling. Always remember to move your handy stitch marker up to the final stitch of every round to maintain a flawless count.
As you progress into the fourth and fifth rounds, the number of individual, non-increasing stitches between each double increase will naturally grow by one. For example, round four consists of two solitary stitches followed by an increase, while round five features three solitary stitches followed by an increase. You will continue expanding this flat circle until the diameter perfectly matches the required measurement for your target head size.
To determine if your crown is ready, simply lay the flat circle down on a hard surface and measure across the center with a tape measure. For an average adult head, you will generally want to stop increasing once the circle reaches approximately 6.5 to 7 inches in diameter. Achieving this precise measurement ensures that the body of your beanie will fit comfortably without feeling overly restrictive.
3. Stitching the Body and Achieving the Perfect Length
Once your crown has reached the ideal target diameter, the most relaxing and meditative portion of this Basic Crocheted Hat- Tutorial officially begins. From this point forward, you will completely stop adding any further increases and simply place a single stitch into every single space around. This sudden stabilization of the stitch count causes the flat circle to naturally curl downward, instantly forming the sides of your beanie.
Working the body of the beanie allows you to find a comfortable, soothing rhythm as you build row after row of uniform fabric. Because you are no longer counting complex increase intervals, this is the perfect time to enjoy your favorite music, watch a show, or chat with friends. It is still a wonderful habit to verify your total stitch count every few rows just to ensure you have not accidentally dropped a loop.
The overall depth of your headwear is entirely determined by the total number of straight, non-increasing rows you choose to complete during this stage. If you prefer a classic, snug-fitting beanie that sits right at the ears, you will complete fewer total rounds before finishing. If you are aiming for a trendy, modern slouchy look, you can simply keep adding rows until the fabric reaches your desired length.
As you work down the body, try to maintain a perfectly uniform tension so that the sides of your cap look smooth and professional. If you notice the fabric starting to flare outward or pull inward tightly, take a moment to evaluate your hook grip and physical posture. Consistent stitch height is the secret key to making a handmade accessory look like it came straight from a high-end boutique.
For a standard adult size, the total height from the very top of the crown to the bottom edge typically measures between 8 and 8.5 inches. You can easily test the fit as you go by slipping the unfastened piece directly onto your head or using a foam styling model. This ability to customize the project on the fly is one of the greatest benefits of learning via this Basic Crocheted Hat- Tutorial.
Once the main body reaches roughly half an inch before your final desired length, it is time to think about crafting a clean border. Leaving a tiny bit of room at the bottom allows you to add a supportive, structured edging that keeps the hat secure on the wearer. Prepare your mind for the final frame of the project as we approach the finishing border rows.
4. Crafting the Ribbed Border and Finishing Touches
The final phase of our Basic Crocheted Hat- Tutorial focuses on adding a beautiful, structural rim that provides essential elasticity and keeps the shape intact. While you can certainly finish your beanie with a simple row of single crochet, creating a textured ribbing offers a premium look. Utilizing alternating front post and back post double crochets is an exceptional way to mimic a classic knit look with your hook.
This flexible ribbing technique creates a stretchy, snug fabric that comfortably hugs the forehead, preventing the finished accessory from slipping out of place. Work this alternating pattern carefully for two to three rounds until your border reaches your ideal aesthetic width. This simple addition elevates the overall design, providing both functional wind protection and an elegant design element.
Once you are completely satisfied with the total length and style of your border, it is time to safely secure your hard work. Cut your working yarn, leaving a generous tail of at least six to eight inches to give yourself plenty of material for weaving. Pull the remaining tail completely through the final active loop on your hook and tug it firmly to create a secure knot.
Thread that leftover yarn tail onto your sturdy metal yarn needle to begin the clean process of weaving in your loose ends. Carefully guide the needle horizontally through the dense inside stitches of your border, switching directions at least three times to lock the fiber down. Weaving your ends securely ensures that your handmade creation can go through countless laundry cycles without ever coming unraveled.
Flip the hat over and repeat this exact weaving process with the starting yarn tail located right at the very center of your crown. If you used a magic ring to start, pull it completely tight one last time to close any remaining pinhole before anchoring the thread. Trimming these excess tails flush against the crochet fabric leaves you with a flawlessly clean, professional interior presentation.
To add an extra splash of personal style, you can optionally attach a fluffy faux-fur pom-pom or a custom leather tag to the crown. Your completed project is now entirely ready to be worn with pride, gifted to a special friend, or photographed for your digital craft catalog. Congratulations on mastering this timeless, versatile technique that you can use for many rewarding years to come!
Frequently Asked Questions (FAQ)
How many yards of yarn do I actually need to complete a basic beanie?
For a standard adult-sized beanie using worsted weight yarn, you will generally need between 150 to 200 yards of fiber. Most standard 100-gram skeins of acrylic or wool yarn contain plenty of yardage to complete one full hat with a bit of leftover material. If you plan to add a matching yarn pom-pom to the top, it is smart to have a second skein on hand just in case.
Can a total beginner finish this project without prior experience?
Absolutely! This project is widely considered the ultimate entry-point for beginner crafters because it introduces core concepts like working in the round and increasing. As long as you know how to make a slip knot, chain, and execute a double crochet stitch, you can successfully follow along. Taking your time and tracking your steps with a marker will ensure complete success.
Why is my crocheted hat turning out wavy instead of flat at the top?
If the crown of your hat is starting to look wavy or ruffled, it usually means you have added too many increase stitches too quickly for your tension. This can happen if you accidentally repeat an increase row or place extra stitches into a single space. To fix this, simply unravel your work back to the flat section and recount your stitches carefully.
How do I adjust this specific pattern to fit a small toddler or newborn?
To scale the size down for infants or children, you simply stop working increase rounds much earlier in the process. For a newborn, you might only work three increase rounds before moving directly to the straight body section. Measuring the crown diameter against a standard size chart will guide you to the perfect fit for any age group.
What is the advantage of starting with a magic ring versus a chain loop?
The magic ring allows you to pull the center opening completely closed by pulling on the short tail, leaving zero holes for cold air to pass through. Starting with a traditional chain loop often leaves a small permanent opening in the center of your crown. While both methods work, the magic ring delivers a much cleaner, more professional final look.
How should I wash and care for my completed handmade hat?
The proper cleaning method depends entirely on the specific fiber content listed on your original yarn label. If you used premium utility acrylic, your item can typically be machine washed on a gentle cycle and tumble dried on low heat. For natural animal fibers like wool, hand washing in cool water with a mild detergent and laying flat to dry is best.
Conclusion
In this Basic Crocheted Hat- Tutorial, we have covered every single necessary step to create a gorgeous, cozy beanie entirely from scratch. From selecting your medium worsted yarn and proper hook size to mastering crown increases and working the elastic ribbed border, you now possess the core skills required for endless future projects.
This foundational pattern is a stepping stone that opens the door to creating countless variations, styles, and custom color combinations.