There is something absolutely magical about transforming a simple skein of yarn into a beautiful, functional piece of art, and this Crochet Sunflower Bag – Tutorial is designed to help you do exactly that. Sunflowers have long been a symbol of joy, warmth, and longevity, making them the perfect motif for a vibrant, eye-catching accessory. Whether you are walking through a local farmers’ market, heading to a sunny beach, or just running everyday errands, a handmade bag covered in bright, cheerful blooms adds an instant touch of bohemian charm to any outfit.
If you have been searching for a rewarding project that combines utility with a gorgeous aesthetic, learning how to make a crochet sunflower bag is a fantastic choice. In this comprehensive guide, we will break down every single step of the process, ensuring that even intermediate beginners can follow along with ease and confidence. Crafting your own accessories allows you to control the quality, choose sustainable materials, and customize the colors to match your personal style perfectly, which is why this specific pattern has taken the crafting community by storm.
By the end of this post, you will understand exactly how to select the right yarn, construct the classic flower granny squares, assemble the pieces into a sturdy tote, and add finishing touches that ensure your bag lasts for years to come. We will dive deep into the specific techniques required to make your stitches pop, giving your flowers a beautiful, three-dimensional texture. Grab your favorite crochet hook, find a cozy spot with plenty of light, and let’s dive straight into our comprehensive Crochet Sunflower Bag – Tutorial.
1. Choosing the Perfect Materials for Your Crochet Sunflower Bag
Selecting the right yarn is the absolute foundation of a successful crochet sunflower bag project because it determines both the durability and the final look of your tote. For a bag that will hold its shape and carry your essentials without stretching out excessively, a 100% cotton yarn or a high-quality cotton blend is highly recommended. Cotton yarn provides excellent stitch definition, which makes the petals of your sunflower stand out beautifully while offering the structural integrity needed for daily wear and tear.
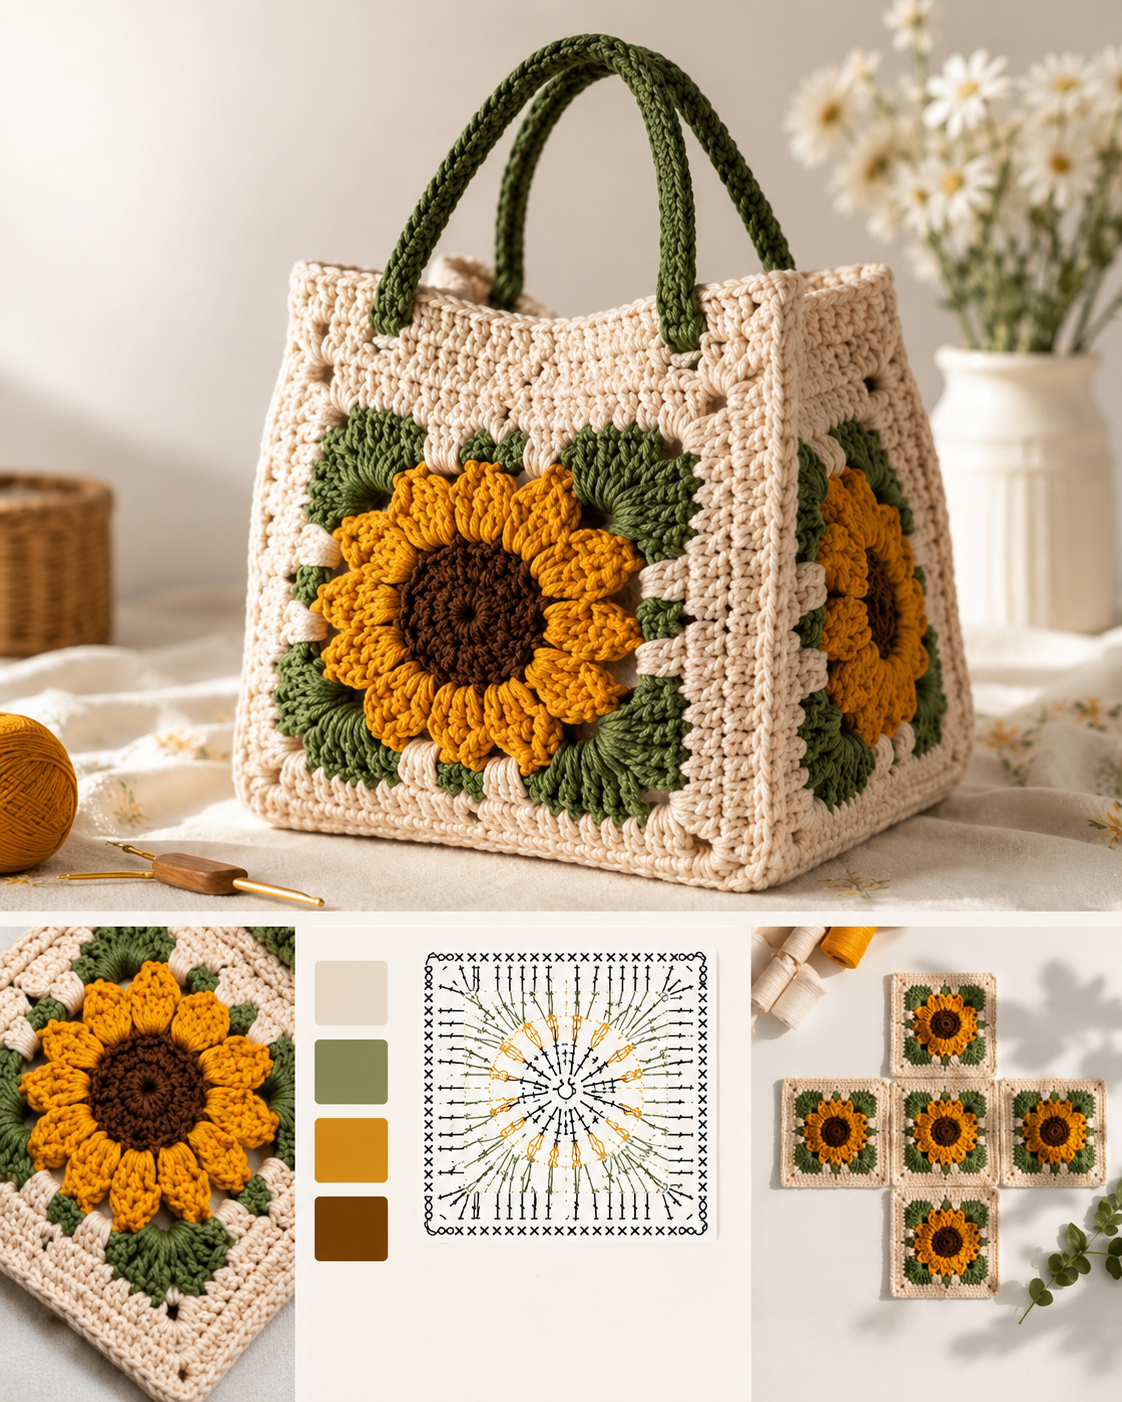
When it comes to colors, you will want to choose shades that mimic the natural beauty of a sun-drenched garden. A rich, deep dark brown or a textured bronze color works beautifully for the flower center, creating that classic contrast. For the vibrant petals, a bright mustard yellow, goldenrod, or soft pastel yellow will give your bag that iconic, cheerful look. Finally, you will need a solid background color to join the squares together, such as a creamy off-white, a sage green, or a stark black to make the yellow pop.
In addition to your yarn, you will need to pair it with the correct crochet hook size, typically ranging from a 3.5mm (E) to a 4.5mm (G) hook, depending on your personal tension. A slightly smaller hook than what the yarn label recommends can actually be beneficial for bags, as it creates tighter, more secure stitches that prevent small items from slipping through the gaps. You will also want to gather a few essential notions before you begin, including a sharp pair of scissors, a sturdy darning needle for weaving in ends, and a few stitch markers to keep track of your rounds.
If you want to take your accessory to the next level, you might also consider purchasing some fabric for a interior lining, though this is entirely optional. A simple cotton canvas or a fun floral print fabric can be sewn inside the bag to add an extra layer of protection and prevent the yarn from stretching when carrying heavier items like books or water bottles. Magnetic snaps or a high-quality zipper can also be integrated into the top border if you prefer a secure closure.
Planning your materials ahead of time ensures a smooth, uninterrupted crafting experience from start to finish. It is always a good idea to buy an extra skein of your background color just in case your tension is a bit looser than expected, as running out of yarn mid-project can be quite frustrating. Once you have all your beautiful skeins neatly organized and your tools laid out on your workspace, you are officially ready to begin the actual crocheting process.
Remember that the beauty of a handmade item lies in its customization, so do not be afraid to experiment with different color palettes if traditional yellow isn’t your favorite style. Some crafters love making moody autumn sunflowers with burnt orange petals, while others prefer whimsical, fantasy flowers using variegated neon yarns. Whatever you choose, ensure the yarn weights match across all colors so that your individual squares turn out perfectly uniform in size.
2. Master the Sunflower Granny Square Step by Step
The heart and soul of this Crochet Sunflower Bag – Tutorial lies in mastering the individual floral blocks, which are modified versions of the classic granny square. To begin, you will start by creating the dark center of the flower using your brown yarn, typically working in a magic ring or a small chain loop. The first round usually consists of a series of double crochet or half double crochet stitches worked directly into the ring to form a neat, solid circle that represents the seed head of the sunflower.
For the second round, you will often switch to a puff stitch, cluster stitch, or popcorn stitch using the same brown yarn or a secondary transition shade to give the center a realistic, bumpy texture. This textured round is crucial because it lifts the center of the flower off the background, creating a gorgeous 3-dimensional effect that looks highly professional. Once this round is complete, you will fasten off the brown yarn and securely weave in your loose ends before moving on to the bright petals.
Next, you will attach your vibrant yellow yarn into any space between the stitches of the previous round to begin crafting the iconic sunflower petals. The most popular technique for these petals is the classic puff stitch or a elongated bobble stitch, which tapers beautifully to create a pointed flower shape. Each petal is separated by a chain stitch, allowing the flower to expand evenly without buckling or curling upward at the edges.
Once your beautiful circular sunflower is fully formed, it is time to transform it into a square shape by introducing your background color. You will attach the background yarn to any chain space around the outer edge of the flower and use a combination of different stitch heights to level out the circle. By placing tall treble crochets in the corners and shorter double or half double crochets along the sides, you magically square off the circle.
As you work your way around the square, you will create distinct chain spaces in the four corners, which establishes the classic granny square blueprint. Working one or two additional rounds of standard double crochet clusters around this base will enlarge the square to your desired size and provide a clean border for joining later. It is highly recommended to block your finished squares using a blocking board or pins and steam to ensure they are all exactly the same dimensions.
For a standard-sized tote bag, you will typically need to crochet anywhere from 13 to 15 of these individual sunflower squares, depending on the specific layout design you choose to follow. Take your time with this phase of the project, treating each square as a mini-masterpiece, and enjoy watching your pile of sunny blossoms grow. Consistency in your stitch tension throughout this stage is the ultimate secret to achieving a perfectly symmetrical, well-balanced final bag.
3. Assembling Your Squares Into a Sturdy Tote Structure
Once all your gorgeous floral blocks are completed and blocked to perfection, the next exciting phase of our Crochet Sunflower Bag – Tutorial is the assembly process. Lay out your squares on a flat surface to determine the exact orientation and layout of your bag, ensuring that all the flowers are facing outward in the correct direction. The most popular layout for a modern, slouchy market bag utilizes 13 squares arranged in a specific grid that folds up into a beautiful 3D tote shape.
There are several methods you can use to join your crochet squares together, depending on the specific look and texture you want to achieve for your accessory. The whipstitch method, done with a darning needle and a long strand of your background yarn, creates a flat, almost invisible seam that keeps the focus entirely on the flowers. Alternatively, you can use a slip stitch join or a single crochet join on the right side of the fabric to create a raised, decorative ridge that frames each square beautifully.
If you prefer a completely seamless look without picking up a sewing needle, you can actually utilize the “join-as-you-go” method during the very last round of each square. This advanced technique connects the current square to the neighboring squares using slip stitches into the corners and sides as you crochet, eliminating the need for extensive assembly at the end. Whichever method you choose, make sure to keep your joining tension consistent so the seams do not pull tightly or distort the shape of the bag.
As you join the squares according to your layout diagram, you will begin to see the flat grid transform into a deep, spacious bag with a unique pointed top edge. Take extra care when reinforcing the interior corners where multiple squares meet, as these points will experience the most stress and pulling when the bag is filled with your items. A few extra stitches at these intersection points can dramatically increase the overall lifespan of your handmade tote.
After all the main body squares are securely connected, it is time to work a cohesive border around the entire top opening of the bag. Attach your background yarn to the top edge and work several rounds of single crochet or half double crochet stitches all the way around the perimeter. This top border ties the entire design together visually, smooths out any uneven edges from the assembly process, and creates a rock-solid foundation for attaching your handles.
During this border stage, you can also decrease slightly at the valleys between the squares and increase at the peaks to create a perfectly straight top edge if you prefer a classic rectangular tote look. However, leaving the natural zig-zag peaks intact gives the bag an incredibly trendy, modern origami-inspired aesthetic that is highly popular on social media. Once the body is fully assembled and bordered, pause to admire your progress before moving on to the final details.
4. Crafting Comfortable Handles and Adding Professional Finishing Touches
No crochet sunflower bag is complete without a pair of comfortable, sturdy handles or a long crossbody strap that allows you to carry your new creation with absolute ease. To make matching crochet straps, you can attach your yarn directly to the top peaks of the bag and work rows of thick, compact stitches like the Romanian point lace cord or simple rows of single crochet. To prevent the straps from stretching out over time under the weight of your belongings, consider crocheting over a piece of cotton cording or ribbon.
If you prefer a mixed-media look that gives your handmade bag a high-end boutique feel, you can opt for pre-made leather, faux-leather, or wooden handles instead of yarn. These can be easily sewn onto the top border using strong nylon thread or attached using stylish metal split rings and rivet fasteners. Choosing contrasting dark leather straps can elevate the entire aesthetic of the bag, making it look like a designer piece while still retaining its cozy, handmade soul.
For those who want maximum functionality and longevity, adding a fabric lining to the interior of your bag is the ultimate professional upgrade. You do not need an advanced sewing machine to do this; a simple hand-sewn liner made from a cotton fat quarter can be easily stitched into place just below the top crochet border. This simple addition completely prevents small items like keys, pens, or lip balms from poking through your beautiful crochet stitches and falling out.
Before you officially declare your project finished, it is time for the final cleaning and detailing phase, which truly separates amateur projects from professional-grade items. Grab your darning needle one last time and meticulously weave in every single loose yarn tail from your square changes, ensuring they are knotted securely hidden inside the stitches. A drop of fabric glue on the final knots can provide extra peace of mind, especially if you plan to wash the bag frequently.
Give your assembled bag a gentle final block or a light steam treatment to relax the joining seams and allow the squares to settle into their permanent shape beautifully. If you love personalization, this is the perfect moment to sew a custom cork or leather garment label onto the front border, showcasing your brand or initials. Your stunning, vibrant accessory is now completely finished and ready to hit the streets, turn heads, and collect endless compliments.
Remember to care for your new handmade accessory properly by hand washing it in cool water with a mild detergent whenever it gets dirty, and always laying it flat to dry. Avoid hanging the wet bag by its straps, as the weight of the water can permanently stretch the fibers out of shape. With proper love and care, your gorgeous sunflower tote will remain bright, sturdy, and beautiful for many sunny seasons to come.
Frequently Asked Questions (FAQ)
How many individual squares do I need to make for a standard crochet sunflower bag?
For the most popular slouchy tote design, you will need to crochet exactly 13 sunflower granny squares. Some larger tote variations or rectangular designs may require 15 to 18 squares to achieve extra depth and a wider opening.
What is the best yarn type to use for this project so it doesn’t stretch out?
A 100% cotton yarn in a medium/worsted weight (4) is highly recommended for bags because cotton fibers do not stretch nearly as much as acrylic or wool. It provides excellent structure, crisp stitch definition, and can be washed easily without losing its shape.
Can a total beginner successfully complete this sunflower bag tutorial?
Yes, absolutely! While it involves a few special stitches like the puff or bobble stitch, the project is broken down into small, manageable squares. If you know the basic stitches like single and double crochet, you can easily master the squares with a little patience.
Is it absolutely necessary to add a fabric lining to the inside of the bag?
While a lining is not mandatory, it is highly recommended if you plan to use the bag for heavy items or daily commutes. The lining adds structural support, prevents the crochet fabric from sagging over time, and stops tiny objects from slipping through the gaps between stitches.
How do I wash and maintain my handmade sunflower tote bag?
To keep the colors bright and prevent fuzzing, it is best to hand wash your bag in cold water with a gentle fabric soap. Gently squeeze out the excess water without wringing or twisting the yarn, reshape the bag, and lay it flat on a clean towel to air dry completely.
Conclusion
In this Crochet Sunflower Bag – Tutorial, we have explored everything from selecting the ultimate durable cotton yarn to mastering the textured, three-dimensional sunflower granny squares, assembling the pieces seamlessly, and adding those gorgeous final straps.
Creating this bag is not just a wonderful way to practice your stitching skills, but it also leaves you with a stunning, practical accessory that channels endless summer vibes wherever you go.