If you are looking for a comprehensive Soft Baby Shoes – Tutorial, you have come to the right place to learn how to craft the perfect footwear for tiny feet. Creating handmade baby shoes is not only a delightful and rewarding DIY project, but it also ensures that your little one wears something incredibly comfortable, breathable, and safe. Many commercial shoes are too rigid for developing feet, which is why learning how to make soft-soled baby shoes has become such a popular trend among parents and crafters alike.
In this detailed Soft Baby Shoes – Tutorial, we will walk you through every single step of the process, from selecting the finest baby-safe fabrics to mastering the final stitches. You do not need to be an expert tailor to succeed with this sewing project; all it takes is a bit of patience, the right materials, and a love for creating beautiful, functional items. By making these yourself, you can customize the colors, patterns, and textures to match any outfit perfectly.
Before we dive into the actual crafting process, it is important to understand why soft baby shoes are highly recommended by pediatricians worldwide. During the first months of life, a baby’s feet are mostly made of soft cartilage, and wearing stiff footwear can hinder natural foot development and balance. This guide is designed to help you create a pair of flexible baby slippers that mimic barefoot walking while providing excellent protection against cold floors and rough surfaces.
1. Choosing the Right Materials for Soft Baby Shoes
When preparing to follow this Soft Baby Shoes – Tutorial, the first and most crucial step is selecting your textiles. Because a baby’s skin is incredibly sensitive, you must always prioritize organic cotton fabric, soft flannel, or genuine flexible leather for your project. These materials allow the feet to breathe easily, preventing sweat buildup and irritation throughout the day.
For the interior lining, we highly recommend using premium hypoallergenic fleece or a soft bamboo jersey blend. These fabrics provide a cozy, cushioned environment for the tiny toes while keeping them warm during colder seasons. Avoid any synthetic materials that feel rough to the touch or contain harsh chemical dyes that could irritate your infant.
The sole of the shoe requires special attention because it provides the grip your little one needs when finding their balance. For non-walking infants, a simple layer of soft cotton canvas or faux suede works beautifully to maintain maximum flexibility. If your baby is already cruising or taking their first steps, consider using a specialized non-slip grip fabric for safety.
You will also need high-quality elastic bands to ensure the shoes stay securely on those wiggly little feet without cutting off circulation. A standard 1/4-inch braided elastic is usually the perfect size for creating an adjustable, snug fit around the ankle area. Make sure to test the stretchiness before cutting it to your desired length.
Additionally, gather your basic sewing tools, which include heavy-duty fabric shears, a reliable sewing machine, matching polyester threads, and plenty of sewing pins or quilting clips. Having everything organized beforehand will make your crafting experience much smoother and more enjoyable. Using a universal or leather-specific needle on your machine will also prevent skipped stitches.
Lastly, consider pre-washing all your chosen fabrics before cutting out your shapes to prevent any unexpected shrinkage later on. Since handmade baby shoes will inevitably need to be washed after a day of playtime, pre-shrinking the fabric ensures the finished product maintains its perfect shape and size after every wash cycle.
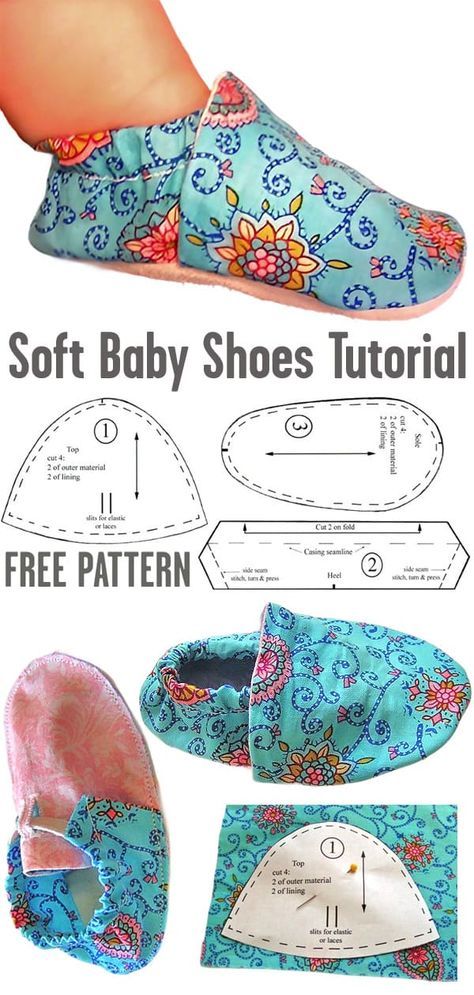
2. Preparing Your Pattern and Cutting the Fabric
The next phase of our Soft Baby Shoes – Tutorial involves downloading or drawing an accurate baby shoe pattern that matches your child’s current foot measurements. To find the ideal size, gently measure the bottom of your baby’s foot from the heel to the tip of the longest toe, then add about half an inch for seam allowances and growth.
Once you have your paper pattern ready, carefully press your fabrics with an iron to eliminate any wrinkles or folds that could distort your cuts. Lay your chosen outer fabric, lining material, and sole fabric flat on your cutting mat. It is always a good idea to double-check the grainline of the textile to ensure maximum structural integrity.
Pin your paper template securely to the fabric layers to prevent any slipping while you operate your shears. For each individual shoe, you will typically need to cut one sole piece from the outer grip material, one sole piece from the comfortable inner lining, and two upper foot pieces. Repeat this exact process for the opposite foot, ensuring you mirror the pattern pieces.
Precision is absolutely vital during this cutting phase because even a tiny variance of a quarter-inch can significantly alter how the soft-soled baby shoes fit on a newborn’s foot. Take your time using sharp fabric scissors, or utilize a rotary cutter for incredibly smooth, fray-free edges along the curves.
After successfully cutting all your essential pieces, group them into two separate piles—one pile for the left shoe and one for the right shoe. This simple organizational trick prevents you from accidentally sewing two left feet together, which is a surprisingly common mistake for beginners. Mark your elastic insertion points lightly with a water-soluble fabric marker.
Now that your pieces are perfectly shaped and organized, you are fully prepared to transition from preparation to assembly. Your workspace should now hold two outer soles, two inner linings, and the corresponding upper pieces, along with your measured strips of flexible elastic.
3. Step-by-Step Assembly and Sewing Instructions
Now we reach the core of our Soft Baby Shoes – Tutorial, where your cut pieces finally transform into an adorable pair of footwear. Start by taking your upper fabric pieces and folding the straight ankle edge over by about half an inch to create a clean casing for the ankle elastic. Pin this fold securely in place.
Take your sewing machine and stitch close to the raw edge of this fold, leaving a small opening at both ends to thread the elastic through later. This channel must be wide enough for your safety pin to glide through easily. Repeat this exact step for both the left and right upper shoe components.
Attach a small safety pin to one end of your flexible elastic strip and gently thread it completely through the newly created ankle casing. Once the elastic emerges from the opposite side, secure both loose ends to the outer edges of the fabric using a temporary baste stitch, keeping the fabric gathered beautifully.
Next, place the outer upper piece and the outer sole piece together with their right sides facing each other, matching the center front and center heel marks carefully. Use plenty of quilting clips to hold these curved edges flush against one another, as curves can easily shift during machine operation.
Carefully stitch around the entire perimeter of the sole using a standard quarter-inch seam allowance, moving slowly around the tight curves of the toe and heel. Once the outer shell is securely attached, repeat this exact process with your interior lining pieces, but remember to leave a two-inch opening along the side of the lining.
This clever opening will allow you to turn the entire shoe right side out once everything is fully assembled. After sewing the lining, insert the outer shoe shell inside the lining shell so their right sides are touching, stitch around the top ankle opening, and then carefully pull the entire shoe through the gap you left open.
4. Final Touches and Quality Safety Checks
The final stage of this Soft Baby Shoes – Tutorial focuses on finishing details, aesthetic presentation, and essential safety verifications before use. Use a blunt tool, like a chopstick or a turning tool, to gently push out all the curved seams from the inside, ensuring the toe and heel areas are perfectly rounded.
Locate the two-inch opening inside the lining fabric that you used to turn the footwear right side out. Tuck the raw edges neatly inward by a quarter-inch, press them flat with your fingers, and use a neat invisible hand stitch or a very close machine topstitch to seal the opening completely shut.
Push the completed lining down into the shoe, smoothing out any internal bunches with your fingers so that the footbed lies completely flat and comfortable. Give the finished handmade baby shoes a thorough press with your steam iron to set the seams beautifully and give them a professional, polished appearance.
Inspect the interior carefully with your fingers to ensure there are no exposed rough edges, loose threads, or forgotten pins that could scratch a child’s sensitive skin. The interior must feel completely smooth and cushioned, offering a luxurious environment for developing feet.
Gently tug on the elastic casing to ensure it stretches smoothly and snaps back into place without any popping sounds from the thread. Proper elasticity is what keeps these breathable baby slippers from falling off when your infant kicks their legs or crawls around the living room floor.
Congratulations, you have successfully completed your crafting journey! You now possess a beautiful, custom-made pair of soft-soled baby shoes that combine style, comfort, and healthy foot development. You can now replicate this process using different colors, prints, and textures to expand your collection or create unforgettable gifts for baby showers.
Frequently Asked Questions (FAQ)
What is the best fabric to use for newborn baby shoes?
The ideal fabrics for newborns are natural, breathable, and soft materials such as organic cotton, bamboo jersey, flannel, and genuine soft leather. These materials protect delicate skin and allow proper air circulation.
Can I wash handmade soft baby shoes in a washing machine?
Yes, if you made the shoes using cotton, flannel, or canvas fabrics, you can easily wash them on a gentle cycle with mild detergent. However, if you used real leather or suede, it is best to spot-clean them with a damp cloth to avoid ruining the texture.
How tight should the ankle elastic be?
The elastic should be snug enough to keep the shoe secure on the foot during movement, but loose enough that it doesn’t leave red marks on your baby’s skin. A good rule of thumb is to ensure you can comfortably slip your pinky finger under the elastic while the shoe is being worn.
Are soft-soled shoes good for babies who are learning to walk?
Absolutely. Pediatricians and podiatrists widely recommend soft-soled footwear for early walkers because it allows their toes to grip the floor naturally, which strengthens foot muscles and improves overall balance.
How long does it take to complete this DIY project?
For a beginner, the entire process—including measuring, cutting, and sewing—takes roughly one to two hours. Once you become familiar with the steps and pattern layout, you can easily complete a pair in under 45 minutes.
Conclusion
In this comprehensive guide, we explored everything necessary to create beautiful, comfortable, and safe footwear through our Soft Baby Shoes – Tutorial.
We covered the selection of premium baby-safe fabrics, the precision required during the pattern cutting phase, the step-by-step machine assembly, and the final safety checks to protect your little one’s feet. This project is a wonderful way to express your creativity while providing practical comfort for a developing child.