Crochet Sunflowers – Tutorial: Bringing the warmth of summer into your home has never been easier than with this beautiful, cheerful project. Sunflowers are an absolute staple in the crafting world, symbolizing adoration, loyalty, and longevity, which makes them the perfect subject for your next handmade masterpiece. Whether you are looking to brighten up a dreary corner of your living room, create a stunning bouquet for a loved one, or simply challenge your crafting skills, this comprehensive guide will walk you through every step of the process with ease and joy.
When you dive into a Crochet Sunflowers – Tutorial, you are not just learning how to manipulate yarn; you are embarking on a creative journey that transforms simple fibers into a vibrant, everlasting blossom. The rich texture of the dark center paired with the brilliant, overlapping yellow petals creates a striking visual contrast that mimics nature perfectly. This project is incredibly versatile, allowing you to use the finished flowers as standalone decor, appliques for blankets and bags, or even structural pieces mounted on floral wire stems.
As we explore this detailed guide together, you will find that breaking down the anatomy of a flower into simple stitches makes the entire process incredibly approachable. We will look at the best materials to use, the exact stitch sequences required, and expert tips to ensure your petals pop with realistic volume. Grab your favorite hook, select your most vibrant skeins of yarn, and let us begin crafting a beautiful piece of sunshine that will never fade.
1. Choosing the Perfect Materials for Your Crochet Sunflowers – Tutorial
Selecting the right yarn weight and composition is the foundational step for achieving a stunning, professional-looking finish. For this Crochet Sunflowers – Tutorial, a medium-weight cotton or acrylic yarn (worsted weight or aran) is highly recommended because it provides the structure and stitch definition needed to keep the petals from sagging. Cotton yarn is particularly excellent for home decor items as it offers a matte finish and holds its shape beautifully over time.
Color selection plays a massive role in making your project instantly recognizable and visually striking. You will need a rich, deep dark brown or espresso shade for the textured center, a vibrant golden yellow or mustard hue for the radiant petals, and a leafy forest green for the stem and backing. Choosing shades with depth—such as a slightly variegated brown or a warm, sun-kissed yellow—can add a lovely dimension to your finished flower.
Equally important is matching your yarn with the correct crochet hook size to ensure your tension creates a firm fabric. A hook size ranging from 3.5mm (E) to 4.5mm (G) is generally ideal for worsted weight yarn when making amigurumi or structured floral pieces. A slightly smaller hook than what the yarn label suggests will help keep your stitches tight, ensuring that any stuffing or structural wire remains hidden inside.
Do not forget the essential notions that make the assembly process smooth, organized, and stress-free. A sharp pair of yarn needles with a large eye is absolutely crucial for weaving in those unavoidable loose ends and sewing the components together securely. Stitch markers will also be your best friend when working the center circle in continuous rounds, helping you track your progress without losing count.
If you plan to display your work in a vase, you will also want to gather some sturdy floral wire or wooden skewers to act as the stem. Floral tape is fantastic for wrapping the wire and securing the green yarn to create a seamless look from the base of the flower down to the bottom of the stem. A small amount of polyester fiberfill stuffing can also be used if you prefer a plump, three-dimensional center.
Taking the time to organize your workspace and gather quality materials beforehand ensures a smooth, uninterrupted crafting experience. When you have everything neatly laid out, you can focus entirely on the rhythm of your stitches and enjoy the creative process. Now that your project bag is packed with the perfect supplies, you are fully prepared to move on to the actual construction of the flower.
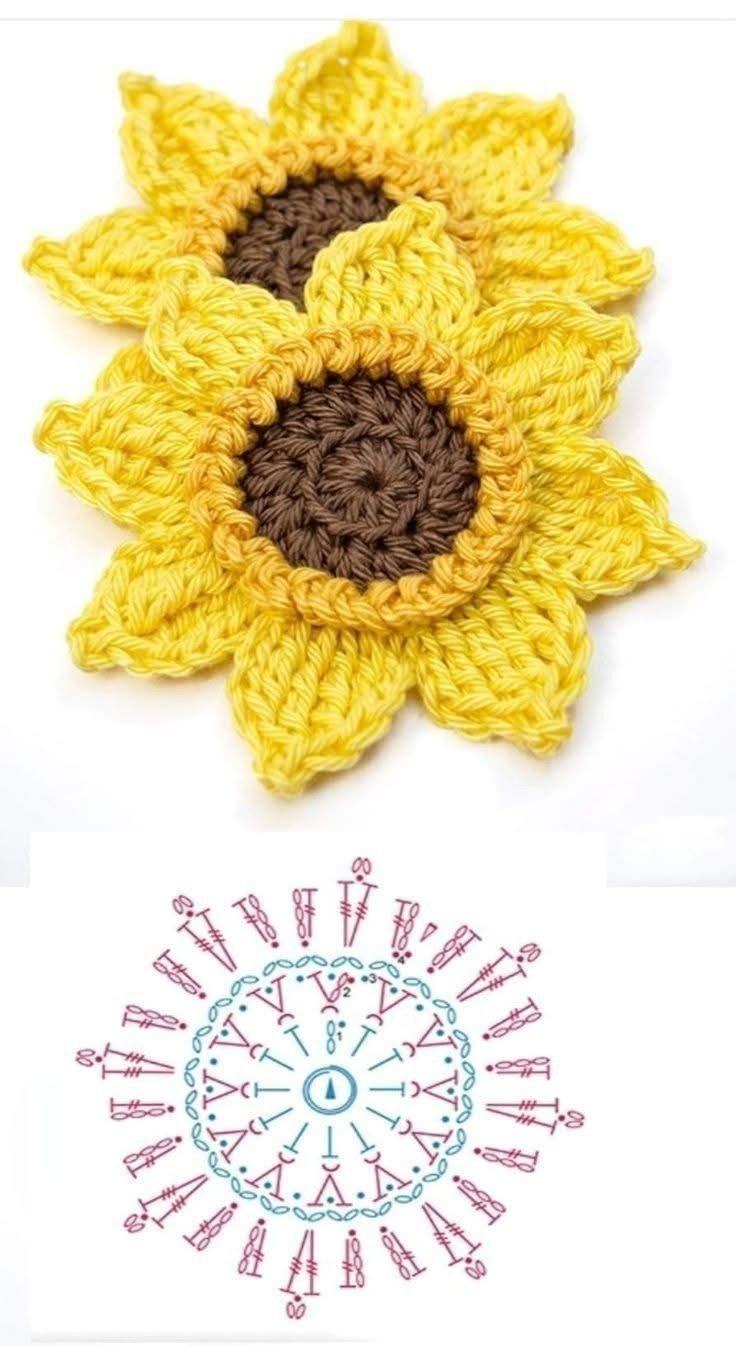
2. Crafting the Textured Center Seed Pad
The journey of our Crochet Sunflowers – Tutorial truly begins in the heart of the flower with the dark, textured center seed pad. To start, you will create a magic ring (or magic circle) using your dark brown yarn, which allows you to pull the center completely closed without leaving an unsightly hole. If you struggle with the magic ring, chaining four and slipping stitching into the first chain to form a loop works as a great alternative.
Inside your magic ring, you will work six single crochet stitches, which serves as the perfect base round for a flat, expanding circle. Secure the ring tightly, and instead of joining with a slip stitch, you can work in continuous spirals to avoid a visible seam running up your center piece. This technique gives the seed pad a clean, professional look that perfectly mimics the natural patterns found in real sunflowers.
For the second round, you will increase your stitch count by working two single crochets into every stitch from the previous round, bringing your total to twelve stitches. To create that iconic, bumpy texture that resembles real seeds, you can alternate standard stitches with bobble stitches or popcorn stitches in the subsequent rounds. This adds a beautiful tactile dimension that elevates the project from a simple flat disk to a realistic work of art.
As you expand the circle in round three, you will follow a standard increase pattern: work one single crochet in the first stitch, then two single crochets in the next, repeating this sequence all the way around to reach eighteen stitches. Maintaining a consistent increase formula ensures your circle remains completely flat and does not begin to cup or ripple as it grows larger.
Continue increasing systematically in each round—adding one more regular stitch between increases—until your dark brown center reaches your desired diameter. For a medium-sized flower, stopping around thirty-six or forty-eight stitches usually provides the perfect canvas for attaching the vibrant petals. Once you reach the final round of the center, fasten off your brown yarn, leaving a long tail for sewing later.
To give the flower stability, it is highly recommended to crochet a second identical circle using your forest green yarn to serve as the back piece. This green backing hides all the messy yarn tails inside the flower and provides a clean attachment point for your stem. Having both the brown front and the green back ready sets the stage for the most exciting part of the project: the bright yellow petals.
3. Stitching the Radiant Golden Petals
With the textured center complete, it is time to bring this Crochet Sunflowers – Tutorial to life by attaching the brilliant golden yellow yarn. Join your yellow yarn to any front loop of the outer round of your brown circle using a simple slip stitch. Working in the front loops only leaves the back loops available for attaching the green backing later, resulting in a neat construction.
To form the first petal, you will chain up five or six stitches, which determines the length and drama of your sunflower’s beautiful rays. Working back down the chain, you will create a gradual taper by placing a slip stitch in the second chain from the hook, followed by a single crochet, a half double crochet, and a double crochet in the remaining chains. This clever combination of stitch heights creates a perfectly pointed, natural leaf shape.
Once you reach the base of the chain, anchor the petal to the main circle by slip stitching into the very next stitch of the brown round. To create a dense, lush appearance, you can immediately begin your next chain sequence in that same stitch or move one stitch over. Repeating this process all the way around the circle will reward you with a spectacular ring of vibrant, pointed petals.
To make your flower look even more realistic and full, you can create a second layered row of petals working in the rounds just behind the first row. By offsetting the second layer so the back petals peek out between the front ones, you achieve a gorgeous, dimensional depth. This simple design choice makes a massive difference, giving your project a high-quality, boutique-style aesthetic.
As you work your way around, maintain a relaxed but consistent tension so that every single petal turns out uniform in size and shape. If your petals begin to curl excessively, it may mean your chains are too tight, so try using a slightly looser hand or a larger hook for this section. Enjoy the rhythm of building the bright border, watching your project transform into a miniature sun.
When you complete the final petal, slip stitch into the starting point to close the round, fasten off your yarn, and weave in the ends carefully. Take a moment to gently pull and shape each petal with your fingers, stretching the stitches slightly to maximize their pointed tips. Your stunning flower head is now fully formed and ready for the final assembly and structural steps.
4. Assembly, Stem Attachment, and Display Ideas
The final phase of our Crochet Sunflowers – Tutorial focuses on assembly, adding structural integrity, and exploring creative ways to showcase your finished piece. If you want a sturdy stem for a bouquet, take your floral wire and create a small hook or loop at one end using pliers. This loop prevents the wire from slipping through the fabric, keeping your flower securely attached to its stem.
Insert the straight end of the wire through the center of the green backing circle from the inside out, so the hooked end rests flat against the fabric. Secure the wire further by wrapping it with strong craft glue or hot glue, then begin wrapping green yarn tightly down the length of the wire to create a smooth, natural-looking stem. This step adds immense professionalism to your work, hiding the bare metal completely.
Now, place your textured brown center and your green backing circle wrong-sides together, ensuring the stem wire extends outward from the bottom. Using a yarn needle and a length of green or brown yarn, stitch the two pieces together through the remaining unworked loops of the outer rounds. Before sealing the circle completely, add a small pinch of fiberfill stuffing if you want a plump, pillowy flower head.
Once the sewing is complete, secure your yarn with a hidden knot, pull the tail inside the flower, and snip the excess close to the fabric. If you want to add extra realism, you can crochet a couple of simple green leaves using standard basic stitches and attach them directly to the wrapped stem. Your gorgeous, handmade creation is now structurally sound and ready to brighten up any environment.
There are countless ways to style and display your beautiful new creation around your home or give it as a meaningful gift. Arrange a collection of three or five stems inside a rustic mason jar or a ceramic vase for an instant, maintenance-free centerpiece. Alternatively, you can omit the wire stem entirely and sew the flower heads onto throw pillows, tote bags, or cozy winter blankets.
These beautiful creations also make incredible gifts for teachers, friends, or family members celebrating a housewarming, birthday, or graduation. Because they never wither or require watering, they serve as a lasting reminder of your care, creativity, and handiwork. Every time someone looks at the bright yellow petals, they will feel the warmth and cheer that you stitched into every single row.
Frequently Asked Questions
What is the best yarn for making a crochet sunflower?
The absolute best yarn for this project is a 100% cotton yarn in a worsted or sport weight. Cotton provides incredible stitch definition, holds its shape perfectly without sagging, and offers a beautiful matte texture that complements floral designs. However, high-quality acrylic yarn is also an excellent, budget-friendly alternative that works wonderfully.
How do I prevent my sunflower petals from curling too much?
Petal curling is usually caused by tight tension when crocheting the initial chain spaces. To fix this, try consciously loosening your tension when making the chains, or use a hook that is half a millimeter larger just for the petal sections. Gently blocking your finished flower with a bit of steam can also help flatten out stubborn petals.
Can a complete beginner successfully complete this project?
Yes, absolutely! While the project looks intricate and advanced, it is entirely made up of foundational stitches such as the chain, single crochet, half double crochet, and double crochet. By following a step-by-step guide and mastering the magic ring, a beginner with a little patience can easily create a beautiful flower.
How can I make the center look more like real seeds?
To achieve a highly realistic look, you can incorporate texture-rich stitches like the bobble stitch, puff stitch, or popcorn stitch into the dark brown center rounds. Alternating a textured stitch with a standard single crochet creates an amazing three-dimensional surface that mimics natural sunflower seeds beautifully.
Conclusion
In this Crochet Sunflowers – Tutorial, we have covered every single detail necessary to create a spectacular, sun-kissed floral masterpiece from scratch. We explored the ideal selection of sturdy cotton yarns and hooks, mastered the textured increases of the dark brown center pad, stitched radiant golden petals, and assembled a durable stem for a beautiful display.
This project is a wonderful way to practice tension control, shaping, and layered construction, resulting in a timeless piece of decor that brings joy to any room.