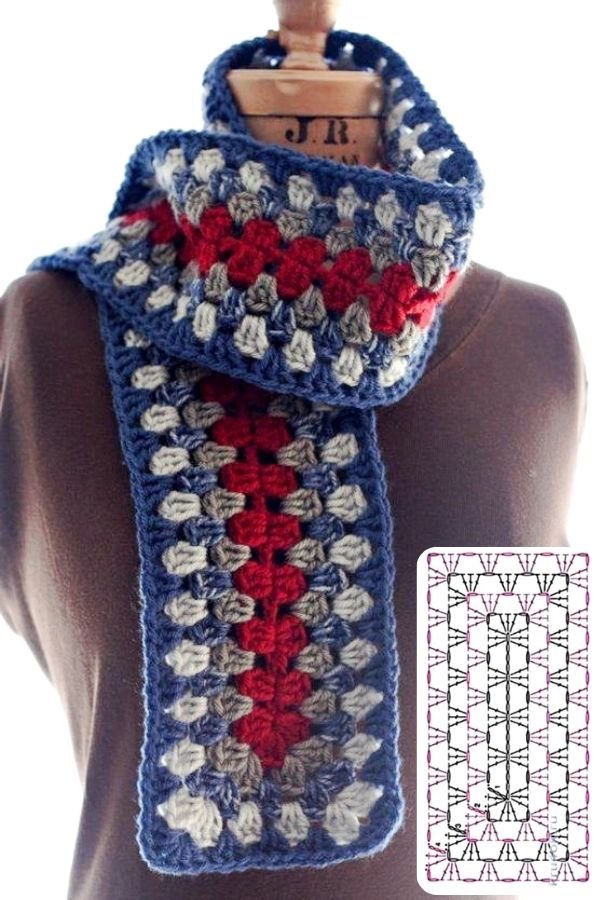
Granny Stripe Scarf em crochet – Pattern is one of the most beloved projects for beginners and experienced crafters alike, offering a timeless aesthetic that combines vintage charm with modern versatility. This specific style utilizes the classic “granny” stitch—a series of three double crochet clusters—to create a rhythmic and colorful fabric that is as warm as it is beautiful. By following a Granny Stripe Scarf em crochet – Pattern, you can transform simple yarn remnants into a stunning fashion statement, making it a perfect project for those who enjoy “stash-busting” or experimenting with bold, vibrant color palettes.
The appeal of the Granny Stripe Scarf em crochet – Pattern lies in its simplicity and the meditative nature of its construction. Unlike complex lace patterns that require constant counting, the granny stripe follows a predictable logic that allows you to relax while your hands do the work. This makes it an ideal companion for a quiet afternoon of crafting or while catching up on your favorite series. Furthermore, the crochet pattern is easily adjustable, meaning you can create a narrow, delicate scarf or a wide, chunky wrap simply by altering your starting chain and row count.
In this comprehensive guide, we will delve into the technical nuances of the Granny Stripe Scarf em crochet – Pattern, providing you with the knowledge to select the best materials and master the assembly. We will explore how to achieve straight edges, how to change colors seamlessly, and how to add the final touches that make your handmade scarf look professional. Whether you are making this for yourself or as a thoughtful gift, mastering the Granny Stripe Scarf em crochet – Pattern is an essential milestone in every crocheter’s journey, blending tradition with a splash of personal creativity.
1. Choosing the Perfect Yarn and Tools for Your Granny Stripe Scarf em crochet – Pattern
The first step in any successful Granny Stripe Scarf em crochet – Pattern is selecting the right yarn. For a classic, soft feel, a worsted weight acrylic or wool blend is often the best choice because it provides great stitch definition and is durable enough for daily wear. If you are aiming for a more luxurious, winter version of the crochet scarf, consider using alpaca or mohair blends, which add a beautiful “halo” effect to the granny clusters.
Your choice of crochet hook will directly impact the drape of the finished Granny Stripe Scarf em crochet – Pattern. Usually, a 5.0mm (H) or 5.5mm (I) hook works best with worsted yarn. If you want a stiffer, more structured scarf, go down a size; if you prefer a scarf that flows and wraps easily around the neck, use a larger hook to create looser, airier stitches within the pattern structure.
Color selection is where the Granny Stripe Scarf em crochet – Pattern truly shines. You can opt for a “scrappy” look by changing colors every row, or a more sophisticated “ombre” effect by using different shades of the same color family. Many crafters choose a neutral “anchor” color, such as cream or grey, and alternate it with bright pops of color to give the crochet pattern a balanced and modern appearance.
Don’t forget the importance of stitch markers and a high-quality tapestry needle. In a Granny Stripe Scarf em crochet – Pattern, keeping your edges straight can be a challenge for beginners, and marking the first stitch of each row ensures you don’t accidentally decrease your width. A sharp needle is essential for weaving in the many ends that come with a multi-colored crochet project, ensuring your scarf remains secure and neat.
When preparing to start your Granny Stripe Scarf em crochet – Pattern, it is also wise to consider the “yardage.” Depending on how long you want your scarf to be, you will typically need between 400 and 600 yards of yarn. If you are using multiple colors, ensure that each ball is of a similar weight so the granny stripes remain consistent in height and texture throughout the entire length of the scarf.
Lastly, consider the “blocking” tools you might need once the Granny Stripe Scarf em crochet – Pattern is finished. Blocking boards and stainless steel pins are vital for opening up the stitches and ensuring your scarf lies flat. This final step is often what separates a “homemade” looking item from a high-end, professional crochet garment, giving your granny stripes a perfectly polished and uniform finish.
2. Technical Steps to Master the Granny Stripe Scarf em crochet – Pattern
To begin the Granny Stripe Scarf em crochet – Pattern, you must first create a foundation chain. The key is to use a multiple of 3 plus 1 (for example, a chain of 31 or 37). This ensures that the granny clusters fit perfectly across the row. Many experts suggest using a hook one size larger for the foundation chain to prevent the bottom of your scarf from “pulling” or being tighter than the rest of the crochet pattern.
The first row of the Granny Stripe Scarf em crochet – Pattern usually involves single or double crochets to create a stable base. From the second row onwards, the “granny” magic happens. You will work three double crochets (a cluster) into the spaces between the clusters of the previous row. This “space-filling” technique is what gives the Granny Stripe Scarf em crochet – Pattern its iconic ventilated but cozy texture.
Changing colors in a Granny Stripe Scarf em crochet – Pattern is best done during the final pull-through of the last stitch of the row. This creates a clean transition between rows without visible knots. To minimize the work later, you can “carry” your yarn up the side if you are only using two colors, but for many-colored scuff patterns, cutting the yarn and weaving in ends is the standard for a professional look.
Maintaining straight edges is the most common hurdle in a Granny Stripe Scarf em crochet – Pattern. The pattern typically alternates between starting a row with a full cluster and starting with a turning chain and a space. Paying close attention to the pattern instructions for the beginning and end of each row is the secret to avoiding a scarf that gradually grows wider or narrower as you work.
The “tension” of your hands plays a significant role in the Granny Stripe Scarf em crochet – Pattern. If you notice that your granny clusters look “clumped” or too tight, try to relax your grip on the hook. The granny stitch is meant to be somewhat loose and squishy. A consistent tension ensures that every granny stripe is the same width, giving the scarf a professional and high-quality aesthetic.
As you progress through the Granny Stripe Scarf em crochet – Pattern, it is helpful to count your clusters every few rows. It is very easy to miss a space at the end of a row, which can throw off the symmetry of the crochet design. By double-checking your cluster count, you ensure that your scarf remains a perfect rectangle, ready for whatever fringe or border you decide to add at the end.
3. Personalizing and Styling Your Granny Stripe Scarf em crochet – Pattern
One of the best ways to personalize your Granny Stripe Scarf em crochet – Pattern is by adding a unique border. A simple single crochet border in a solid color can “frame” the vibrant stripes and give the scarf a more finished look. Alternatively, a scalloped or “picot” edge adds a touch of femininity and detail that makes the handmade scarf stand out from mass-produced winter accessories.
Fringe and tassels are another fantastic way to customize the Granny Stripe Scarf em crochet – Pattern. You can use long strands of all the colors used in the scarf to create a thick, playful fringe at both ends. Tassels provide a more modern, “boho-chic” vibe and are particularly effective if you have made a wider version of the crochet pattern that doubles as a wrap or a prayer shawl.
The width and length of your Granny Stripe Scarf em crochet – Pattern can also be adapted to your personal style. For a “skinny scarf” that serves as a fashion accessory, start with a narrow foundation chain. For a “super scarf” that can be wrapped multiple times for extreme warmth, continue the pattern until the scarf reaches 80 inches or more in length, creating a dramatic and cozy winter statement.
Experimenting with “flecked” or “tweed” yarns can give the Granny Stripe Scarf em crochet – Pattern a rustic, farmhouse feel. These yarns have small bits of contrasting fiber spun into them, which adds depth to the granny clusters. When used in a Granny Stripe Scarf em crochet – Pattern, tweed yarns hide imperfections well and look beautiful when paired with a simple denim jacket or a wool coat.
You can also turn the Granny Stripe Scarf em crochet – Pattern into an “Infinity Scarf” by sewing the two short ends together. This creates a continuous loop that is very easy to wear and never falls off. The granny stitch works perfectly for this style because the seam can be easily hidden within the pattern rows, making the transition between the ends virtually invisible to the naked eye.
Finally, consider adding “pockets” to the ends of your Granny Stripe Scarf em crochet – Pattern. By crocheting two small squares in the same granny stitch and sewing them onto the ends of the scarf, you create a functional and trendy “pocket scarf.” This modification is very popular in the crochet community and turns a simple neck warmer into a practical garment for keeping hands warm during chilly walks.
4. Care, Longevity, and Sustainability in Crochet Projects
Caring for a garment made from a Granny Stripe Scarf em crochet – Pattern is vital for its longevity. If you used acrylic yarn, the scarf can often be machine washed on a gentle cycle, but it should always be placed in a mesh laundry bag to prevent the granny clusters from snagging on the machine’s agitator. For wool-based scarves, hand-washing in cool water with a specialized wool detergent is the best way to prevent felting.
Sustainability is a key benefit of the Granny Stripe Scarf em crochet – Pattern. Because it uses small amounts of various colors, it is the ultimate “zero-waste” project. Instead of throwing away the “leftover” yarn from larger projects like blankets or sweaters, you can incorporate those scraps into a multi-colored scarf, giving new life to materials that might otherwise have been discarded.
Blocking your Granny Stripe Scarf em crochet – Pattern after washing is the secret to keeping it looking new. When the scarf is damp, lay it out on a flat surface and gently pull it into its rectangular shape. This “sets” the fibers and ensures that the granny stripes don’t curl at the edges. A well-blocked scarf has a much more professional “store-bought” drape and feel.
Storage also plays a role in the life of your Granny Stripe Scarf em crochet – Pattern. Always store your crochet items folded rather than hanging. Hanging a scarf can cause the stitches to stretch out under their own weight, especially if the scarf is long and heavy. Storing it in a breathable cotton bag will protect the yarn fibers from dust and moths, ensuring it stays fresh for the next winter season.
If your Granny Stripe Scarf em crochet – Pattern eventually develops “pills” (small balls of fuzz), you can easily remove them with a fabric shaver or a sweater stone. This minor maintenance keeps the crochet stitches looking sharp and the colors vibrant. A high-quality handmade scarf can last for decades if treated with a little bit of care, eventually becoming a cherished vintage piece in your wardrobe.
Sharing the Granny Stripe Scarf em crochet – Pattern with others is a great way to build community. Whether you are teaching a friend to crochet or donating your finished scarves to a local shelter, the granny stripe is a symbol of warmth and care. The beauty of this pattern is that it is universal; a scarf made from a Granny Stripe Scarf em crochet – Pattern is a gift of time, skill, and affection that transcends fashion trends and generations.
FAQ: Frequently Asked Questions about Granny Stripe Scarf em crochet – Pattern
1. Is the Granny Stripe Scarf em crochet – Pattern suitable for absolute beginners?
Yes, it is one of the best projects for beginners! Once you learn how to make a double crochet and a chain stitch, you have all the skills needed to complete this pattern. It is very forgiving and helps you practice maintaining consistent tension.
2. How do I stop the edges of my granny stripe scarf from curling?
Curling usually happens if your foundation chain is too tight or if your tension is uneven. Adding a simple border of single crochet all the way around the finished scarf is the most effective way to flatten the edges and give the crochet pattern more stability.
3. Can I use different yarn weights in the same scarf?
It is generally not recommended to mix different weights (e.g., DK with Worsted) in a Granny Stripe Scarf em crochet – Pattern because it will make your stripes uneven. If you must use different yarns, try to ensure they have a similar “grist” or thickness to keep the pattern uniform.
4. How many colors should I use for my granny stripe scarf?
There is no limit! Some people use a different color for every single row, while others prefer a 2-color or 3-color rotation. The Granny Stripe Scarf em crochet – Pattern looks great in both high-contrast and subtle tonal variations, so let your creativity guide you.
5. How do I weave in so many ends securely?
The best way is to weave your ends back and forth through the granny clusters at least three times. This “Z” pattern creates enough friction that the yarn won’t pop out even after multiple washes. Weaving in your ends as you go will also make the finishing process much less overwhelming.
6. What is the difference between a granny square and a granny stripe?
A granny square is worked in the round from the center outwards, while a Granny Stripe Scarf em crochet – Pattern is worked in rows, back and forth. Both use the same cluster of three double crochets, but the construction method is different.
Conclusion
In this article, we have explored the timeless beauty and technical simplicity of the Granny Stripe Scarf em crochet – Pattern, a project that remains a cornerstone of the crochet world. We covered everything from selecting the right yarns and hooks to mastering the rhythmic granny cluster and ensuring your edges remain perfectly straight.