
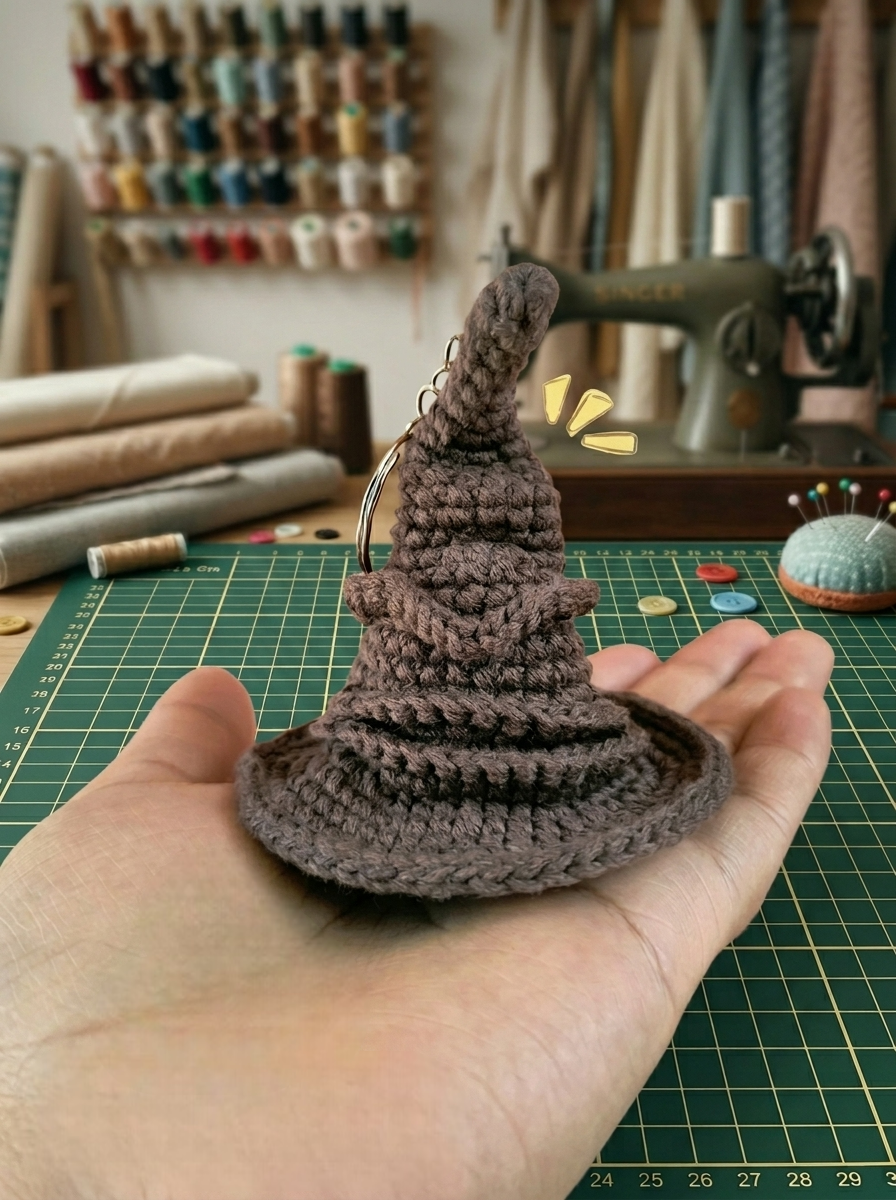
Bringing the magic of the Wizarding World into your living room has never been easier than with this comprehensive Harry Potter Sorting Hat Amigurumi Crochet – Tutorial. Whether you are a lifelong Gryffindor, a proud Hufflepuff, a witty Ravenclaw, or a cunning Slytherin, there is one iconic artifact that unites all Hogwarts students: the legendary Sorting Hat. Crafting your own miniature, textured replica allows you to blend your love for fiber arts with J.K. Rowling’s magical universe, creating a timeless keepsake or a perfect gift for a fellow fan.
Crocheting pop culture icons has skyrocketed in popularity, and for good reason. Using the Japanese art of amigurumi, which involves knitting or crocheting small, stuffed yarn creatures and objects, you can capture incredible details in a compact form. This specific crochet pattern focuses on translating the weathered, ancient, and expressive look of the Sorting Hat into soft stitches, ensuring that the final piece looks just as alive and moody as it does in the films.
Before diving into the step-by-step instructions, it is essential to understand the foundational techniques and materials that will make your project a success. Achieving the perfect slouchy cone shape and the iconic grumpy facial folds requires a bit of patience and the right tension. By following this structured Harry Potter Sorting Hat Amigurumi Crochet – Tutorial, you will master the art of shaping yarn to look like ancient magical leather, utilizing basic stitches to achieve extraordinary results.
1. Essential Materials and Tools for Your Amigurumi Project
To begin your magical crafting journey, selecting the right yarn weight and hook size is crucial for achieving a clean look. For this project, a worsted weight or aran yarn in a deep chocolate brown, taupe, or weathered tan works best to mimic old leather. Pair this with a slightly smaller crochet hook than recommended on the yarn label, such as a 3.5mm crochet hook (E/4), to ensure your stitches are tight enough to keep the stuffing hidden.
High-quality polyester fiberfill stuffing is another non-negotiable component for your wizarding creation. You want a stuffing that holds its shape well over time but remains soft to the touch. Because the Sorting Hat has distinct facial features molded into its fabric, how you stuff the piece will ultimately determine how much personality your finished amigurumi possesses.
In addition to your yarn and hook, you will need a few essential notions to keep your work organized and precise. A reliable stitch marker is indispensable for tracking your rounds, as amigurumi is typically worked in a continuous spiral. You will also need a sharp yarn needle for weaving in loose ends and sculpting the facial wrinkles, along with a pair of sturdy scissors.
For beginners, selecting an acrylic yarn or a cotton-acrylic blend is highly recommended. Acrylic offers excellent stitch definition and is quite forgiving if you need to unravel a few rows to correct a mistake. Cotton blends, on the other hand, provide a sturdier structure which helps the wide brim of the hat hold its shape without flopping downward.
Before making your first stitch, gather all your supplies in a well-lit workspace where you can comfortably focus. Having everything within arm’s reach prevents interruptions and allows you to maintain consistent stitch tension. Consistency in your tension is the secret weapon to making your amigurumi look professional and uniform.
Now that your crafting station is fully prepared with the correct tools, you are ready to begin the actual fabrication. This tutorial will guide you seamlessly from the very first loop to the final structural assembly. Let us unlock the magic of the crochet stitches to bring this enchanted Hogwarts artifact to life.
2. Understanding the Core Crochet Stitches and Techniques
The foundation of almost every round amigurumi project is the legendary magic ring, sometimes referred to as a magic circle. This technique allows you to begin crocheting in the round without leaving a visible hole in the center of your work. By pulling the tail of the yarn tightly, you close the gap completely, ensuring that no polyester stuffing can leak out of the top of your hat.
The primary stitch used throughout this entire project is the single crochet (sc). This basic stitch creates a dense, sturdy fabric that is perfect for structural items like hats and toys. Mastering the single crochet allows you to focus on the more complex aspects of the pattern, such as shaping and regular stitch count tracking.
To expand your piece from a sharp point into a wide cone, you will need to perform a series of crochet increases (inc). An increase simply means placing two single crochet stitches into the exact same stitch from the previous row. This adds stitches to your current round, gradually widening the circumference of the hat to create its natural, organic taper.
Conversely, to shape the distinct folds and the base of the hat, you will utilize the invisible decrease (dec). Traditional decreases can sometimes leave small bumps or gaps in amigurumi, but the invisible version solves this issue beautifully. By inserting your hook only into the front loops of the two subsequent stitches before completing your single crochet, the reduction remains completely hidden.
Another advanced technique used to create texture in this design is working in the back loops only (BLO) or front loops only (FLO). By altering which loop you insert your hook into, you can create sharp ridges on the surface of your work. These ridges are incredibly useful for transition points, such as where the main cone of the hat meets the flat, wide brim.
As you progress through the rows, always remember to count your stitches at the end of every single round. It is incredibly easy to accidentally lose or add a stitch, which can skew the symmetry of your hat over time. Keeping a close eye on your numbers guarantees that your Harry Potter Sorting Hat Amigurumi Crochet – Tutorial yields perfect results.
3. Step-by-Step Construction of the Sorting Hat Body and Brim
To begin the construction, create a magic ring and work 4 single crochet stitches into the loop, pulling it tight to form the very tip of the hat. For rounds 2 through 10, you will alternate between rounds of even single crochets and rounds with gradual increases. This slow expansion creates the sharp, narrow peak characteristic of the ancient Hogwarts artifact.
As you reach round 11, it is time to start creating the natural slouchy folds of the hat. To do this, you will perform a rapid series of increases followed immediately by a row worked in the back loops only. This intentional manipulation of the fabric forces the crochet work to fold over slightly on itself, mimicking old, wrinkled leather.
Continue working down the main body of the hat, following a steady increase formula until your round reaches roughly 48 stitches. This section forms the main cavity where the “eyes” and “mouth” of the Sorting Hat will eventually be sculpted. Ensure your stitch tension remains firm during this phase so the face maintains its structural integrity.
Once the main body length is achieved, you will transition to creating the iconic wide brim of the hat. In the next round, work entirely in the front loops only to force the stitches to flare straight outward at a ninety-degree angle. From this point forward, you will dramatically increase the number of stitches in each round to make the brim lie completely flat.
The final round of the brim should be finished with a clean border to prevent curling. You can achieve this by using the crab stitch (reverse single crochet) or simply working a round of slip stitches all the way around the edge. Fasten off your yarn, leaving a long tail that can be used for any final structural sewing or adjustments.
Before adding the stuffing, take a moment to admire the raw shape you have created with your hook. The piece should already resemble a rustic wizard hat, ready to be infused with personality. The next phase of our journey involves bringing those famous facial features to life using clever assembly methods.
4. Sculpting the Face and Adding the Final Magical Details
The true magic of this project lies in the facial sculpting process, which transforms a simple brown cone into a living character. Take your yarn needle and a long strand of matching brown yarn, inserting it from the inside of the hat out through the face area. By catching a few stitches and pulling the yarn tightly back inward, you can indent the fabric to create deep, expressive sunken eyes.
Repeat this indentation process a little lower down on the body to form the wide, frowning mouth of the hat. The fabric naturally buckles between the eyes and the mouth, creating the appearance of a prominent, wrinkled nose. Secure these sculpting threads firmly on the inside of the amigurumi with strong knots before adding your polyester fiberfill.
When stuffing your Sorting Hat, do not overfill the very top tip or the specific areas where you made the facial folds. You want the tip of the hat to remain floppy so it can lean to one side, just like in the films. Fill the lower cavity firmly enough to maintain the facial structure, but keep it pliable enough to adjust the expression.
To complete the bottom of the amigurumi and keep the stuffing inside, you can crochet a simple flat circle matching the stitch count of the inner brim. Align this circle with the unworked loops from your brim transition row and use your yarn needle to sew it securely in place. This closes the project cleanly and gives the piece a flat, stable base to stand on.
For an extra touch of authenticity, you can add two long, crocheted brown strands to the sides of the brim to represent the hanging tassels of the hat. You can also use a dark brown fabric marker or a bit of diluted acrylic paint to add shading inside the eye sockets and mouth folds. This simple weathering technique adds incredible depth and a realistic, ancient look to your crochet project.
Now your miniature magical companion is officially complete and ready to sort anyone who dares to place it on their fingertips. Display it proudly on your bookshelf next to your favorite novels, or use it as a whimsical holiday ornament. Your dedication to mastering these stitches has successfully brought a piece of Hogwarts history into the real world.
Frequently Asked Questions (FAQ)
What is the best yarn type for an amigurumi Sorting Hat?
An acrylic or cotton blend in worsted weight is ideal for this project. Acrylic provides excellent stitch definition and flexibility for creating facial wrinkles, while cotton offers rigidity to keep the wide brim from drooping.
How do I make the brim of the hat stay flat instead of curling?
Curling usually happens if your tension is too tight or if there are not enough increases in the brim rounds. To fix this, ensure you are increasing consistently, and finish the final round with a slip stitch or a reverse single crochet border to stabilize the edge.
Can a beginner complete this Harry Potter Sorting Hat Amigurumi Crochet – Tutorial?
Yes, absolutely! While the facial sculpting and back-loop transitions require a bit of patience, the project relies primarily on basic stitches like the single crochet, increase, and decrease. Following the steps carefully will guide any beginner to success.
How do I get the tip of the hat to fold over properly?
The slouchy look is achieved by alternating rows of rapid increases with rows of standard stitches, combined with working in specific loops. Avoid stuffing the very top peak of the hat heavily, as leaving it empty allows it to naturally fold and drape to the side.
Is safety eyes needed for this specific amigurumi pattern?
No, safety eyes are not required for this design. The Sorting Hat’s eyes are actually formed by creating deep hollows and folds in the fabric itself through yarn sculpting, rather than using plastic eyes. This gives it a more authentic, fabric-like appearance.
Conclusion
In this Harry Potter Sorting Hat Amigurumi Crochet – Tutorial, we have explored the entire creative process of bringing a beloved magical artifact to life.
From choosing the perfect weathered yarn and mastering essential stitches like the magic ring and invisible decrease, to sculpting the iconic, grumpy facial features and stabilizing the wide brim, you have learned the exact techniques required to create a professional-grade amigurumi piece. This project showcases how simple adjustments in stitch placement and tension can completely transform a basic geometric shape into a character filled with personality and charm.