How to Make Crochet Glasses Case – Tutorial: creating your own stylish, protective sleeve for your eyewear is one of the most rewarding quick crafts you can undertake today. Whether you are a seasoned pro with a hook or a complete beginner looking for a functional project, learning how to make crochet glasses case – tutorial styles will help you preserve your spectacles in a custom, scratch-free pouch. Eyeglasses and sunglasses are essential, often expensive investments, and keeping them safe from scratches inside a bag requires a soft, durable barrier that only a handmade item can provide.
This comprehensive how to make crochet glasses case – tutorial guide is designed to walk you through the entire process from picking your yarn to stitching the final seam. By choosing to craft your own holder, you gain total control over the design, colors, thickness, and closure types, making it uniquely yours or a thoughtful, personalized gift for a loved one. Throughout this how to make crochet glasses case – tutorial, you will find that the steps are straightforward, repetitive in the best way, and highly customizable for any frame size.
Investing a little bit of your time into this how to make crochet glasses case – tutorial not only saves money but also introduces you to fundamental stitches that form the backbone of many advanced crochet projects. In this guide, we are going to dive deep into the essential materials, the step-by-step stitch breakdown, assembly techniques, and creative ways to personalize your finished case. Let us grab our hooks, select our favorite yarn colors, and explore how easily you can transform a simple skein into a beautiful, practical accessory.
1. Choosing the Right Materials for Your Crochet Glasses Case
Selecting the proper yarn is the first vital step in our how to make crochet glasses case – tutorial because the fiber content directly impacts how well your glasses are protected. For an everyday eyewear pouch, a 100% cotton yarn or a sturdy acrylic blend in medium weight (worsted weight) is highly recommended. Cotton provides a firm, breathable texture that holds its shape beautifully over time, ensuring your glasses do not get crushed easily while resting inside your purse or backpack.
The hook size you choose should match the yarn guidelines, but going down half a size can create a tighter, denser fabric. A tighter stitch tension is a brilliant SEO-optimized crochet technique because it prevents the arms of your glasses from poking through the gaps between stitches. Typically, a 4.0mm (G-6) or 3.5mm (E-4) crochet hook works wonders with worsted weight yarn to achieve that solid, protective barrier.
Aside from yarn and hooks, you will need a few basic notions to complete your how to make crochet glasses case – tutorial project successfully. Gather a pair of sharp embroidery scissors, a tapestry needle for weaving in loose ends, and a flexible measuring tape to check your frame dimensions. If you plan to add a secure closure, look for unique buttons, magnetic snaps, or a bit of velcro to keep your glasses from sliding out.
Stitch markers are another fantastic tool to keep nearby, especially if you are a beginner learning how to make crochet glasses case – tutorial methods for the first time. They help you identify the beginning of your rounds or the exact turning chains, reducing the risk of dropping stitches and creating uneven edges. Having these tools organized beforehand makes the crafting process incredibly smooth, relaxing, and enjoyable.
When thinking about color design, consider using bright, vibrant hues that make your case easy to spot inside a dark bag. Alternatively, sophisticated neutral tones like cream, charcoal, or taupe offer a timeless appearance that matches any outfit or professional setting. You can even experiment with self-striping yarn to achieve a multi-colored look without needing to manually change yarn balls.
Ultimately, high-quality materials yield a high-quality finished product that stands up to daily wear and tear. Taking the time to select soft yet durable yarn ensures that the delicate lenses of your glasses remain entirely free from micro-scratches. Now that your crafting station is fully prepped with the best supplies, you are ready to move on to the actual structural creation.
2. Step-by-Step Stitch Guide and Pattern Foundation
To kick off the stitching phase of this how to make crochet glasses case – tutorial, you will need to determine your initial chain length. Measure the width of your glasses at their widest point, then crochet a foundation chain that matches this measurement plus an extra half-inch for wiggle room. For a standard pair of reading glasses, a starting chain of roughly 12 to 15 chain stitches is usually the sweet spot.
Once your foundation chain is ready, we will utilize the single crochet (sc) stitch, which is the absolute best choice for structural durability. Single crochet stitches create a thick, compact fabric that minimizes gaps, offering maximum physical protection for your eyewear. Insert your hook into the second chain from the hook, yarn over, pull up a loop, yarn over again, and pull through both loops on your hook.
The secret to a seamless how to make crochet glasses case – tutorial design is working in a continuous spiral or joining rounds directly around both sides of the foundation chain. Instead of turning your work at the end of the first row, rotate your piece 180 degrees and work single crochets along the opposite underside of the chain. This brilliant maneuver creates a natural, seamless pocket bottom without requiring any messy sewing later on.
Continue placing one single crochet into every stitch around, using your stitch marker to keep track of where each new round commences. As your rounds accumulate, you will vividly see the fabric grow upwards, forming a protective tube perfectly molded to the shape of your glasses. Keep stitching in this rhythmic manner until the length of the sleeve completely covers your glasses up to the top rim.
If you prefer a slightly faster project or a different texture, you can substitute the single crochet with a half double crochet (hdc) stitch. The half double crochet offers a lovely ribbed appearance while still maintaining a relatively dense structure that keeps dust and lint away from your lenses. Whichever stitch you choose, consistency in your tension is key to keeping the case uniform from bottom to top.
Periodically slide your glasses inside the growing pouch during the process to verify that the fit is snug but not overly tight. You want the glasses to glide in smoothly without forcing them, yet they should not wobble loosely inside the case. Once the sleeve reaches the desired height, you are ready to finish the top edge or prepare for a closure flap.
3. Assembly, Seaming, and Secure Closures
If you opted to crochet a flat rectangle instead of working in seamless rounds, this stage of the how to make crochet glasses case – tutorial is where the magic comes together. Fold your flat piece perfectly in half lengthwise, ensuring the right sides of the fabric are facing inward toward each other. Using your tapestry needle and a matching strand of yarn, employ the whip stitch or mattress stitch to sew along the bottom and side edges securely.
For those who followed the seamless round approach, finishing the top edge beautifully is your primary goal. You can execute a final round of slip stitches (sl st) all the way around the opening to give it a clean, polished, and professional border. A slip stitch edge prevents the opening from stretching out over time with repeated use, ensuring long-lasting structural integrity.
Now, let us discuss adding a functional closure, which is highly recommended in this how to make crochet glasses case – tutorial to keep your eyewear safe. To create an easy fold-over flap, simply stop working in the round once you reach the top of the case and switch to working in rows back and forth across just one half of the opening. Decrease a stitch at the beginning and end of each row to form a beautiful, tapered triangle flap.
To incorporate a buttonhole into your flap, crochet to the center of your row, chain two or three stitches (depending on your button size), skip the corresponding stitches below, and continue to the end. On the subsequent row, work standard stitches directly into that chain space to lock the buttonhole into place. Finally, securely sew a decorative wood or vintage plastic button onto the body of the case right where the flap naturally lands.
If buttons are not your preference, you can easily sew a premium metal snap fastener or a strip of fabric velcro onto the inside rim. Another trendy alternative is crafting a crochet drawstring cord by chaining a long strand of yarn, threading it through the top round of stitches, and tying cute knots at the ends. This drawstring style allows you to cinch the case tightly shut with minimal effort.
Take a moment to carefully weave in all remaining loose yarn tails using your tapestry needle, hiding them inside the internal stitches for a clean finish. Cut the yarn close to the fabric, taking care not to snip your actual stitches. Your structural assembly is now fully completed, leaving you with a durable, functional piece ready for daily use.
4. Personalization and Creative Design Enhancements
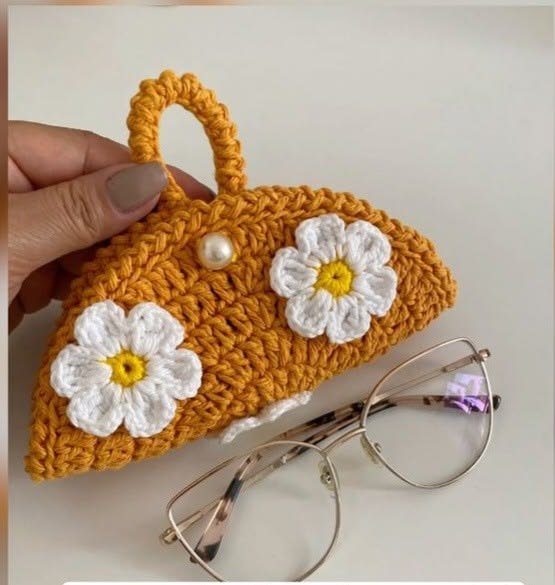
The most exciting part of mastering how to make crochet glasses case – tutorial designs is the freedom to inject your personal artistic flair into the final product. You can embellish a plain case by crocheting tiny applique flowers, leaves, or stars and sewing them onto the front surface for a 3D effect. These small details instantly transform a utilitarian pouch into an eye-catching, whimsical fashion statement.
Another fantastic styling technique is incorporating colorwork, such as changing yarn shades every few rounds to create bold, nautical stripes or a modern ombre gradient. If you are familiar with advanced stitches, adding a row of bobble stitches can introduce an incredibly fun, bumpy texture that doubles as shock absorption for your glasses. Experimenting with different stitches keeps your crochet journey fresh, engaging, and deeply educational.
For those who love a vintage aesthetic, consider adding a delicate lace border around the opening of the case using a smaller steel hook and fine embroidery thread. Alternatively, embroidery on crochet is highly popular right now; you can use a contrast color of yarn to stitch initials, geometric patterns, or simple daisies directly onto the finished single crochet background. The creative possibilities are virtually endless when you treat your case as a blank canvas.
If you are worried about finer dust particles or want extra cushioning, you can line the inside of your case with a soft piece of felt or satin fabric. Cut the fabric to match the dimensions of your case, stitch the fabric sides together, drop the liner inside the crochet pouch, and neatly hand-sew the top edges together. This luxurious touch provides a high-end, store-bought feel while offering premium scratch protection for high-value designer sunglasses.
Don’t forget that these cases make wonderful, quick-to-craft gifts for teachers, grandparents, colleagues, or friends who are constantly misplacing their reading glasses. You can customize the theme to match their favorite sports team colors, holiday themes, or individual wardrobe palettes. Crafting a personalized item shows a level of care and thoughtfulness that commercial, mass-produced items simply cannot replicate.
By applying the steps outlined in this how to make crochet glasses case – tutorial, you have expanded your needlework skillset and created a reusable, eco-friendly accessory. Keep practicing with different yarns, textures, and dimensions to refine your technique and build a beautiful collection of custom pouches. Enjoy the peace of mind that comes with knowing your eyewear is nestled safely within your own handmade creation.
FAQ: Frequently Asked Questions
What is the best yarn type for a crochet glasses case?
The absolute best choice is 100% cotton yarn in a worsted or sport weight. Cotton offers excellent stitch definition, does not stretch excessively over time, and creates a sturdy, protective barrier. Acrylic yarn is a soft, budget-friendly alternative, but ensure your stitches are tight so the fabric maintains its shape.
How long does it take to complete this tutorial?
Because a glasses case is small, it is an ideal afternoon project. A beginner might take around two to three hours to carefully follow the steps, while an experienced crocheter can easily finish a basic seamless case in under an hour.
Do I need to know advanced stitches to make this pouch?
Not at all. This project relies primarily on the single crochet stitch, which is one of the first stitches every beginner learns. As long as you can make a slip knot, chain, and single crochet, you can successfully complete this entire tutorial.
Can this pattern be modified to fit larger sunglasses?
Yes, easily. To customize the fit, simply increase the length of your initial foundation chain until it matches the widest part of your sunglasses. Continue adding rounds until the height completely covers the frames before finishing.
How do I clean my handmade crochet glasses case?
If you used 100% cotton or acrylic yarn, you can hand wash the case in warm water with a mild detergent. Reshape it while damp and lay it flat to air dry completely to ensure it retains its original structural dimensions.
Conclusion
In this how to make crochet glasses case – tutorial, we have explored everything from selecting dense, protective yarns like cotton to mastering the compact single crochet stitch for maximum durability.
We covered the seamless round construction method, proper assembly for flat panels, secure closure options like buttons and flaps, and creative personalization techniques to make your item truly stand out. This project is a fantastic, eco-friendly way to protect your eyewear while honing your crafting skills.