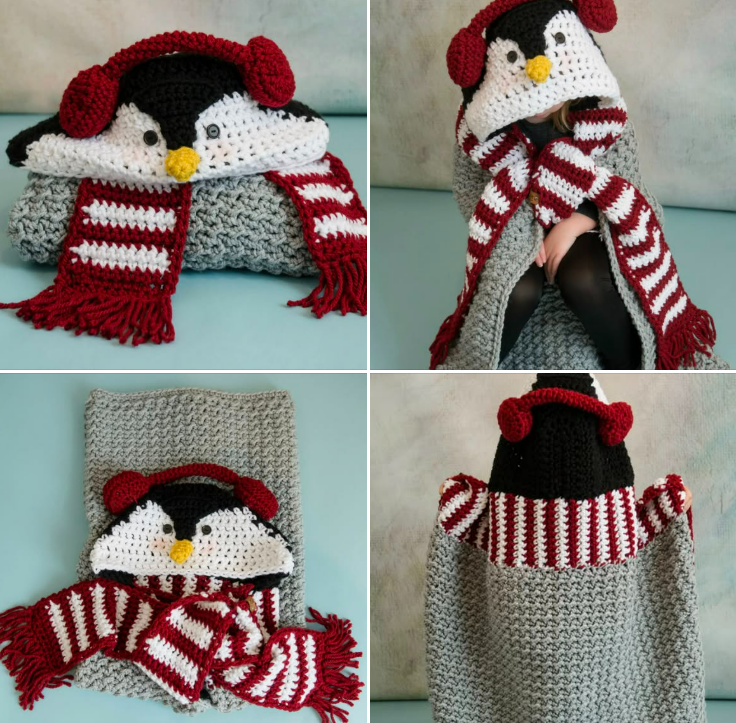
The Penguin Blanket with Hood Crochet – Pattern is one of the most adorable and cozy crochet projects you can create. Perfect for both children and adults, this blanket combines functionality and fun, turning a simple crochet piece into a cuddly penguin-shaped wrap with a warm hood. It’s a perfect companion for winter evenings, movie nights, or as a thoughtful handmade gift.
This Penguin Blanket with Hood Crochet – Pattern allows you to craft a blanket that is not only practical but also filled with personality. The penguin design brings a playful and comforting touch, making it a favorite among crochet lovers who enjoy creating themed blankets or animal-inspired projects. Whether you make it for yourself, a child, or as a baby shower gift, this blanket promises to bring smiles and warmth.
In this guide, you’ll learn everything about making a Penguin Blanket with Hood Crochet – Pattern—from choosing the right materials and following simple steps, to customizing it with your personal touch. It’s a fun and rewarding project for crochet enthusiasts of all skill levels, and by the end, you’ll have a beautiful handmade blanket that’s as cute as it is cozy.
1. Materials and Tools Needed for the Penguin Blanket with Hood Crochet – Pattern
Before you begin your Penguin Blanket with Hood Crochet – Pattern, gather all the essential materials. Choosing the right yarn and tools will ensure your finished piece is soft, durable, and comfortable to use.
For the yarn, opt for soft acrylic or polyester yarn, which provides warmth without being too heavy. You’ll need black, white, orange, and gray yarns—the classic penguin colors. Acrylic yarn is perfect for this project because it’s machine washable and easy to care for, making it ideal for blankets.
Choose a crochet hook that matches the yarn’s thickness—usually between 5 mm (H-8) and 6 mm (J-10). This size range helps create a blanket with a good drape and comfortable texture. A yarn needle will be necessary for sewing parts together and weaving in ends. You may also need stitch markers if you want to keep track of your rows or sections.
In addition to your crochet materials, have some stuffing or soft fiberfill ready for the beak and flippers if you plan to make them three-dimensional. This gives your penguin blanket an adorable plush look. For the eyes, you can crochet small white and black circles or use safety eyes for a more defined effect.
Lastly, ensure you have scissors and a soft measuring tape handy. Taking accurate measurements helps you size the blanket properly, especially if you’re making it for a specific person or age group. With all your materials in place, you’re ready to start crocheting your cozy Penguin Blanket with Hood Crochet – Pattern.
2. Step-by-Step Guide to Making the Penguin Blanket with Hood Crochet – Pattern
Creating the Penguin Blanket with Hood Crochet – Pattern involves crocheting the main blanket body, crafting the hood, and assembling all the penguin details to complete the design. It’s a project that can be adapted to any skill level by adjusting the complexity of stitches.
Start by making the main blanket. You can choose between a rectangular or cocoon-style blanket, depending on how you want it to wrap around the body. For beginners, a simple rectangle with single crochet (sc) or half double crochet (hdc) stitches works perfectly. Crochet the base color—usually black or gray—until you reach the desired size.
Next, create the penguin’s white belly section. This is typically an oval or rounded rectangle crocheted separately in white yarn. Once finished, sew or crochet it onto the center of the blanket to represent the penguin’s body.
For the hood, start by crocheting a square or rectangular piece that fits comfortably over the head. Attach this hood to one side of the blanket, ensuring it aligns with the body section. You can shape the hood slightly by tapering the top corners or adding a seam for a rounded effect.
Now it’s time for the fun details! Crochet two small flippers using black yarn, and if desired, stuff them lightly for a 3D effect. Crochet or embroider an orange beak and attach it to the center of the hood. For the eyes, either crochet circles or use safety eyes and sew them securely onto the hood above the beak.
Once all the pieces are attached, weave in any loose ends and check for secure stitching. If you like, you can add a white border around the edges of the blanket for a polished look. Congratulations—you’ve completed your adorable Penguin Blanket with Hood Crochet – Pattern, ready to snuggle up or gift to someone special.
3. Creative Variations for the Penguin Blanket with Hood Crochet – Pattern
The Penguin Blanket with Hood Crochet – Pattern is versatile and can be customized in countless creative ways. By experimenting with colors, textures, and decorative details, you can make each blanket a unique piece of art.
For a classic penguin, stick with traditional colors—black, white, orange, and gray. But for a more playful version, try pastel shades like baby blue, soft pink, or mint green. These variations make wonderful gifts for children or themed baby showers.
If you want to add extra coziness, use chunky yarn instead of medium-weight yarn. This will make your blanket thicker, warmer, and faster to complete. It also gives the penguin design a plush, huggable look.
Consider adding embellishments to make your Penguin Blanket with Hood Crochet – Pattern stand out. You can crochet a little red scarf, add small snowflakes, or even create tiny feet at the bottom corners of the blanket for a full penguin look. These small details make your creation even more endearing.
For a personalized touch, embroider the recipient’s name or initials on the back or along the edge of the blanket. This transforms your handmade project into a keepsake that will be cherished for years.
You can also adapt the pattern for different sizes—from baby blankets to adult-sized wraps. Adjust the number of stitches and rows to make the blanket larger or smaller, ensuring it suits whoever will be using it.
Finally, think about creating matching accessories. A small penguin-themed pillow or pair of slippers can complement your Penguin Blanket with Hood Crochet – Pattern perfectly, completing a cozy winter set.
4. Tips and Tricks for Perfecting the Penguin Blanket with Hood Crochet – Pattern
Even though the Penguin Blanket with Hood Crochet – Pattern is beginner-friendly, a few tips and tricks can help ensure your project turns out beautifully every time. Attention to detail and smart finishing touches will make your blanket look professional and last for years.
First, maintain consistent stitch tension throughout your work. Uneven tension can cause the blanket to stretch or curl. Practice your stitches on a small swatch if necessary before starting the full blanket.
Second, measure your blanket as you go. This ensures you don’t accidentally make it too small or too large. Remember, crochet can sometimes shrink slightly after washing, so make it a little larger if you want a perfect fit later.
Third, when sewing parts like the beak and flippers, secure them firmly. Use small, tight stitches to prevent pieces from loosening over time, especially if the blanket will be used by children.
Fourth, wash and block your finished blanket before gifting or using it. This softens the yarn and helps the stitches settle evenly, giving your Penguin Blanket with Hood Crochet – Pattern a neat and professional appearance.
Fifth, consider using a soft lining fabric on the inside of the hood for extra comfort, especially if the yarn is textured. This adds warmth and makes the hood feel smoother against the skin.
Lastly, store your blanket carefully during off-seasons. Keep it folded in a dry, clean space or inside a cotton bag to prevent dust buildup. Taking care of your handmade creations ensures they stay beautiful and functional for many winters to come.
FAQ About the Penguin Blanket with Hood Crochet – Pattern
Q1: Is the Penguin Blanket with Hood Crochet – Pattern suitable for beginners?
Yes! The pattern uses simple stitches and assembly steps, making it ideal for beginners with basic crochet knowledge.
Q2: What yarn works best for this blanket?
Soft acrylic or polyester yarns are best. They are warm, durable, and easy to wash—perfect for blankets and wearables.
Q3: Can I make the blanket larger or smaller?
Absolutely. You can adjust the number of stitches and rows to customize the size to fit a child or adult.
Q4: How long does it take to make the blanket?
Depending on your crochet speed and the size, it usually takes between 10–20 hours to complete.
Q5: How do I attach the hood to the blanket?
You can crochet it directly onto the blanket edge or sew it separately for better control and alignment.
Q6: Can I add extra features like a scarf or feet?
Yes! Personal touches like scarves, feet, or embroidered snowflakes make your Penguin Blanket with Hood Crochet – Pattern even more unique and festive.
Conclusion
The Penguin Blanket with Hood Crochet – Pattern is a delightful project that blends creativity, comfort, and functionality. It’s the perfect handmade gift or cozy accessory for winter, offering both warmth and a touch of fun. Whether you stick to classic penguin colors or explore vibrant variations, this blanket is sure to become a favorite piece in any household.
We hope this guide has inspired you to create your own Penguin Blanket with Hood Crochet – Pattern. Try it out, share your experience, and let us know your thoughts and suggestions in the comments. Your creativity and feedback help keep the crochet community warm and connected—one stitch at a time!