Stained Glass Square Crochet – Tutorial is one of the most rewarding projects you can undertake if you want to bring the luminous beauty of cathedral windows into your home decor. This specific technique allows artisans to play with high-contrast colors and geometric precision, resulting in a finished product that looks far more complex than it actually is to create. By following this comprehensive Stained Glass Square Crochet – Tutorial, you will learn how to master the art of “drawing” with yarn, using dark outlines to make vibrant hues pop with an almost ethereal glow.
The magic of a Stained Glass Square Crochet – Tutorial lies in the clever use of overlay crochet or tapestry crochet methods to simulate the lead cames found in traditional glasswork. Many crafters find this style addictive because each round reveals a bit more of the “stained glass” effect, keeping the process engaging and visually stimulating from start to finish. Whether you are planning to make a single decorative cushion or a massive heirloom blanket, the foundational skills covered in this guide will ensure your stitches are crisp, your colors are balanced, and your finished work is professional.
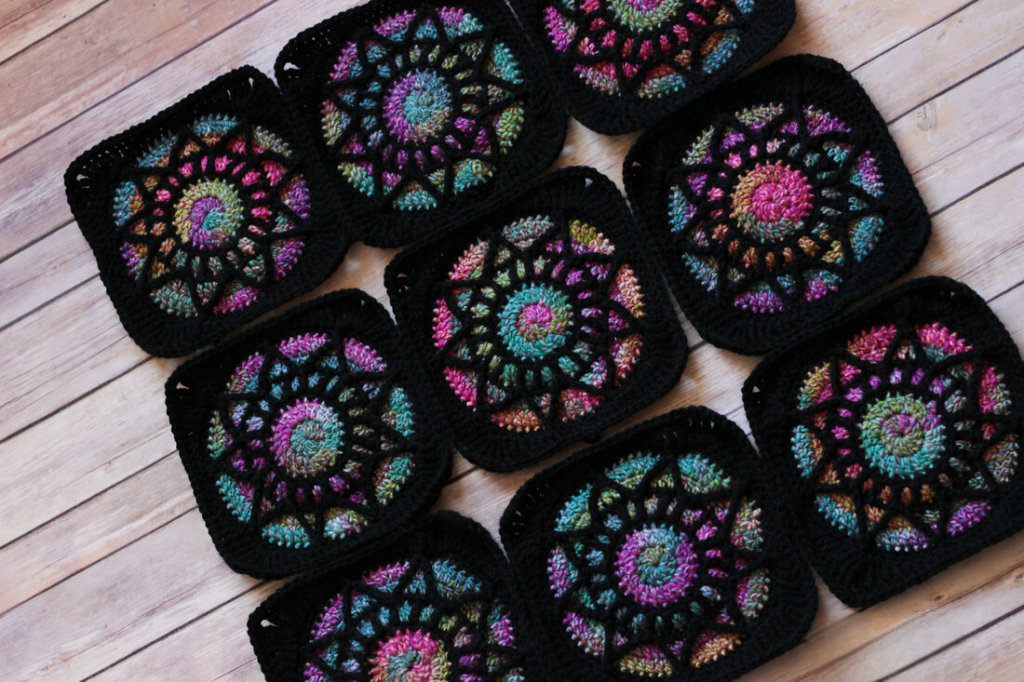
Before we dive into the technical steps of this Stained Glass Square Crochet – Tutorial, it is essential to consider your material choices, as they define the final aesthetic. To achieve that authentic window-like appearance, a deep, solid black or charcoal yarn is typically used for the “leading,” while variegated or jewel-toned yarns fill the “glass” sections. This contrast is the secret to successful SEO-optimized crochet patterns, as it creates the visual depth that fans of this niche absolutely adore. Get your hooks ready as we explore the structural breakdown of this beautiful design.
1. Understanding the Stained Glass Square Crochet Technique
The Stained Glass Square Crochet – Tutorial begins with a firm grasp of color theory and stitch placement. Unlike standard granny squares, this method relies on a dark “frame” that surrounds blocks of bright color. This creates a visual break that mimics the lead strips in a window. To succeed, you must be comfortable changing colors frequently and managing multiple strands of yarn without creating bulk.
Choosing the right hook size for your Stained Glass Square Crochet – Tutorial is a critical first step. Generally, using a slightly smaller hook than recommended for your yarn weight helps create a dense, sturdy fabric. This density ensures that the “glass” colors don’t peek through the dark outlines where they aren’t supposed to be. A tighter tension is often preferred for these geometric designs to maintain the square’s sharp edges.
The most popular method for this Stained Glass Square Crochet – Tutorial involves working in the back loops only (BLO) for certain rounds. This technique creates a small ridge on the front of the work, which provides a perfect anchor for the surface stitches that form the dark outlines. By mastering loop anatomy, you can add three-dimensional texture to your flat square, making it look like a piece of art.
Consistency is the backbone of any high-quality crochet tutorial. When working on the Stained Glass Square Crochet – Tutorial, you must ensure your increases at the corners are symmetrical. If one corner is tighter than the others, the square will warp, and the “stained glass” effect will look distorted. Always count your stitches after every round to maintain the perfect 90-degree angles required for a professional finish.
In this Stained Glass Square Crochet – Tutorial, the “leading” color is usually a solid black acrylic or cotton. Cotton is excellent for definition, while acrylic offers a softer drape for blankets. Regardless of the fiber, the contrast is what drives the SEO value of the project, as “high-contrast crochet” is a trending search term among enthusiasts looking for modern, striking patterns.
Finally, remember that the Stained Glass Square Crochet – Tutorial is a lesson in patience. You will likely have more ends to weave in than a standard project, but the result is worth the extra effort. Using a “join-as-you-go” method for the color changes can help minimize the finishing work. Organizing your yarn by color family before you start will also keep your creative process smooth and enjoyable.
2. Essential Materials for Your Crochet Project
To follow this Stained Glass Square Crochet – Tutorial effectively, you need a curated selection of yarns. The primary “glass” colors should be vibrant; think emerald greens, sapphire blues, and ruby reds. Using a long-gradient yarn can also produce a beautiful effect, as the colors shift naturally within the “panes” of the glass. This adds a layer of sophistication to the Tutorial without requiring manual color swaps.
A high-quality ergonomic crochet hook is highly recommended for the Stained Glass Square Crochet – Tutorial. Because this project requires many repetitive stitches and a somewhat tight tension, an ergonomic handle prevents hand fatigue. Most crafters prefer a 4.0mm (G) or 5.0mm (H) hook depending on the yarn weight, but always check your gauge before starting the full project.
Stitch markers are non-negotiable tools in this Stained Glass Square Crochet – Tutorial. When you are working with dark yarn for the outlines, it can be difficult to see exactly where a round begins or where the corner stitches are located. Placing a bright marker in the corner increases will save you from making mistakes that are hard to fix later. Accuracy is key to professional crochet results.
A sharp pair of embroidery scissors and a blunt-tipped tapestry needle are also vital for the Stained Glass Square Crochet – Tutorial. Since you will be changing colors to create the “stained glass” panes, you will need to weave in ends securely. A blunt needle is better for crochet as it slides between the fibers rather than splitting the yarn, which keeps the structural integrity of your stitches intact.
Blocking boards are the “secret ingredient” to finishing this Stained Glass Square Crochet – Tutorial. Once you finish your square, it might look a bit rumpled or slightly uneven. Pinning the square to a blocking board and lightly steaming it will set the stitches in place. This makes the lines of your “stained glass” perfectly straight and ensures all your squares are the exact same size.
Lastly, a printed or digital copy of the stitch chart for this Stained Glass Square Crochet – Tutorial is helpful. Many visual learners find that following a diagram alongside written instructions clarifies the overlay stitch placement. Having your pattern easily accessible allows you to focus on the rhythm of the stitches rather than constantly scrolling through your phone or computer.
3. Step-by-Step Stitch Guide and Pattern Logic
The core of the Stained Glass Square Crochet – Tutorial starts with a magic ring or a small chain loop using your “glass” color. In the first few rounds, you will create a simple circle or small square. The transformation happens when you introduce the dark yarn. The Tutorial dictates that the dark yarn should travel behind the work or be carried through, depending on your preferred technique.
In the middle stages of the Stained Glass Square Crochet – Tutorial, you will implement front post double crochet (FPDC) stitches. These are the stitches that create the raised “lead” lines. By working around the post of a stitch from a previous round, you pull the dark yarn forward to sit on top of the colored stitches. This is the defining characteristic of the stained glass crochet style.
As you progress through the Stained Glass Square Crochet – Tutorial, you must pay close attention to the heights of your stitches. To keep the square flat, you may need to alternate between single, half-double, and double crochet stitches. This compensates for the distance the “lead” lines have to travel across the colored sections. Maintaining a flat surface is essential for SEO-friendly crochet instructions.
Color transitions should be invisible for the best results in this Stained Glass Square Crochet – Tutorial. Change your yarn on the last pull-through of the stitch before the new color starts. This ensures that the top “V” of the stitch matches the color of the legs, preventing “bleeding” between the dark outlines and the bright glass panes. This technical precision is what differentiates a beginner from an expert.
Corner management is a specific focus of our Stained Glass Square Crochet – Tutorial. Usually, a (2 dc, ch 2, 2 dc) or (3 dc, ch 2, 3 dc) cluster is used in the corners to allow the square to grow outward. If you notice your square is curling inward like a bowl, you likely need more stitches in the corners. If it is waving, you may have too many.
The final round of the Stained Glass Square Crochet – Tutorial usually ends with a solid border of the dark “leading” color. This frames the entire piece and provides a clean edge for joining multiple squares together. A round of single crochet or crab stitch (reverse single crochet) can provide a very sturdy and attractive finish that highlights the internal geometric crochet patterns.
4. Tips for Perfecting Your Finished Square
One of the best tips for the Stained Glass Square Crochet – Tutorial is to use a consistent yarn brand. Different brands of the same weight can have slight variations in thickness. In a project that relies on geometric alignment, even a tiny difference in yarn diameter can cause the square to become lopsided. Stick to one line of yarn for the best Tutorial outcome.
Tension control is the most common struggle in the Stained Glass Square Crochet – Tutorial. If your “lead” lines are too tight, they will pull the colored sections inward, causing the fabric to pucker. If they are too loose, the lines will look sloppy. Practice on a small swatch first to find the “sweet spot” where the surface stitches sit comfortably on the fabric.
Lighting is surprisingly important when following a Stained Glass Square Crochet – Tutorial. Working with black or dark navy yarn can be very straining on the eyes, especially in the evening. Using a neck light or a bright task lamp will help you see the stitches clearly. This prevents the common mistake of skipping stitches or inserting the hook into the wrong space.
Steam blocking is highly recommended for the Stained Glass Square Crochet – Tutorial. While “wet blocking” is an option, steam blocking allows you to shape the acrylic fibers (if using acrylic) much more effectively. It “kills” the yarn slightly, which gives the square a beautiful, professional drape. This makes your crochet home decor look like it was bought from a high-end boutique.
Don’t be afraid to experiment with the “glass” colors in this Stained Glass Square Crochet – Tutorial. While the classic look uses many colors, a monochrome version (using different shades of one color) can look incredibly modern and sophisticated. You can even use metallic-flecked yarn for the “glass” to give it a shimmering, reflective quality that mimics real glass.
Finally, keep a project journal while working through the Stained Glass Square Crochet – Tutorial. Note down which hook you used and any adjustments you made to the pattern. If you decide to make a full blanket later, you will have all the details needed to ensure the new squares match the ones you’ve already made. This level of organization is the hallmark of a dedicated crochet artist.
FAQ – Frequently Asked Questions
What is the best yarn for a Stained Glass Square Crochet – Tutorial?
For the most authentic look, a smooth, non-fuzzy yarn like mercerized cotton or a high-quality anti-pilling acrylic is best. This ensures the “lead” lines are sharp and the colors are vibrant without any “halo” effect blurring the edges of the design.
Can a beginner try this Stained Glass Square Crochet – Tutorial?
Yes, but it is helpful if you already know basic stitches like single and double crochet. The main challenge is the color changing and post stitches. If you follow the steps slowly, it is a great way to advance your skills to an intermediate level.
How do I join several squares made from this Tutorial?
The best way to join them is using the “whip stitch” or a “flat slip stitch join” using the same dark yarn used for the outlines. This keeps the grid pattern consistent across the entire blanket, making the individual squares look like one large window.
Does this project use a lot of yarn?
Because of the overlay stitches and frequent color changes, it does use slightly more yarn than a standard flat granny square. However, the resulting fabric is thicker and warmer, making it excellent for pillows and heavy blankets.
Is it hard to see the stitches in the dark yarn?
It can be! We recommend working under a bright light and using a hook that feels comfortable. If you struggle, you can use a dark grey or deep bronze instead of pure black, which might be easier on your eyes while still providing high contrast.
Conclusion
We hope this Stained Glass Square Crochet – Tutorial has inspired you to pick up your hook and create something truly luminous. We have covered everything from the essential materials and color theory to the specific stitch techniques and finishing touches that make this style so iconic. By mastering the balance between vibrant “glass” and dark “leading,” you can produce stunning pieces of fiber art that will be cherished for years to come.
The beauty of the Stained Glass Square Crochet – Tutorial is its versatility; whether you’re making a small coaster or a king-sized bedspread, the geometric satisfaction remains the same. Remember to focus on your tension, choose high-contrast colors, and always block your finished work for that professional, crisp look.