The Easy Patchwork Owl Keychain – Tutorial is the perfect solution for crafters of all skill levels who want to dive into the world of quilting and fabric upcycling. Keychains are fantastic everyday accessories, and when you make them yourself, they carry a special charm that mass-produced items simply cannot match. This step-by-step guide will walk you through the entire process of creating a whimsical, pocket-sized companion that will keep your keys organized and bring a smile to your face every time you reach into your bag.
Crafting a personalized Easy Patchwork Owl Keychain – Tutorial allows you to express your unique style while mastering basic stitching techniques. Owls have always been a favorite motif in the crafting community, symbolizing wisdom, protection, and a touch of rustic cozy charm. By combining small scraps of contrasting fabrics, you can give your little owl a distinct personality, whether you prefer vibrant bohemian colors, soft pastels, or classic country plaids. This project is incredibly versatile, making it an excellent choice for handmade gifts, party favors, or even a popular item to sell at local craft fairs.
One of the greatest benefits of following this Easy Patchwork Owl Keychain – Tutorial is that it is a highly effective scrap-busting project. Instead of throwing away those beautiful left-over strips of cotton from your larger quilting endeavors, you can turn them into something beautiful and functional. Fabric scrap quilting is both eco-friendly and budget-friendly, allowing you to maximize your resources while experimenting with fun pattern combinations. Get your sewing machine ready, gather your prettiest fabric remnants, and let’s explore the wonderful, creative journey of making your very own patchwork owl.
1 Gathering Your Essentials for the Owl Keychain Project
Before cutting into your favorite fabrics, it is important to gather all the necessary supplies to ensure a smooth and enjoyable crafting experience. For this Easy Patchwork Owl Keychain – Tutorial, you will need a few basic sewing tools that you likely already have in your craft room. Having everything organized on your workspace beforehand saves time and keeps your creative momentum going strong from start to finish.
The star of the show is, of course, your selection of fabric scraps. You will want to choose at least two or three coordinating cotton prints to give your owl its classic patchwork look. Lightweight woven cotton is the ideal choice because it holds its shape well, presses beautifully, and is easy to maneuver around tight curves and small corners.
In addition to your pretty fabric pieces, you will need a small amount of polyester fiberfill or cotton stuffing to give your owl a plump, three-dimensional body. For the functional keychain element, secure a sturdy metal split ring or a lobster swivel clasp. You will also need a short piece of ribbon or fabric casing to connect the owl securely to the metal hardware.
To bring out the owl’s distinct facial features, gather two small black buttons or safety eyes for the pupils, and a small scrap of orange or yellow felt for the beak. If you prefer a completely soft keychain, you can easily substitute the buttons with simple embroidery floss and stitch the eyes using a basic satin stitch.
Standard sewing notions are essential for assembling your Easy Patchwork Owl Keychain – Tutorial. Make sure you have a reliable pair of fabric scissors, sharp pins or quilting clips to hold the small pieces together, a fabric marking pen, and a high-quality sewing thread that matches your primary fabric choice.
Whether you choose to sew this project using a standard domestic sewing machine or prefer the slow, meditative process of hand stitching, the results will be equally beautiful. Hand sewing gives you incredible control over the small details, while a machine will speed up the process if you plan on making a whole flock of these adorable accessories.
2 Preparing and Cutting Your Patchwork Fabric Pieces
Precision is key when working with miniature quilting projects, so taking your time during the preparation and cutting phase will yield the best results. Start by pressing all your fabric scraps with a warm iron to remove any wrinkles or creases, ensuring your cuts are completely accurate. A flat, crisp piece of fabric is much easier to work with than a wrinkled one, especially when dealing with small templates.
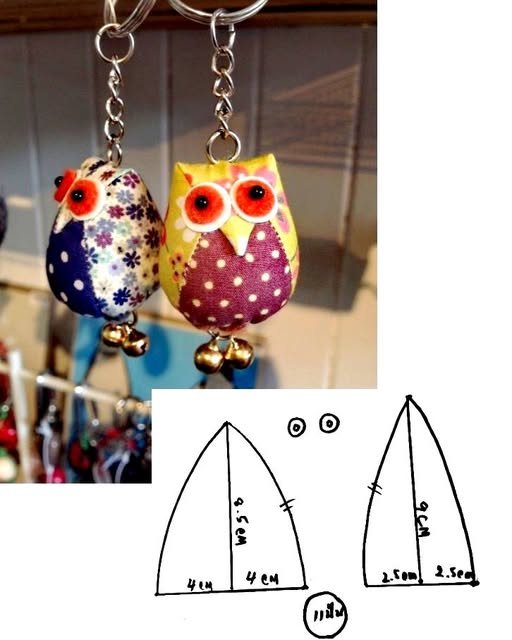
To make the body of our Easy Patchwork Owl Keychain – Tutorial, you will want to create a simple paper template shaped like a rounded arch or a modified teardrop with a flat bottom. You can easily draw this shape yourself on a piece of cardboard, making it roughly three inches wide and four inches tall. This size is large enough to showcase your patchwork patterns while remaining small enough for a comfortable keychain.
To achieve the beautiful patchwork effect on the front of your owl, you can stitch together alternating fabric strips before cutting out the main shape. Try joining three or four contrasting strips of fabric using a precise quarter-inch seam allowance to create a new, striped fabric block. Press the seams open or to one side so the fabric lies perfectly flat against your workspace.
Once your patchwork fabric block is ready, place your paper template on top and trace the outline using your fabric marking pen. Cut out one patchwork piece for the front of the owl, and then use the same template to cut one solid piece of fabric for the back. Using a solid or contrasting print for the back gives the keychain a clean, professional appearance.
Don’t forget to cut out the tiny details that will give your owl its unique facial expression and charm. Cut out two small circles from white felt or plain fabric to act as the background for the eyes, and a small triangle from your orange felt for the beak. Having these small elements cut and laid out beforehand makes the assembly process much more organized and enjoyable.
Finally, prepare the loop that will connect your plush owl to the metal keychain hardware. Cut a piece of ribbon or a folded strip of fabric measuring approximately two inches in length, ensuring it is durable enough to withstand daily wear and tear. Now that all your components are neatly cut and laid out, you are ready to move on to the sewing stage.
3 Assembling the Owl Face and Sewing the Body
Now comes the most exciting part of our Easy Patchwork Owl Keychain – Tutorial, where your little fabric creation begins to develop its own unique personality. Start by working on the front patchwork piece before assembling the entire body, as it is much easier to apply the facial features while the fabric is completely flat. Position the two white felt eye circles and the orange beak triangle onto the upper half of the patchwork front.
Using a needle and coordinating thread, hand-stitch the felt eyes and beak into place using a neat blanket stitch or a simple running stitch. If you are using a sewing machine, you can use a tight zigzag or applique stitch to secure them firmly. Once the felt base is secure, sew your black buttons or attach your safety eyes directly into the center of the white circles.
Next, take your prepared ribbon or fabric loop and fold it in half to create a secure loop. Position this loop at the very top center of your owl’s head, pointing inwards toward the center of the face, with the raw edges aligned with the raw edge of the fabric. Pin it securely in place, as this loop will eventually hold the metal keyring and needs to be extra strong.
Place the back fabric piece directly on top of the decorated front piece, making sure the right sides of the fabric are facing each other. Your cute owl face and the ribbon loop should now be hidden on the inside of this fabric sandwich. Pin or clip all the way around the perimeter to keep the edges perfectly aligned while you sew.
Sew around the perimeter of the owl shape using a quarter-inch seam allowance, starting at the bottom edge. Be sure to leave a small opening of about one and a half inches at the bottom of the owl so you can turn it right side out later. Remember to backstitch at the beginning and end of your sewing to prevent the stitches from unraveling during the turning process.
Carefully clip the curved edges and corners with your scissors, taking care not to cut through your stitches, as this helps the fabric lay smoothly once turned. Gently pull the fabric through the bottom opening to reveal the right side of your owl, using a chopstick or turning tool to push out the rounded edges.
4 Final Stuffing Details and Attaching the Keychain Hardware
Your beautiful creation is almost complete, and it is time to bring it to life with proper stuffing and finishing touches. Take small pinches of your polyester fiberfill and gently push them through the bottom opening, filling the top ears and corners first. It is best to use small amounts of stuffing at a time to ensure your Easy Patchwork Owl Keychain – Tutorial finishes with a smooth, even shape without lumps.
Stuff the owl firmly so that it maintains its shape when handled, but avoid overstuffing it to the point where the seams begin to strain. As you fill the body, use your fingers to shape the owl, ensuring the patchwork front looks plump and symmetrical. Leave just enough space near the open bottom edge so you can easily close the opening.
Turn the raw edges of the bottom opening inward by a quarter of an inch, aligning them perfectly with the rest of the sewn seam. Use a few pins or a mini clip to hold the folded edges tightly together while you prepare your needle and thread for the final closure. A clean, hidden closure is what separates a beginner project from a professional-looking craft.
To close the opening seamlessly, use a hand-sewing needle and matching thread to work a neat ladder stitch across the folded edges. Pull the thread gently after every few stitches to pull the edges together and make the thread completely invisible. Knot your thread securely close to the fabric, push the needle into the body, and bring it out an inch away before clipping the thread short.
With the body completely sealed, the final step is to attach your functional hardware to the top fabric loop. Gently slide your metal split ring or open your lobster clasp and loop it directly through the durable fabric ribbon at the top of the owl’s head. Give it a gentle tug to ensure everything is secure and ready to carry your keys.
Congratulations, you have successfully completed your beautiful, unique fabric accessory using this comprehensive guide. Take a moment to admire your handiwork, smooth out the fabric, and marvel at how a few simple scraps were transformed into art. Now you can attach it to your keys, clip it onto your favorite backpack, or wrap it up as a thoughtful handmade gift.
Frequently Asked Questions
What is the best type of fabric to use for this owl keychain project?
The ideal fabric for this project is 100% quilting cotton because it comes in countless vibrant patterns, does not stretch out of shape, and is easy to sew for beginners. You can also experiment with lightweight linen, denim scraps, or flannel for different textures, but avoid highly stretchy fabrics like jersey knit.
Can I make this patchwork keychain entirely by hand without a sewing machine?
Absolutely! Because the project is small, it is very manageable to sew entirely by hand using a basic running stitch or backstitch for the seams. Hand sewing gives you excellent control around the tight curves of the owl’s head and allows you to enjoy crafting anywhere without needing heavy equipment.
How do I clean my fabric owl keychain if it gets dirty over time?
Since keychains are handled frequently, they can accumulate dirt, but you can easily clean them by spot cleaning with a damp cloth and mild soap. If it requires a deeper clean, gently hand wash it in warm water, squeeze out the excess moisture without wringing, and let it air dry completely in the sun.
What can I use instead of polyester fiberfill for stuffing the keychain?
If you don’t have polyester fiberfill, you can use small fabric scraps chopped into tiny pieces, leftover yarn ends, or raw cotton balls as eco-friendly alternatives. Keep in mind that using fabric or yarn scraps will make the keychain slightly heavier and firmer than using lightweight polyester fiberfill.
How can I customize this pattern to make different animals?
You can easily modify the basic shape and facial details of this template to create cats, foxes, or bears by altering the ears and nose shapes. For example, changing the round owl eyes to sleek cat eyes and adding yarn whiskers will transform this basic pattern into a whole new animal design.
Conclusion
In this tutorial, we explored the delightful process of creating a beautiful, personalized fabric accessory from start to finish. We covered how to choose the best cotton scraps, prepare and cut your templates, piece together the patchwork details, and assemble the face and body before completing it with hardware.
This project is a wonderful way to practice your sewing skills while recycling materials into something truly functional.