Fabric Organizer Cachepot – Tutorial: Have you ever looked around your creative space, living room, or bedroom and wished for a beautiful, sustainable way to clear the clutter? Managing a tidy home or craft studio can sometimes feel like an endless battle, especially when you are looking for storage solutions that actually match your personal style. Plastic bins and generic storage boxes can look sterile, which is why a handmade, fabric-based alternative is the perfect answer for passionate crafters and homeowners alike.
This comprehensive fabric organizer cachepot – tutorial is designed to guide you step-by-step through creating your very own versatile, soft fabric basket. Not only is this project incredibly practical for tidying up small items like yarn, thread, toys, or even potted plants, but it is also a fantastic way to practice your sewing skills. Crafting your own storage allows you to choose colors, textures, and patterns that perfectly complement your interior design while giving you the immense satisfaction of a DIY victory.
In this guide, we will explore everything you need to know to achieve professional results, even if you are relatively new to sewing. We will cover materials, cutting dimensions, assembly techniques, and creative customization ideas to make your project truly unique. By the end of this fabric organizer cachepot – tutorial, you will have a beautiful, functional piece of home decor and the confidence to create an entire fleet of them for every room in your house.
1. Choosing the Best Materials for Your Fabric Basket
When diving into this fabric organizer cachepot – tutorial, your very first step is selecting the right materials, as the fabric choice determines both the look and structural integrity of your basket. For the exterior fabric, you want something sturdy and durable that can hold its shape well over time. Excellent choices include heavy cotton canvas, duck cloth, linen blends, or even repurposed textiles like old denim fabric from worn-out jeans, which adds a wonderful rustic charm and a nod to sustainable crafting.
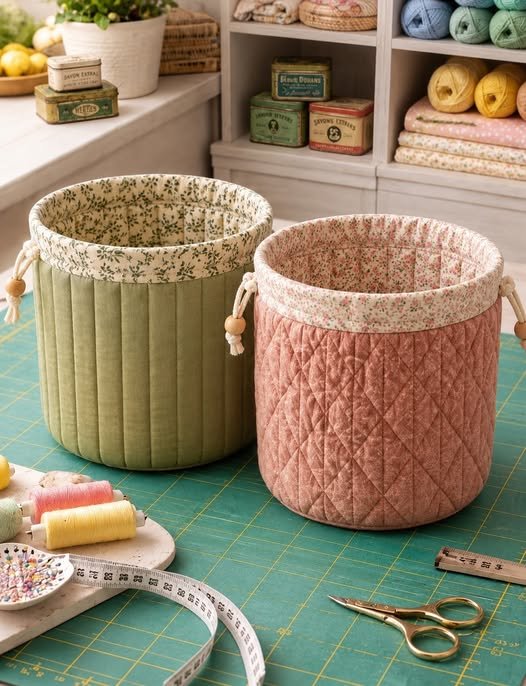
For the interior lining, a lighter weight fabric works beautifully to prevent the seams from becoming too bulky to sew. Standard quilting cotton is an absolute favorite for linings because it comes in endless vibrant prints and colors, allowing you to create a fun, surprising contrast when the top edge of your cachepot is folded down. Combining a solid, neutral exterior with a bright, patterned interior is a classic design choice that instantly elevates the look of your handmade organizer.
Structure is the secret ingredient that transforms a floppy fabric bag into a crisp, professional-looking cachepot. To achieve this, you will need a high-quality fusible interfacing, which is an iron-on layer applied to the wrong side of your fabric to give it extra stiffness. For smaller baskets, a medium-weight fusible fleece or woven interfacing works perfectly, while larger storage bins benefit from heavy-duty, ultra-firm stabilizers to ensure the walls stand tall without sagging.
Beyond the textiles, gather your everyday sewing notions before you begin to keep your workflow smooth and enjoyable. You will need a reliable sewing machine equipped with a sharp needle suitable for your fabric weight, such as a size 90/14 for canvas or denim. A rotary cutter, a self-healing cutting mat, and a long quilting ruler are highly recommended for achieving perfectly straight, square cuts, which makes alignment much easier later on.
Do not forget a good supply of sewing pins or Wonder Clips, which are especially helpful for holding thick, layered fabric edges together without bending. Matching or contrasting sewing thread, sharp fabric scissors for trimming, and a reliable iron are also essential tools for this project. The iron, in particular, is your best friend here, as crisp pressing makes a massive difference in the final, polished appearance of your fabric organizer cachepot.
Ultimately, selecting materials is where your creativity truly shines, allowing you to customize your project for any purpose. If you plan to use your cachepot as a decorative cover for a indoor plant, consider choosing a water-resistant canvas or adding a hidden plastic liner inside to protect the fabric from moisture. Taking the time to thoughtfully plan and prepare your materials ensures a delightful sewing experience and a final product that is both beautiful and built to last.
2. Cutting Your Pieces and Preparing the Interfacing
Precision during the cutting phase is the foundation of a perfectly symmetrical basket, so take your time measuring twice before making a single cut. For a standard, versatile medium-sized cachepot, you will need to cut two matching rectangles for the exterior fabric, two for the lining fabric, and two pieces of your chosen fusible interfacing. A great starting dimension for a handy desktop organizer is 10 inches wide by 8 inches tall, though you can easily scale these numbers up or down.
Once your main rectangles are cleanly cut, it is time to prepare them for the boxing process, which is the technique that gives your flat fabric pieces a three-dimensional, flat-bottomed shape. On the bottom two corners of all four fabric rectangles (and the interfacing pieces), you will measure and cut out a small, perfect square. For our 10×8 inch example, cutting a 2-inch square out of both bottom corners will create a beautifully proportioned base and a stable footprint for your finished basket.
Next, find a comfortable spot at your ironing board because it is time to fuse the interfacing to your fabric pieces. Place your exterior fabric rectangles wrong-side up on the board, and position the fusible side of the interfacing (the side that feels bumpy or shiny) directly against the fabric. If you want an exceptionally sturdy cachepot, you can actually cut a second set of interfacing and fuse it to the lining pieces as well, which gives the walls double the support.
Follow the manufacturer’s instructions for your specific interfacing, using a hot, dry iron or a bit of steam as recommended, and press firmly down rather than sliding the iron across the surface. Hold the iron in place for a few seconds in each spot to ensure the heat-activated adhesive melts completely and bonds permanently to the textile. Allow the pieces to cool completely on a flat surface for a minute or two, which lets the adhesive set properly and prevents bubbles from forming later.
Applying interfacing might feel like an extra step, but it is the critical phase that separates an amateur DIY attempt from a professional boutique-quality home accessory. This structure allows the cachepot to maintain its crisp, upright shape even when it is completely empty, ensuring it looks neat on your shelves. It also makes the fabric much easier to handle and guide through your sewing machine, as the stabilized edges will not stretch out of shape while you sew.
With your fabric pieces reinforced, stabilized, and perfectly notched at the bottom corners, your preparation work is officially complete, and you are ready to head to the machine. Organization is key here, so keep your exterior pieces and your lining pieces stacked in separate, neat piles on your workstation. Taking these disciplined prep steps sets you up for absolute success as we transition into the actual construction and sewing phases of our fabric organizer cachepot – tutorial.
3. Assembling and Sewing the Structure Together
Now comes the exciting part of our fabric organizer cachepot – tutorial where we begin to sew our flat pieces into a tangible, three-dimensional storage basket. Start by taking your two exterior fabric pieces and placing them right sides together, ensuring all the edges and the cut-out corner notches align perfectly. Pin or clip along the two vertical sides and the straight bottom edge, leaving the top open and leaving the cut-out square corners untouched for now.
Take your pieces to the sewing machine and stitch down the two sides and across the bottom edge using a standard 1/4-inch or 1/2-inch seam allowance, remembering to backstitch at the beginning and end of each line to secure your threads. Next, repeat this exact same process for the two lining pieces, with one crucial modification: leave a 3-inch to 4-inch unsewn gap in the middle of the bottom edge. This open gap is absolutely essential because it acts as the birthing window through which we will turn the entire project right-side out later.
With the sides and bottoms stitched, it is time to box the corners, which is a magical sewing technique that instantly gives your fabric organizer its depth and flat bottom. Open up one of the cut-out square corners on your exterior piece, flattening it out so that the side seam aligns perfectly with the bottom seam. Press the seams open or nest them in opposite directions to reduce bulk, pin the straight edge securely, and sew across it with a strong straight stitch, backstitching heavily over the seam intersections.
Repeat this boxing technique for the other bottom corner of the exterior bag, and then perform the exact same steps on both bottom corners of your lining piece. Once finished, you will find yourself with two distinct, boxy pouches: a sturdy, structured exterior basket and a slightly softer, matching lining basket. Take a moment to press the seams you just sewed with your iron, as pressing flat seams helps the stitches settle into the fabric fibers beautifully.
Next, leave the exterior basket turned wrong-side out, but turn your finished lining pouch completely right-side out. Insert the right-side-out lining directly into the wrong-side-out exterior basket, so that the right sides of both the exterior and lining fabrics are facing and touching each other. Align the top raw edges carefully, matching the side seams perfectly, and use plenty of pins or clips around the entire upper perimeter to keep the layers from shifting.
Sew completely around this top circular rim using your machine’s free arm if it has one, maintaining a consistent seam allowance all the way around. Take your time during this step, ensuring that the fabric stays flat and does not bunch up under your presser foot as you rotate the cylinder. Once this top seam is sewn completely around, your exterior and lining are securely joined, and you are ready for the final transformation steps.
4. Finishing Touches, Turning, and Topstitching Your Cachepot
Locate the opening gap that you left in the bottom of your lining fabric earlier, and gently reach your fingers inside to grab the bottom of the exterior fabric. Carefully pull the exterior fabric out through the opening, working slowly to guide the entire bulk of the basket through the small hole without ripping the stitches. It might feel like a tight squeeze, especially with heavy interfacing, but with a little patience, the entire cachepot will neatly turn right-side out.
Once the basket is turned, tuck the raw edges of the lining opening cleanly inward by about a 1/4 inch, matching the rest of the pressed seam line, and pin it closed. You can quickly sew this opening shut by running a very narrow stitch right along the edge with your sewing machine, or close it by hand with a ladder stitch for an invisible finish. Since this seam sits at the very bottom inside of your basket, a quick machine stitch is perfectly acceptable and highly durable.
Now, push the entire lining pouch down inside the exterior basket, using your fingers or a dull turning tool to neatly smooth out the bottom corners and edges. Roll the top seam between your thumbs to get the fabric aligned perfectly right at the edge, and press it thoroughly with a hot iron to create a sharp, crisp upper rim. A good, heavy press at this stage is what gives the organizer its high-end, professionally manufactured appearance rather than a crinkled DIY look.
To ensure the lining stays neatly inside and never rolls upward during daily use, we will finish the rim with a beautiful, professional topstitching details. Sew a clean line of stitches completely around the top edge of the basket, about 1/8 inch or 1/4 inch away from the crisp rim you just pressed. This step adds immense structural stability to the opening of your organizer, keeping it taut, round, and beautifully open so you can easily drop items inside.
The ultimate signature look for a fabric cachepot is a stylish folded-over cuff, which beautifully showcases your contrasting interior lining fabric. Simply fold the top rim down by an inch or two, adjusting the height to your personal preference and pressing the new fold line with your iron to lock it in place. This decorative cuff not only looks incredibly cozy and charming, but it also adds an extra layer of fabric thickness around the rim, making the basket even stronger.
Your beautiful organizer is now completely finished and ready to use around your home or to be given away as a thoughtful, handmade gift! You can customize your finished piece even further by sewing on leather handles, attaching decorative buttons, or adding delicate embroidery to the front panel. Now that you have mastered the fundamental techniques of this fabric organizer cachepot – tutorial, you can experiment with different sizes and fabrics to organize your entire world.
Frequently Asked Questions (FAQ)
What are the best fabric combinations for a sturdy fabric organizer cachepot?
For an organizer that stands tall and holds its shape, pairing a heavy-duty exterior fabric like cotton canvas, denim, or upholstery fabric with a lightweight quilting cotton lining is ideal. The heavy exterior provides the necessary structural support, while the lightweight lining keeps the seams manageable and allows for fun, colorful contrast prints when the cuff is folded down.
Can I wash my fabric organizer cachepot if it gets dirty?
Yes, most fabric cachepots can be washed, but the washing method depends heavily on the type of interfacing you used. If you used high-quality fusible fleece or woven cotton interfacing, you can gently hand wash or machine wash the basket on a delicate cycle with cold water, then reshape it and let it air dry completely before giving it a fresh press with an iron.
How do I adjust the measurements to make a larger or smaller basket?
Adjusting the size is incredibly simple: to make a taller basket, increase the height of your initial rectangles; to make it wider, increase the width. Just remember that when you change the size of the corner notches cut out of the bottom, it changes the depth of your basket—a larger corner cut creates a wider base with shorter walls, while a smaller cut keeps the basket narrower and taller.
Why is my fabric organizer collapsing, and how can I fix it?
If your basket is collapsing, it usually means the interfacing chosen was too lightweight for the size of the basket or the weight of the fabric. You can easily fix this on your next project by using a firm stabilizer like Peltex or double-layering your interfacing; for an already finished basket, inserting a matching piece of stiff cardboard or plastic canvas into the bottom can help stabilize it.
Conclusion
In this fabric organizer cachepot – tutorial, we have covered the entire creative process of transforming simple fabric panels into a structured, elegant, and highly functional home accessory.
From selecting robust textiles like canvas and denim to applying structural interfacing, boxing corners, and executing flawless topstitching, you now possess the core skills needed to conquer fabric organization. This project beautifully bridges the gap between utility and creative expression, offering an eco-friendly way to declutter your home with personalized style.