If you are a passionate sewist, quilter, or crafter, you already know that a reliable pin cushion is an absolute necessity in your creative workspace. However, standard, mass-produced pin cushions can often feel a bit boring and lack the artistic flair that inspires your daily projects. Learning how to make mannequin pin cushion – tutorial steps will not only elevate the aesthetic of your sewing room but also provide you with a highly functional, sturdy tool that keeps your pins organized and always within arm’s reach.
Crafting your own miniature dress form is a fantastic way to blend utility with vintage elegance. This project allows you to customize every detail, from the choice of fabric to the decorative embellishments, making it a reflection of your unique personal style. Whether you prefer a classic Victorian look, a modern minimalist vibe, or something fun and colorful, this tutorial will guide you through creating a miniature masterpiece that looks like a high-end boutique display.
In this comprehensive guide, we will break down the entire process into simple, manageable steps that anyone can follow, regardless of crafting experience. By using accessible materials and clear techniques, you will soon have a stunning piece of sewing room decor that is as practical as it is beautiful. Let’s dive right into the ultimate how to make mannequin pin cushion – tutorial and discover how satisfying it is to build your own miniature sewing dress form from scratch.
1. Essential Materials for Your Mannequin Pin Cushion
To get started on this how to make mannequin pin cushion – tutorial, you will first need to gather all the necessary supplies to ensure a smooth crafting experience. Having everything ready on your workspace will make the process much more enjoyable and efficient.
The foundation of your miniature dress form relies heavily on the right fabric selection. Choosing a durable, tightly woven material like cotton, linen, or canvas ensures that your pins won’t slip through too easily or damage the weave over time.
For the core stuffing, high-quality polyester fiberfill is highly recommended because it holds its shape beautifully and allows pins to slide in smoothly. You will also need a sturdy base, which can be made from a wooden candlestick holder, an old spool of thread, or even upcycled materials.
Additionally, a strong adhesive such as hot glue or fabric glue is crucial for securing the fabric to the base. Make sure you have basic sewing tools on hand, including heavy-duty thread, sharp fabric scissors, and a reliable sewing needle.
Don’t forget the decorative elements that will truly bring your miniature mannequin to life. Ribbons, lace trims, vintage buttons, and small beads are perfect for adding those beautiful finishing touches to the waistline or neckline of your creation.
Using the right materials ensures that your finished project is not only visually appealing but also durable enough to withstand daily use in your sewing room for years to come.
2. Preparing and Cutting the Pattern Pieces
The secret to a perfectly proportioned dress form lies in the accuracy of your template. For this how to make mannequin pin cushion – tutorial, you can easily draw a simple hourglass silhouette on paper to serve as your master pattern.
Your pattern should consist of three main pieces: a front body panel, a back body panel, and a flat oval base piece for the bottom. Make sure to include a small seam allowance of about one-quarter inch around all the edges when drawing.
Once your paper template is ready, pin it securely to your chosen fabric. Using sharp fabric scissors, carefully cut out the pieces, ensuring that the fabric does not shift or bunch up during the cutting process.
If you are using a patterned fabric, take a moment to consider the placement of the print on the mannequin’s body. Centering a beautiful floral motif or aligning stripes can drastically improve the final look of your project.
After cutting out the fabric pieces, it is a good idea to gently press them with an iron to remove any wrinkles. Working with crisp, flat fabric makes the assembly and sewing process much easier and more precise.
Taking your time during this preparation stage sets the foundation for a professional-looking result, ensuring that all the body contours line up perfectly when it is time to sew.
3. Assembling and Stuffing the Dress Form Body
Now that your pieces are ready, place the front and back body panels right sides together, matching up the outer edges carefully. Pin them securely along the sides and shoulders to prevent any shifting while you sew.
Using a tight backstitch or a sturdy machine stitch, sew along the side seams and shoulders, leaving the bottom edge completely open. Be sure to backstitch at the beginning and end of your seams to secure the thread.
Carefully clip the curves around the waist and neck area, being very careful not to cut through your stitches. Clipping the curves is essential because it allows the fabric to lay flat and smooth once it is turned right side out.
Gently turn the fabric body right side out through the bottom opening, using a chopstick or a turning tool to fully push out the shoulders and neck contours. Press the empty fabric body one more time to sharpen the seams.
Begin stuffing the mannequin firmly with your polyester fiberfill, pushing small amounts at a time into the neck and shoulders first. It is vital to pack the stuffing tightly so the pin cushion remains firm and holds its shape when holding heavy pins.
Once the body is completely packed and firm, insert your flat oval fabric base into the bottom opening. Fold the raw edges inward and use a neat ladder stitch to sew the bottom base securely to the main body, leaving a tiny gap in the center for the stand.
4. Mounting the Mannequin to the Stand and Adding Details
The final major structural step in our how to make mannequin pin cushion – tutorial is mounting your beautifully stuffed dress form onto its permanent stand. Take your wooden candlestick or upcycled base and apply a generous amount of strong glue to the top peg.
Carefully insert the glued peg into the small central opening you left at the bottom of the mannequin body. Press and hold the pieces together firmly for a few minutes to ensure the bond is completely secure and straight.
Once the glue has dried and the mannequin is stable, you can close any remaining gap at the base with a few final hand stitches. Your pin cushion should now stand completely upright without tilting or wobbling.
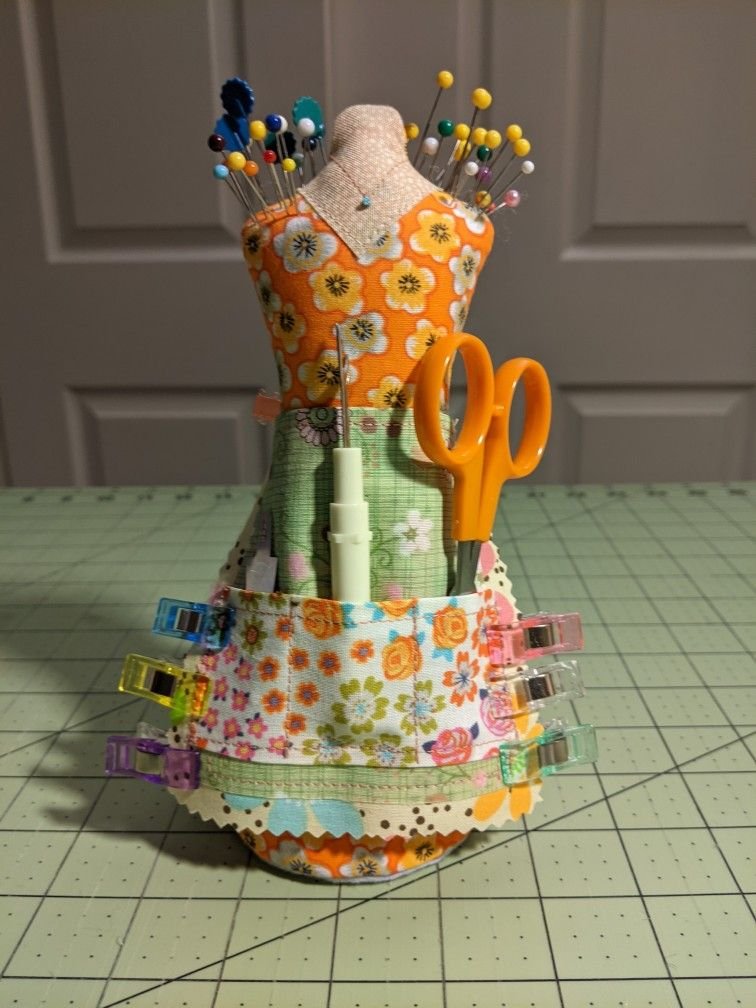
Now comes the most creative and fun part of the entire project: adding the custom embellishments. Tie a delicate satin ribbon around the waistline to create a beautiful sash that also hides any slight imperfections in the fabric.
You can glue a delicate strip of vintage lace around the neckline or hemline to give your mannequin a classic, romantic look. Adding a tiny decorative button or a miniature faux pearl necklace can elevate the design significantly.
Take a step back and admire your handiwork, adjusting any final details to make it perfect. Your new creation is now ready to hold your favorite sewing pins and needles, acting as a stunning centerpiece on your work table.
Frequently Asked Questions (FAQ)
What is the best fabric to use for a mannequin pin cushion?
The best fabrics are tightly woven, non-stretch materials like 100% quilting cotton, linen, lightweight canvas, or denim. These fabrics hold their shape well when stuffed tightly and can withstand being repeatedly poked with pins without fraying or tearing.
Can I make this project without a sewing machine?
Absolutely! This project is small enough to be easily sewn entirely by hand. Using a strong backstitch for the main body seams ensures the mannequin remains durable and holds the stuffing tightly without bursting.
What should I use to stuff the pin cushion to keep my pins sharp?
While standard polyester fiberfill works wonderfully for shape and firmness, you can mix in a layer of crushed walnut shells or steel wool in the center. Crushed walnut shells add a nice weight to the base, while steel wool naturally helps keep your pins and needles sharp over time.
How do I make sure the mannequin doesn’t tip over when full of pins?
To prevent tipping, ensure your base is heavy enough. You can use a solid wood or ceramic base, or you can add small weights, such as metal washers or glass beads, inside the bottom section of the mannequin body before sealing it shut.
Conclusion
In this how to make mannequin pin cushion – tutorial, we have covered everything from selecting the right materials and cutting out your pattern pieces to assembling, stuffing, and beautifully accessorizing your miniature dress form.
Creating this project is a wonderful way to recycle fabric scraps and old household items, transforming them into a highly useful tool that brings joy and elegance to your daily sewing routines.