The “4th of July Flag” block – pattern is a delightful and patriotic quilting project that captures the spirit of American independence.
Whether you’re preparing for a festive holiday celebration or simply want to add a touch of Americana to your home décor, this quilting block is the perfect addition.
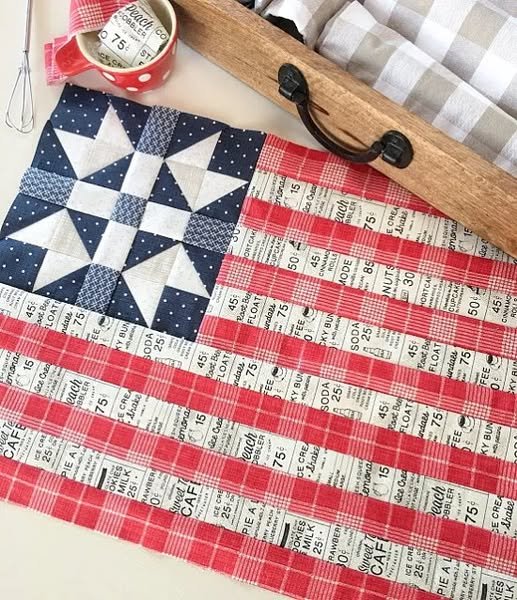
Crafted with red, white, and blue fabrics and arranged to resemble the U.S. flag, it’s both meaningful and eye-catching.
Creating your own “4th of July Flag” block – pattern allows you to express creativity while honoring a beloved national holiday. This pattern can be used on its own or combined into larger projects like table runners, wall hangings, quilts, or even tote bags. It’s an accessible pattern for beginners but still satisfying for seasoned quilters looking for a quick, themed project.
In this article, you’ll discover how to choose the right fabrics, cut and assemble the block, explore creative variations, and get answers to the most frequently asked questions about the “4th of July Flag” block – pattern. Get your fabric ready and let’s celebrate the red, white, and blue through the art of quilting.
1. Selecting Fabric and Tools for Your Flag Block
Choosing the right materials is the first essential step in bringing your “4th of July Flag” block – pattern to life. Each component of the flag has its symbolic color, and choosing the right fabrics can elevate your final piece from simple to stunning.
Start with high-quality cotton fabric in three primary colors: red, white, and blue. Quilting cotton works best because it’s durable, easy to sew, and holds its shape well. Look for fabrics with subtle prints or textures to add depth, or go with solids for a classic look.
You’ll need a rotary cutter and cutting mat to ensure precise cuts. Precision is crucial in quilting, and even minor misalignments can make a block look uneven. Make sure your rotary blade is sharp for clean, straight lines.
Use quilting rulers to measure and cut your fabric pieces accurately. Common dimensions for a flag block include strips for stripes (e.g., 1.5” wide) and a blue field (canton) with star applique or embroidered designs. You can adjust these measurements based on your project size.
Have matching thread, preferably cotton, and a reliable sewing machine ready. You can hand-sew the block if desired, but a machine ensures consistency and saves time, especially if you’re making multiple blocks.
Don’t forget interfacing or lightweight batting if you want to add structure to your flag block, especially for wall hangings or table runners. This helps the block maintain its shape and makes quilting easier.
Before beginning, iron all your fabric pieces and plan your layout. Having a clear visual reference makes the sewing process smoother and reduces mistakes later on.
2. Cutting and Assembling the 4th of July Flag Block
The actual construction of the “4th of July Flag” block – pattern is straightforward yet rewarding. You’ll combine red and white stripes with a blue square to represent the American flag, and you can customize how detailed or minimal you want the block to be.
Begin by cutting seven red and six white strips of equal width. This mirrors the actual flag’s 13 stripes, but you can simplify if desired. Align the stripes in alternating order, starting with red on top. Sew each strip together along the long edge using a quarter-inch seam.
After assembling the stripes, cut a blue rectangle to form the flag’s canton. This should cover the top-left corner of the flag block. You’ll sew it over the top corner of the assembled stripes, aligning it with the top row and a few stripes down.
To add the stars, you can use iron-on appliqué stars, hand embroidery, or fabric paint. For a quick option, white star buttons or printed fabric with stars already on it work well. This step adds texture and visual interest.
Trim the entire block to ensure it’s squared. You may want to add border strips around the flag block to frame it and make it easier to incorporate into a larger quilt or item. Borders also help emphasize the design.
Press all seams flat with an iron, using steam if needed. A well-pressed block looks more professional and is easier to quilt or sew into other projects later.
Test the finished block’s size and proportions to ensure they match the overall vision of your project. Minor trimming is common and helps ensure consistency when combining multiple blocks.
3. Creative Uses and Variations of the Flag Block
The versatility of the “4th of July Flag” block – pattern means it can be used in countless creative ways. From home décor to handmade gifts, this small block can have a big impact.
Turn a single block into a festive mug rug by adding batting and backing. It’s a great way to practice your quilting and binding skills on a small scale while creating something practical and patriotic.
Combine multiple flag blocks into a table runner or placemats. This is perfect for July 4th parties, barbecues, or family gatherings. You can alternate the direction of the flags or add other themed blocks like stars or fireworks.
Use your flag block as the focal point of a tote bag. Incorporate it into the front or back panel and pair it with denim or canvas for a sturdy, functional accessory that celebrates American spirit.
For wall décor, turn the block into a mini quilt or banner. Add hanging tabs or loops so it can be easily displayed on doors, windows, or above the mantel during Independence Day celebrations.
Consider making a patriotic quilt featuring several flag blocks mixed with other Americana-themed designs like liberty bells, bald eagles, or quotes about freedom. This is a wonderful long-term project for anyone who enjoys meaningful quilting.
If you enjoy crafting with kids, use felt or fabric glue to help them create their own no-sew version of the block. It’s a fun and educational craft that lets children participate in the holiday festivities creatively.
4. Tips for Quilting and Finishing Your Block
Once your “4th of July Flag” block – pattern is complete, you can choose to quilt it or incorporate it into a finished item. Here are some tips to ensure a clean, polished final result.
Start by adding a batting layer and backing fabric if you plan to quilt it. Use spray adhesive or safety pins to baste the layers together. This step prevents shifting while quilting.
For the quilting itself, consider straight-line quilting along the stripe seams or free-motion stars in the blue field. These quilting lines enhance the design and add texture without distracting from the flag motif.
Trim the edges and square the block again after quilting. This is important for projects like table runners or wall hangings, where alignment matters visually.
When binding the edges, use bias tape or fabric binding in red, white, or blue for a cohesive look. Attach the binding using a sewing machine for durability or hand-stitch it for a neat finish.
If you’re turning your block into a wall hanging, add a sleeve or hanging tabs on the back. You can also attach a wooden dowel or ribbon loop to hang it easily.
Finally, label your project! Use a fabric marker or stitched tag to write the date, your name, or a patriotic quote. It adds a personal touch and helps document your creative journey.
FAQ – “4th of July Flag” Block – Pattern
Can beginners make the “4th of July Flag” block?
Yes! This pattern is ideal for beginners. It uses simple straight seams and basic quilting techniques, making it a great first project.
What size should the flag block be?
The size can vary depending on your project, but a common size is 12” x 8” finished. You can scale up or down to fit your specific design.
Do I have to use 13 stripes like the real flag?
No, while using 13 stripes is more authentic, you can simplify the pattern to fewer stripes for ease or design preference, especially on smaller blocks.
How can I add stars to the blue section?
Stars can be appliquéd, embroidered, or printed directly on the fabric. Iron-on patches and white buttons shaped like stars are also great options.
Can I wash the finished block or project?
Yes, if sewn with colorfast cotton and properly quilted, it can be machine-washed on a gentle cycle. Use cold water and mild detergent to preserve the colors.
Is this pattern suitable for making gifts?
Absolutely. This block is perfect for patriotic gifts such as mini quilts, placemats, or tote bags for friends and family during summer holidays.
Conclusion
The “4th of July Flag” block – pattern is more than just a quilting project—it’s a heartfelt tribute to American heritage and a fun way to express your creativity. Whether you’re making a single block or incorporating it into a larger quilt, this pattern offers endless possibilities for customization and celebration.
We’ve walked you through everything you need to know: from selecting fabrics and sewing techniques to creative uses and quilting tips. It’s a versatile project suitable for all skill levels and perfect for adding handmade charm to your Independence Day festivities.
Have you tried making your own “4th of July Flag” block – pattern? We’d love to hear your thoughts, see your creations, and know how we can improve this guide. Please leave a sincere opinion and suggestions in the comments – your feedback helps other makers and builds a stronger creative community. Happy quilting! 🇺🇸🧵