The Fish drawstring bag – pattern is a creative and playful project that blends functionality with fun design.
Ideal for gifting, storing small items, or adding charm to everyday accessories, this bag is a favorite among crochet lovers and sewing enthusiasts alike.
Whether you’re a beginner looking for a manageable pattern or a seasoned maker wanting a quick, joyful project, this design is an excellent pick.
What sets the Fish drawstring bag – pattern apart is its whimsical shape that mimics a fish, complete with fins, a tail, and sometimes even embroidered scales or eyes. The drawstring closure adds both practicality and personality, making the bag not just a container, but a statement piece.
In this article, we’ll explore the details of the Fish drawstring bag – pattern, including essential materials, step-by-step construction, customization ideas, and practical tips. We’ll also answer some of the most frequently asked questions and wrap up with key takeaways to inspire your own creative journey.
1. Understanding the Fish Drawstring Bag – Pattern
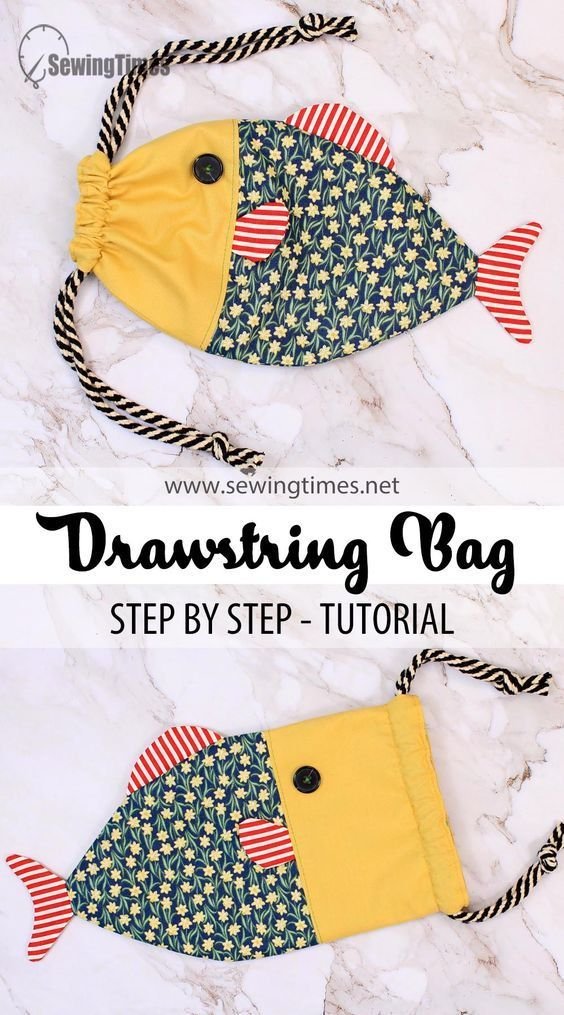
The Fish drawstring bag – pattern is designed to resemble a fish in shape and structure. Typically, it’s made by working in the round, forming an oval or cylindrical body that narrows at the mouth and widens at the base. The fins and tail are either crocheted or sewn on separately and attached later, bringing the design to life.
This type of bag is often made using cotton or acrylic yarn if crocheted, or colorful fabric panels if sewn. The vibrant design and playful details make it perfect for children’s items, beach bags, toy storage, or unique packaging for small gifts.
One of the most charming aspects of this bag is the freedom to personalize it. You can play with colors, textures, and additional features like buttons for eyes or stitched-on scale patterns. Whether you go with realistic fish tones or bold, fantasy-inspired colors, every bag can have its own personality.
The drawstring closure serves both functional and decorative purposes. Not only does it keep the contents secure, but it also enhances the fish-like shape by creating the impression of a puckered mouth when closed.
Most Fish drawstring bag – patterns include instructions for both the body and the decorative elements, but you can adapt or mix components based on your skill level. From beginners using simple stitches to advanced crafters adding texture and dimension, this bag suits a wide range of styles.
Best of all, the finished bag is useful and reusable. Whether it’s carrying toys, cosmetics, craft supplies, or snacks, the fish bag is as practical as it is delightful to look at.
2. Materials and Tools for the Fish Drawstring Bag
Before diving into the Fish drawstring bag – pattern, it’s essential to gather all the necessary supplies. Whether you’re crocheting or sewing your bag, the right materials will make a big difference in how your final product looks and holds up over time.
If you’re crocheting, choose a durable yarn like 100% cotton or an acrylic blend. These fibers hold their shape well and come in a wide range of colors. Worsted weight yarn is a common choice, offering enough structure for the body of the fish while still being easy to work with.
You’ll need a crochet hook that matches your yarn weight—usually between 4.0 mm (G-6) and 5.0 mm (H-8). A smaller hook may help achieve a tighter stitch pattern, which is ideal for bags that need to hold their shape and prevent contents from slipping out.
Other must-have crochet tools include stitch markers (to keep track of rounds), a tapestry needle (for sewing parts and weaving in ends), scissors, and a measuring tape. If you plan to add safety eyes, get those ready too, or prepare buttons or embroidery floss for hand-stitched details.
For a sewn version, choose cotton or canvas fabric for the outer shell. Lightweight interfacing can add firmness, and a soft cotton lining adds strength and a finished look. A sewing machine, fabric scissors, matching thread, pins, and a drawstring cord complete your supply list.
Don’t forget about embellishments! Felt pieces can be used for fins or eyes, and fabric paint or embroidery can mimic fish scales or facial expressions. Decorative beads or appliqué patches add a playful element as well.
Lastly, select a drawstring cord that’s both strong and soft—macrame cord, paracord, or crocheted chain cords work well. Choose a length that allows the bag to open and close easily, but won’t dangle excessively.
3. How to Make the Fish Drawstring Bag
Making a Fish drawstring bag – pattern can be broken down into a few key steps: building the body, adding the tail and fins, creating the drawstring section, and assembling everything together. Here’s a step-by-step breakdown to guide you.
Start with the body. If you’re crocheting, work in the round to form a tube or cone shape. Begin with a magic circle or chain and increase evenly to create the base. Then continue stitching upwards without increasing, forming the cylindrical shape of the fish.
For a sewn version, cut two fish-shaped panels from your main fabric and one from your lining. Sew them right sides together, leaving space at the top for the drawstring channel. Turn it inside out and press the edges flat before stitching the drawstring tunnel in place.
The tail and fins are next. For crochet, these can be made with simple rows or rounds and shaped using increases and decreases. Sew them securely to the base and sides of the fish body. For fabric bags, cut out matching pieces, stitch them right sides together, turn, press, and attach.
To create the drawstring channel in a crochet bag, skip stitches or chain to form eyelets. On a fabric bag, fold the top edge down and sew to form a tunnel. Thread the cord through using a safety pin or bodkin, and knot the ends to prevent fraying.
Now add facial details. You can crochet small circles for eyes, use safety eyes, or embroider features directly onto the bag. Get creative with scale patterns, stripes, or even glitter yarn for a magical fish look.
Finish by checking all seams and joins, weaving in any remaining yarn ends, and blocking your crochet bag if needed. For sewn versions, give everything a final press with an iron, especially the drawstring area, so it functions smoothly.
4. Personalizing and Using Your Bag
Once your Fish drawstring bag – pattern is complete, the real fun begins—customizing it to reflect your personal style and putting it to good use. Here are some creative and practical ideas for both.
Personalize your fish by giving it a name or backstory. Use embroidery to stitch initials or a nickname onto the tail. This is especially cute for kids or gift items. You could even create a set of bags with different expressions for an entire school of fish!
Use multiple colors to create striped or patchwork designs. Try using variegated yarn for a natural scale effect, or assign a different color to each fin. This works particularly well for stash-busting leftover yarn or fabric.
Add interactive features. Zippers, buttons, or even a small outer pocket shaped like a fish fin can make the bag even more functional. For kids, consider adding Velcro to make eyes or fins removable and reattachable for fun.
Think about how you’ll use your bag. For beach days, make a larger version with waterproof lining. For small items like makeup or coins, scale the pattern down and add a carabiner clip to attach to a backpack or purse.
Make themed variations! A goldfish for summer, a spooky deep-sea creature for Halloween, or a glittery rainbow fish for parties. The base pattern remains the same, but your imagination can take it in dozens of directions.
Finally, consider using the bag as eco-friendly gift wrap. Instead of paper, use a handmade fish drawstring bag to hold birthday gifts, holiday treats, or small handmade soaps. The bag becomes part of the gift—reusable and memorable.
FAQ: Fish Drawstring Bag – Pattern
Is the Fish drawstring bag – pattern good for beginners?
Yes! It’s a beginner-friendly project, especially if you’re comfortable working in the round and following simple stitch or sewing instructions.
Can I wash the finished bag?
Yes. If crocheted with cotton yarn, hand-wash and lay flat to dry. Fabric versions can often be machine-washed on gentle, depending on the lining and embellishments used.
How long does it take to make?
Most fish drawstring bags can be completed in 3–6 hours, depending on the size and level of detail.
Can I scale the pattern up or down?
Absolutely. You can make mini versions for coin purses or larger ones for tote bags by adjusting the starting size and number of rounds or stitches.
What’s the best yarn for this pattern?
100% cotton or sturdy acrylic yarn is ideal for durability and ease of care. For fabric, opt for medium-weight cotton or canvas.
Is it safe for children to use?
Yes, as long as you avoid small detachable parts like buttons for eyes in bags meant for very young children. Embroidered or felt features are safer alternatives.
Conclusion
The Fish drawstring bag – pattern is a joyful and functional craft project that invites creativity at every step. Whether you’re making one as a personal accessory, a gift, or a fun project with your kids, the charm of the fish design is sure to make people smile.
We’ve covered everything from what the pattern is, the tools you need, and
step-by-step instructions to fun ideas for customization. With just a little time and imagination, you can transform yarn or fabric into a whimsical bag that’s truly your own.
If you enjoyed this article or created your own version, please leave a sincere opinion or suggestions in the comments below. We love hearing from fellow makers and sharing ideas that help grow our creative community!