If you’re looking for a practical and stylish project, the Herringbone drawstring crochet bag – pattern is a perfect choice.
With its unique texture, functional design, and customizable size, this crochet bag has quickly become a favorite among crafters who want to create something both beautiful and useful.
Whether you’re a beginner looking for a manageable project or an experienced crocheter hoping to try a new stitch, this pattern offers the best of both worlds.
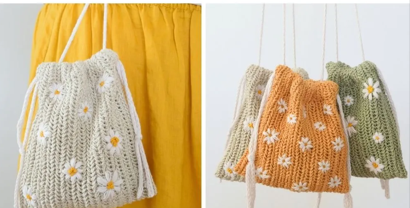
The hallmark of the Herringbone drawstring crochet bag – pattern is its use of the herringbone half double crochet stitch. This stitch produces a tightly woven, diagonal texture that looks sophisticated and modern. Paired with a drawstring closure and optional lining, the finished product is durable, stylish, and perfect for everyday use—from market shopping to carrying your latest WIP (work in progress).
In this article, we’ll explore everything you need to know about crafting this bag. From understanding the materials and stitch techniques to assembling and finishing your project, we’ve broken it all down step by step. We’ll also include styling ideas, customization tips, and a helpful FAQ to make sure you’re fully equipped to bring your vision to life.
1. What Is the Herringbone Drawstring Crochet Bag – Pattern?
The Herringbone drawstring crochet bag – pattern is a modern and functional crochet project that features the herringbone half double crochet stitch, giving it a stylish and structured look. Unlike traditional crochet bags that often use single or double crochet stitches, this pattern brings a fresh twist with its diagonal texture and dense fabric.
What makes the herringbone stitch ideal for bags is its strength. The stitch produces a tight weave that adds durability, making the bag less stretchy and more capable of holding heavier items. This stitch also creates a visually interesting texture, giving the bag a boutique, hand-crafted appearance without the need for complex colorwork or shaping.
The drawstring closure adds both practicality and charm. It allows you to open and close the bag quickly while also adding a decorative element. You can use matching yarn, rope, or even a leather cord for a stylish accent that matches your personal style.
Typically, the bag is constructed in the round, beginning with a flat circle or oval base. After building the base to the desired size, you’ll work the sides upward in continuous or joined rounds using the herringbone stitch. The drawstring channel is usually formed by creating a row of chain spaces or eyelets near the top.
This Herringbone drawstring crochet bag – pattern is extremely customizable. You can change its dimensions, add inner pockets, line it with fabric, or use contrasting colors for the base and body. With just a few tweaks, it can go from a casual beach tote to a chic handbag.
Whether you’re making it for yourself, a gift, or even to sell at craft fairs, this bag delivers both functionality and fashion. It’s one of those projects that is not only fun to make, but also satisfying to use every day.
2. Materials and Tools Needed
Before getting started with the Herringbone drawstring crochet bag – pattern, it’s important to gather the right materials. Having the correct yarn, hook, and accessories on hand ensures your bag turns out just the way you envision it.
First, choose a sturdy yarn. Worsted weight cotton yarn is ideal for this pattern because it’s strong, holds shape well, and has minimal stretch. Cotton also makes your bag more washable and durable for daily use. You can also consider cotton blends for added softness.
You’ll need a crochet hook suited to your yarn. Typically, a 4.5 mm (US 7) or 5 mm (H-8) hook works well for worsted weight yarn. If your stitch tends to be loose, going down a hook size will help achieve the tighter weave needed for bag construction.
In addition to yarn and hook, gather a stitch marker (especially helpful when working in the round), scissors, a yarn needle for weaving in ends, and a measuring tape. These basics will make your process smoother and more accurate.
For the drawstring, you can crochet a chain, use a thick cord, or even opt for a stylish ribbon or leather lace. If you’d like to add beads or tassels to the ends, gather those embellishments in advance as well.
Some crafters like to line their bags with fabric for extra strength and a finished look. If you plan to line yours, you’ll need lightweight fabric, a needle and thread (or sewing machine), and pins. Choose a cotton or linen lining that complements your yarn color.
Finally, if you plan to add a base insert for extra structure, consider using plastic canvas or a stiff interfacing. This helps the bag maintain its shape and makes it more versatile for carrying heavier items like books or groceries.
3. Step-by-Step: Crafting the Bag
Creating your own Herringbone drawstring crochet bag – pattern involves several steps that are easy to follow and highly customizable. Here’s how you can build your bag from start to finish.
Start with the base. Most patterns use a flat circle or oval to create a stable foundation. You’ll begin with a magic ring and increase your rounds evenly. If you’re aiming for a wider bag, increase your base to a larger diameter before working the sides.
Once your base is complete, you’ll switch to the herringbone half double crochet stitch to begin the body. This stitch involves inserting your hook, yarning over, pulling through, and immediately pulling through the first loop on your hook before completing the hdc. The result is a distinctive diagonal pattern.
Work in the round, either in a spiral or with joined rounds, depending on your pattern. Use a stitch marker to keep track of the beginning of each round. Continue stitching upward until the bag reaches your desired height—usually 8 to 12 inches tall for a medium-sized bag.
To create the drawstring section, switch to a round with chain spaces (e.g., dc in next 3 sts, ch 1, skip 1) to form eyelets. This allows the drawstring to pass through easily. After the eyelet row, you can finish with a few rounds of regular stitch for a clean top edge.
Once the crocheting is done, fasten off and weave in all ends with your yarn needle. Thread your drawstring through the eyelets using a safety pin or yarn needle. If you’ve made a long drawstring, you can knot the ends or add tassels or beads for a decorative finish.
Optionally, sew a fabric lining into the inside of the bag for added support. Attach it with small, even stitches along the inside top edge. Your bag is now ready to be filled with your essentials and shown off wherever you go!
4. Styling and Customizing Your Bag
The beauty of the Herringbone drawstring crochet bag – pattern lies in its versatility. With just a few creative choices, you can adapt the look and feel of the bag to match your personal style or occasion.
For a boho vibe, use natural tones like cream, rust, and olive, and add fringe or wooden beads to the drawstring. This gives your bag a casual, earthy feel perfect for weekend markets or festivals.
If you’re aiming for a chic and polished look, stick with a solid color in deep navy, black, or burgundy. Add a leather cord as the drawstring and line the interior with satin fabric for an upscale touch.
Use color blocking to create visual interest. Try making the base one color and the body another. You can also create vertical stripes or even change colors each row for a gradient or ombré effect.
For a fun, personalized bag, consider adding appliqués like crochet flowers, patches, or initials. These additions make the bag uniquely yours and are especially fun when gifting the bag to someone else.
Make multiple sizes! A small version works perfectly as a pouch or mini handbag, while a large version can double as a beach tote or project bag. Adjusting the number of rounds in the base and body makes it easy to scale.
Finally, consider adding hardware like D-rings or a crochet strap to wear the bag crossbody or over the shoulder. This turns your handmade piece into a practical everyday accessory that’s as functional as it is beautiful.
FAQ: Herringbone Drawstring Crochet Bag – Pattern
Is the herringbone stitch beginner-friendly?
It’s slightly more advanced than basic stitches but still accessible for confident beginners. With a little practice, most crocheters pick it up quickly.
How long does it take to complete the bag?
On average, it takes 6–10 hours depending on your skill level and the size of the bag. It’s a great weekend project.
What kind of yarn works best?
Worsted weight cotton yarn is recommended for strength and shape retention. Acrylics work but may stretch more over time.
Can I line the bag?
Yes, and it’s encouraged for added durability and to prevent items from poking through. Lightweight cotton fabric works well.
Can I sell bags made from this pattern?
Yes, as long as the pattern is marked for personal or commercial use. Always respect the designer’s terms of use if following a published pattern.
Is the drawstring secure enough to keep items inside?
Absolutely. If you want extra security, you can add a button or toggle to the drawstring or sew in a magnetic snap.
Conclusion
The **Herringbone
drawstring crochet bag – pattern** is more than just a beautiful project—it’s a blend of function, fashion, and creativity. With its unique stitch texture, sturdy construction, and endless customization options, this bag is a must-try for crocheters of all skill levels.
We’ve covered what the pattern is, the materials you need, how to build it step by step, and creative ideas for styling and enhancing your bag. Whether you want a casual carry-all or a personalized gift, this pattern delivers flexibility and satisfaction.
If you found this guide helpful, please leave your honest opinion or any suggestions in the comments. We’d love to hear about your experience with the pattern or see photos of your finished bag. Happy crocheting!