The Flying Geese Block – Pattern is a timeless and versatile design that has long been a favorite among quilters. Whether you’re crafting a traditional quilt or adding a modern twist to your patchwork, this block offers structure, movement, and endless creative potential.
With its clean lines and geometric elegance, it’s a cornerstone of quilting design.The simplicity of the Flying Geese Block allows for easy repetition and integration into larger quilt projects.
Whether you use it as a border, centerpiece, or scattered accent, the Flying Geese Block – Pattern adapts beautifully to all styles. It works well with solids, prints, and even scraps—making it a go-to block for both beginners and experienced quilters.
In this article, we’ll break down everything you need to know about working with the Flying Geese Block – Pattern, including different methods for construction, design ideas, tips for accuracy, and how to use the block creatively in your quilts. Whether you’re just discovering this classic design or looking for new ways to incorporate it into your work, read on for an in-depth guide.
1. What Is a Flying Geese Block and Why It’s So Popular
The Flying Geese Block – Pattern is a rectangular quilt block composed of one large triangle (the “goose”) flanked by two smaller triangles (the “sky”). When repeated, these blocks create dynamic rows that suggest movement—hence the name “flying geese.”
What makes the Flying Geese Block so appealing is its combination of simplicity and flexibility. It’s easy to learn but can be transformed into incredibly sophisticated patterns. By adjusting fabric colors and layout, you can create stars, chevrons, arrows, and other visually striking motifs.
Another reason for its popularity is how well it pairs with other quilt blocks. It can frame blocks like log cabins or serve as sashing between more complex units. The rectangular shape also makes it ideal for borders, adding flow and direction to your overall quilt layout.
Many quilters also love the Flying Geese Block – Quilt Pattern for its efficiency. Depending on the method used, you can produce multiple units at once, saving time while maintaining accuracy. This makes it ideal for large projects and batch sewing.
Traditionally, flying geese were made using templates or cut triangles, but today’s quilters have a variety of quick and accurate construction methods at their disposal. Techniques like the “no waste” and “four-at-a-time” methods allow for clean edges and faster results.
Ultimately, the Flying Geese Block offers a perfect mix of tradition and innovation. It’s a gateway block for beginners and a design tool for experienced quilters looking to explore more complex compositions.
2. Different Methods to Construct Flying Geese Blocks
There are several ways to create the Flying Geese Block – Quilt Pattern, and each method has its own strengths. Choosing the right one depends on your comfort level, desired size, and whether precision or speed is more important for your project.
The Traditional Method involves sewing two small triangles to opposite sides of a large triangle. While this method is easy to understand, it can be tricky to get perfect points, and the bias edges may stretch if not handled carefully.
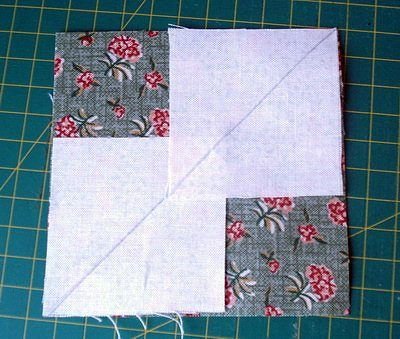
A more popular choice today is the “Four-at-a-Time” Method, which creates four blocks from just one large square and four smaller squares. This method eliminates fabric waste and is great for consistent sizing. It’s fast, efficient, and perfect for mass production.
The “No Waste” Method is similar but more controlled. It involves marking diagonal lines on smaller squares, sewing them to the corners of a larger square, and trimming the excess fabric. This method is great for accuracy and keeps your points crisp.
Some quilters prefer using Flying Geese Rulers or Templates for precision. These tools are especially helpful if you’re making blocks in non-standard sizes or want perfectly aligned geese every time. Specialty rulers also save time in trimming.
Paper Piecing is another option, especially if you’re working with small blocks or complex layouts. It provides unmatched precision and is a good choice for miniature quilts or intricate wall hangings. However, it does create some fabric waste.
Lastly, pre-cut kits and die-cutting machines (like AccuQuilt) offer an easy and fast way to build Flying Geese Blocks, especially for beginners. These tools eliminate the guesswork and let you focus on sewing.
3. Design Ideas Using the Flying Geese Block – Quilt Pattern
The Flying Geese Block – Quilt Pattern is more than just a building block—it’s a design element that can shape the entire look of your quilt. From classic layouts to bold, modern interpretations, the possibilities are endless.
A Traditional Row Layout uses the blocks flying in a single direction across the quilt, creating a strong sense of motion. This is ideal for minimalist quilts or projects where you want the colors or prints to shine.
You can also try a Chevron Layout, where blocks alternate direction, forming a zigzag pattern. This look is both modern and dynamic, especially when done in high-contrast colors or gradients.
Another great option is the Star Formation, where four flying geese blocks radiate out from a central point, forming a star. These stars can be repeated across the quilt for a stunning symmetrical design.
The Circular or Radiating Layout arranges the blocks in a spiral or sunburst pattern. This technique requires careful planning but creates a striking visual impact. It’s perfect for medallion quilts or art quilts.
You can also use the Flying Geese Block as sashing or borders. It frames your focal blocks with movement and contrast, guiding the eye around the quilt and adding professional-looking detail.
Lastly, the block works beautifully in scrap quilts, where each goose is made from a different fabric. This not only reduces waste but also adds character and color to your project. It’s a great way to use up your stash and make each quilt unique.
4. Tips for Perfect Flying Geese Blocks Every Time
Achieving consistent, accurate Flying Geese Blocks can be tricky at first, but with a few tips and tricks, you’ll quickly improve your results and enjoy the process more.
Accurate Cutting is the foundation of any good quilt block. Use a sharp rotary cutter, ruler, and cutting mat, and double-check your measurements before cutting. Precision at this stage saves frustration later.
When sewing, always Use a ¼-Inch Seam Allowance and test it before starting. Even a small variance can cause your blocks to turn out too small or misaligned. A ¼-inch quilting foot helps maintain consistency.
Press, Don’t Iron. Gently press seams with an up-and-down motion instead of dragging the iron, which can stretch fabric. Press seams open or to one side depending on your layout needs and bulk management.
If you’re using the four-at-a-time or no-waste method, be sure to Mark Diagonal Lines Carefully on your fabric before sewing. A clear line ensures that your stitching is accurate and your geese come out clean and crisp.
Trim Your Blocks after sewing to ensure they’re all the same size. Even if they look close, small differences add up when assembling a quilt top. Use a flying geese ruler or square ruler for best results.
Finally, Chain Piece When Possible. This speeds up production and keeps your workflow smooth. It also helps reduce thread waste and keeps you focused on accuracy and efficiency.
FAQ: Flying Geese Block – Quilt Pattern
Q1: What is the standard size of a Flying Geese Block?
The most common size is 2″ x 4″ finished, but blocks can be scaled to fit any quilt design. Just keep the width twice the height for proper proportions.
Q2: Why are my points getting cut off?
This usually happens from inaccurate seam allowances or trimming. Always measure carefully and use a scant ¼-inch seam when assembling blocks.
Q3: Can beginners make Flying Geese Blocks?
Absolutely! The no-waste or four-at-a-time methods are very beginner-friendly. With a little practice, you’ll quickly get the hang of it.
Q4: What’s the best fabric for Flying Geese?
100% quilting cotton is best due to its stability and ease of pressing. Avoid stretchy or thin fabrics, which can distort easily.
Q5: How many Flying Geese Blocks do I need for a quilt?
It depends on the quilt size and design. For a border, you might need 20–40 blocks; for a full quilt top, you might use over 100.
Q6: Do I need special tools to make Flying Geese?
No, but rulers and templates can help with accuracy. You can also use paper piecing or die-cut machines for convenience.
Conclusion
The Flying Geese Block – Quilt Pattern is one of the most enduring and beloved blocks in quilting history—and for good reason. It’s easy to construct, versatile in design, and adaptable to any style or skill level. From simple rows to complex arrangements, this block offers creative freedom and timeless beauty.
Whether you’re making a bold modern quilt or a traditional masterpiece, the Flying Geese Block deserves a spot in your quilting repertoire. It’s the kind of pattern that grows with you as your skills improve and inspires endless variations.
We hope this guide helped you understand
and appreciate the Flying Geese Block – Quilt Pattern in a deeper way. If you’ve used this pattern in your own work, please leave a sincere opinion in the comments and feel free to share tips or suggestions for others in the quilting community.