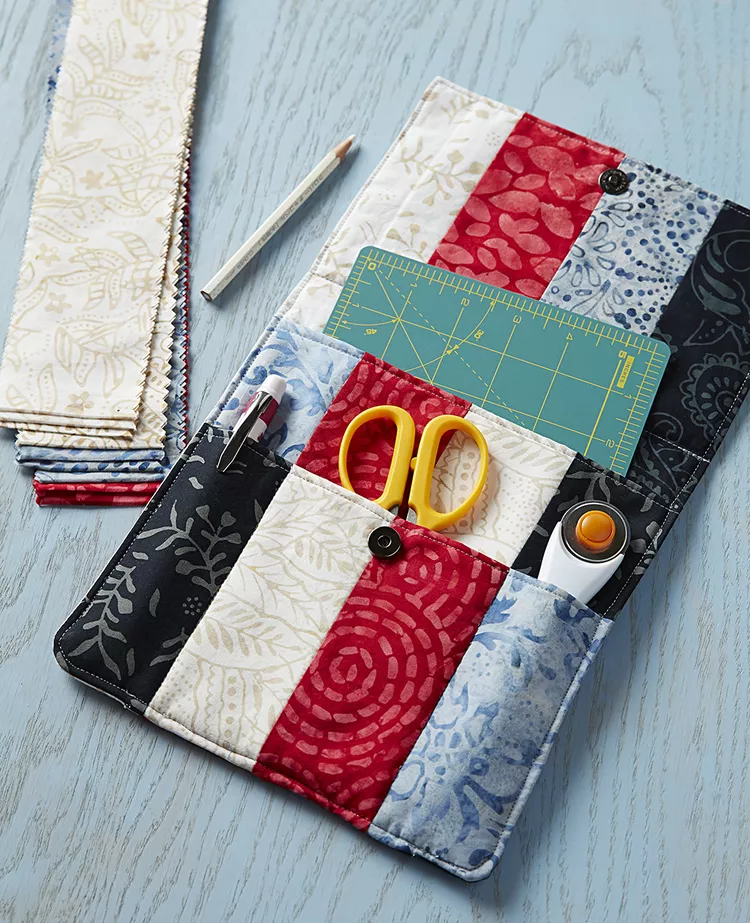
The Mini Rotary-Mat Holder – Quilt Pattern is a must-have tool for quilters who want to keep their workspace organized and efficient.
This small but practical holder allows you to neatly store your rotary mat, making it easily accessible while you work on your quilting projects.
Whether you’re a seasoned quilter or just getting started, this pattern will help you create a functional and stylish storage solution for your tools.
Quilting is a craft that involves precision, and having the right tools organized and at your fingertips can make a huge difference. A Mini Rotary-Mat Holder ensures that your rotary mat is always in its place, preventing damage and reducing clutter on your sewing table. This simple yet effective pattern will help you craft a holder that not only serves its purpose but also adds a personal touch to your quilting space.
In this article, we will explore the steps to create your own Mini Rotary-Mat Holder – Quilt Pattern, providing detailed instructions on materials, assembly, and tips for success.
1. Understanding the Importance of a Rotary-Mat Holder
A Mini Rotary-Mat Holder is essential for keeping your rotary cutting tools organized. Here’s why having one is beneficial for quilters:
- Protects Your Rotary Mat: A rotary mat is a delicate tool that can get scratched or damaged if not stored properly. With a dedicated holder, you can avoid unnecessary wear and tear.
- Saves Space: Quilting involves many tools, and a Mini Rotary-Mat Holder helps keep your workspace tidy by holding your rotary mat in place, freeing up valuable space on your sewing table.
- Convenience: Having a holder for your rotary mat means you won’t have to dig through piles of fabric or other tools to find it. It’s always right where you need it.
- Portable: If you attend quilting classes or workshops, a Mini Rotary-Mat Holder is a great way to keep your rotary mat safe during transport. It’s compact and easy to carry, so you can take it with you anywhere.
- Keeps Your Tools Organized: A dedicated holder helps you maintain an organized space, allowing you to focus on your quilting projects without distractions.
- Adds Personal Flair: By making your own Mini Rotary-Mat Holder, you can customize it to fit your style and match your quilting workspace. It’s a great way to incorporate your personality into your tools.
Now that we understand the importance of a rotary-mat holder, let’s move on to the materials you’ll need to create your own Mini Rotary-Mat Holder.
2. Materials and Tools Needed for the Quilt Pattern
Creating your Mini Rotary-Mat Holder requires just a few basic materials and tools. Here’s a list of what you’ll need to get started:
- Fabric: Choose a fabric that complements your quilting style. Cotton fabric works well for this project, but feel free to experiment with different types depending on your preferences.
- Rotary Mat: The holder is designed to fit your rotary mat, so make sure you have a mat that fits the dimensions of the pattern.
- Quilt Batting: Using quilt batting will add some structure to the holder and protect your mat from damage.
- Thread: Use a strong, durable thread that matches your fabric. This will ensure that your holder holds up well over time.
- Sewing Machine: If you have a sewing machine, it will speed up the process of creating your Mini Rotary-Mat Holder. However, you can also hand-sew if you prefer.
- Scissors or Rotary Cutter: You’ll need sharp scissors or a rotary cutter to cut your fabric and batting to the correct sizes.
- Measuring Tape: To ensure your fabric and batting pieces are the correct size, use a measuring tape to measure your materials accurately.
- Pins or Clips: These will help you secure your fabric pieces together before sewing them, making the process much easier.
With all your materials gathered, you’re ready to start assembling the Mini Rotary-Mat Holder. Let’s look at the step-by-step process.
3. How to Make a Mini Rotary-Mat Holder
Creating your Mini Rotary-Mat Holder involves a few simple steps. Here’s a guide to help you get started:
- Cut the Fabric: Begin by cutting two pieces of fabric for the exterior of your holder. Each piece should be large enough to cover the rotary mat and leave a margin for the seams. Also, cut a piece of quilt batting to match the size of the fabric.
- Prepare the Batting: Lay the quilt batting on top of one piece of fabric, ensuring it’s centered. This layer of batting will provide the necessary cushioning and structure for your holder.
- Pin the Fabric Together: Place the second piece of fabric on top of the quilt batting, right sides facing each other. Pin or clip the fabric pieces together to keep them in place while you sew.
- Sew the Edges: Using a sewing machine, sew around the edges of the fabric, leaving a small opening to turn the holder right-side out. Make sure to sew carefully to secure the batting between the two layers of fabric.
- Turn the Holder Right-Side Out: After sewing, carefully turn the holder right-side out through the opening. Use a pointed tool, like a knitting needle or chopstick, to gently push out the corners for a crisp finish.
- Close the Opening: Once the holder is turned right-side out, use a hand-sewing needle and thread to close the opening. Be sure to sew neatly to ensure the holder looks finished and tidy.
- Topstitch the Edges: To give the holder a clean and professional look, topstitch around the edges. This also helps to secure the layers together and gives the holder a more polished appearance.
With these simple steps, you’ll have a functional and stylish Mini Rotary-Mat Holder ready for use. The final product will help keep your rotary mat safe and organized while adding a touch of creativity to your quilting space.
4. Tips for Customizing Your Mini Rotary-Mat Holder
Now that you’ve made your Mini Rotary-Mat Holder, here are some tips for personalizing and improving your project:
- Choose Fun Fabrics: Select fabrics that match your style or quilting room decor. You can opt for bold patterns, solid colors, or even fabrics that reflect a seasonal theme.
- Add a Pocket: For extra functionality, consider adding a small pocket to the outside of the holder. This can be used to store quilting tools, pens, or other small items you need during your projects.
- Quilt the Fabric: If you want to add a quilted effect to your holder, quilt the fabric before assembling it. This adds texture and visual interest to the design.
- Use a Colorful Thread: Instead of matching the thread to your fabric, use a contrasting or complementary color to add a fun touch to the seams and topstitching.
- Use Fusible Interfacing: If you want a firmer holder, consider adding fusible interfacing to the fabric. This will provide more structure and stability to the holder.
- Embellish with Appliqué: Personalize your holder by adding appliqué designs or embroidery. This could be your initials, a favorite quilting motif, or a decorative border.
With these customization options, you can create a Mini Rotary-Mat Holder that’s as unique and functional as your quilting projects.
FAQ
1. What size should I make the Mini Rotary-Mat Holder? The size of your holder depends on the dimensions of your rotary mat. Measure your mat and add a few extra inches around the edges to ensure a comfortable fit.
2. Can I use a different type of fabric for the holder? Yes! While cotton fabric is ideal, you can experiment with different fabrics such as linen, flannel, or even waterproof fabric if you want something more durable.
3. How do I keep my rotary mat from sliding around? You can add a layer of non-slip fabric or backing to the inside of your holder to keep the rotary mat in place when it’s stored.
4. Can I make a Mini Rotary-Mat Holder for a larger mat? Absolutely! Simply adjust the measurements of your fabric and batting to accommodate a larger rotary mat.
5. Can I make the holder without a sewing machine? Yes! While using a sewing machine will speed up the process, you can also hand-sew the holder if you prefer.
6. How can I ensure my rotary mat stays protected? By creating a holder with quilt batting and using sturdy fabric, your rotary mat will be well-protected from scratches, dirt, and damage.
Conclusion
The Mini Rotary-Mat Holder – Quilt Pattern is a simple yet effective project that will help you keep your rotary mat organized and safe while adding a personal touch to your quilting workspace. By following the steps outlined in this article, you can create a functional and customizable holder that suits your needs.
We hope this article has inspired you to create your own holder and improve your quilting experience. Please share your thoughts or suggestions in the comments below – we’d love to hear from you!