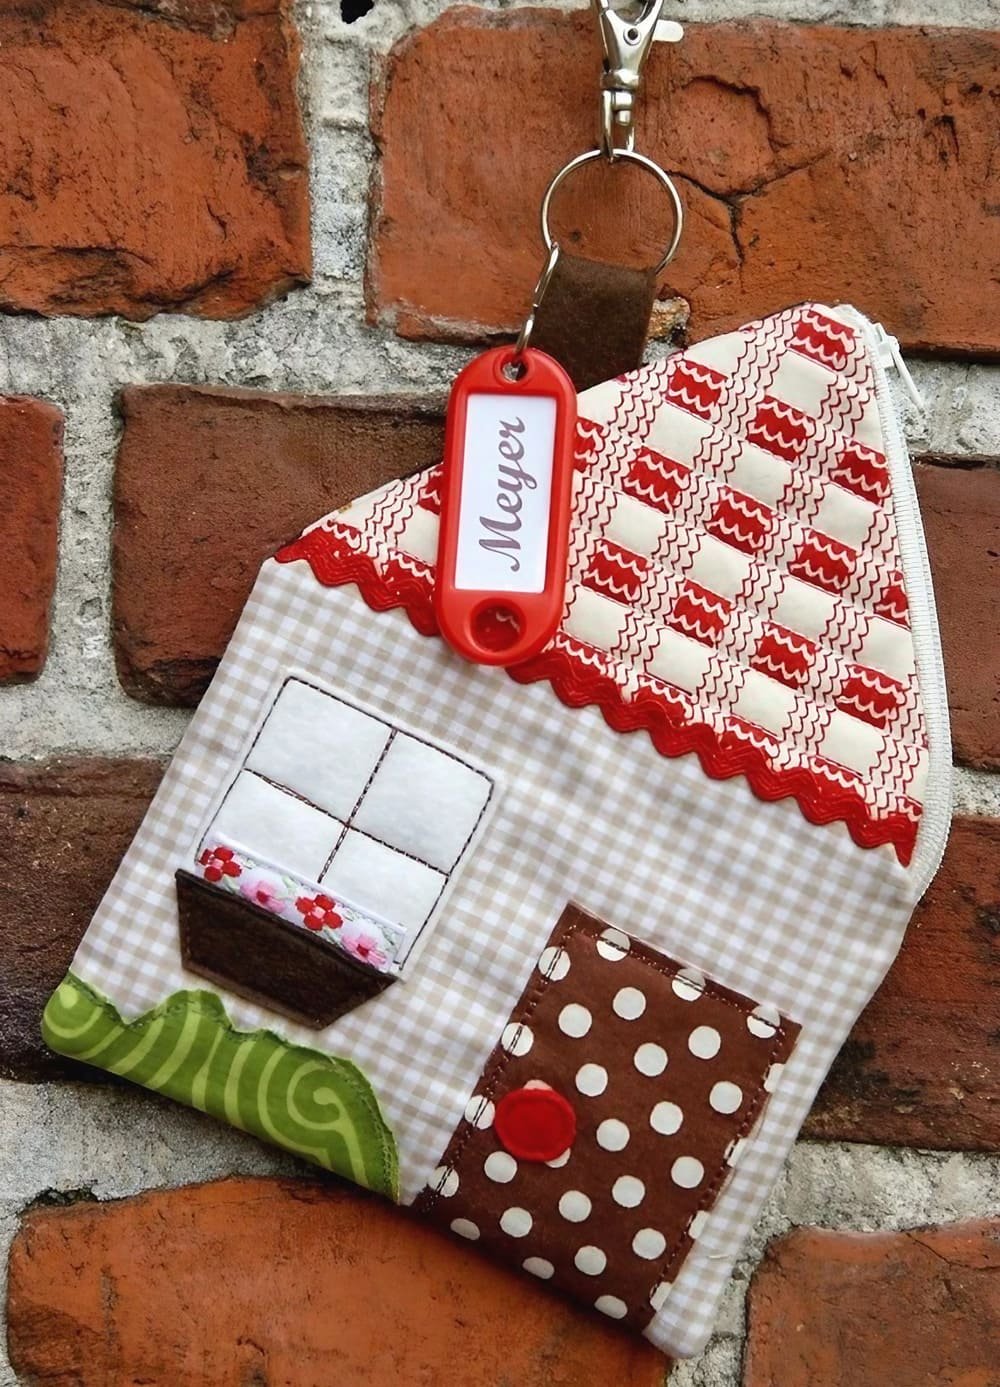
If you love sewing small, fun accessories, the Mini Zipper Pouch House – Pattern is a delightful project to add to your crafting repertoire. This pattern transforms simple fabric and a zipper into an adorable pouch shaped like a little house. Perfect for storing coins, makeup, small sewing supplies, or even as a cute gift, this mini pouch combines creativity and functionality in a charming design.
The Mini Zipper Pouch House – Pattern is accessible to sewists of all skill levels. Whether you are a beginner looking for an engaging project or an experienced sewer wanting a quick, enjoyable task, this pattern is versatile enough to fit your needs. Plus, the house shape allows endless customization options with fabrics, colors, and embellishments.
Throughout this article, we’ll explore everything you need to know about creating your own Mini Zipper Pouch House – Pattern. From choosing the right materials and tools to step-by-step sewing instructions and creative ideas, you’ll be inspired to craft a pouch that is both adorable and practical.
1. Why Choose the Mini Zipper Pouch House – Pattern?
The Mini Zipper Pouch House – Pattern stands out because it offers a blend of whimsical design and everyday use. Unlike regular rectangular pouches, this house-shaped pouch adds personality and charm to a simple accessory. It instantly becomes a conversation starter and a favorite item to carry.
One reason many sewists love this pattern is the compact size. The mini pouch fits perfectly in purses or backpacks, making it an excellent choice for organizing small essentials on the go. It’s ideal for keeping lip balm, earbuds, jewelry, or tiny sewing notions all in one place.
This pattern also encourages fabric experimentation. You can use patterned cottons, canvas, or even repurpose old clothing to give your pouch a unique look. Mixing prints for the roof, walls, and door sections adds depth and character to your finished project.
Additionally, the Mini Zipper Pouch House – Pattern is perfect for gifting. Handmade gifts carry a special meaning, and a pouch shaped like a cozy house feels warm and thoughtful. Personalize it with initials, buttons, or appliqué for an extra special touch.
For beginners, the pattern teaches useful sewing skills like zipper insertion, topstitching, and fabric layering. Experienced sewers can enjoy tweaking the design, playing with size, or adding extra features such as lining or pockets.
Finally, this pattern is quick to sew. Most sewists can complete it within a couple of hours, making it a satisfying project that doesn’t require a huge time commitment.
2. Materials and Tools Needed for the Mini Zipper Pouch House – Pattern
To successfully sew your Mini Zipper Pouch House – Pattern, gathering the right materials and tools is essential. Starting with quality supplies ensures a polished final product and a pleasant sewing experience.
Begin with cotton quilting fabrics for the best structure and ease of sewing. Choose three coordinating fabrics: one for the house walls, one for the roof, and one for the door or window accents. Canvas or denim can also be used for a sturdier pouch.
You will need a 7-9 inch zipper, preferably in a color that complements your fabric choices. The zipper is a key component that allows the pouch to open and close securely.
Basic sewing supplies include:
- Sewing machine with a zipper foot
- Scissors or rotary cutter and mat
- Pins or clips
- Thread matching your fabrics
- Iron and ironing board for crisp seams
- Fabric marker or chalk to transfer the pattern
For added flair, you might want decorative buttons, embroidery floss, or fabric paint to personalize your pouch further.
Don’t forget the printed or digital copy of your Mini Zipper Pouch House – Pattern. Having clear, step-by-step instructions on hand will make the sewing process smooth and enjoyable.
3. Step-by-Step Guide to Sewing Your Mini Zipper Pouch House
Starting your Mini Zipper Pouch House – Pattern is exciting and straightforward if you follow these steps carefully. Here’s a general overview to guide you from fabric cutting to final stitching.
First, prepare your fabrics by washing and ironing them. This step pre-shrinks the material and removes wrinkles for easier cutting.
Next, cut out the pieces according to the pattern: the house base, roof, door, and any additional details like windows or chimney. Precision here ensures your pouch will fit together nicely.
Attach the zipper to the house base pieces by aligning fabric edges with the zipper tape and sewing carefully using a zipper foot. Repeat for both sides.
Sew the roof piece to the house base, following the pattern’s instructions to achieve the signature house shape. Press the seams open to reduce bulk.
Add the door or window applique pieces using a combination of sewing or fabric glue, depending on your preference. Embroidery or buttons can be added at this stage for decorative effect.
Finally, sew the lining inside the pouch for a neat finish. Turn the pouch right side out through the zipper opening and give it a final press.
Remember to topstitch along the zipper for durability and a professional look.
4. Creative Ideas and Customizations for Your Mini Zipper Pouch House
The beauty of the Mini Zipper Pouch House – Pattern is its endless potential for customization. Here are some ways you can make your pouch uniquely yours:
Try different fabric themes—floral prints for a cottage vibe or geometric patterns for a modern look. Seasonal fabrics also make lovely holiday gifts.
Add a little chimney or flower box appliqué to enhance the house effect. These small details make your pouch stand out.
Use contrasting thread colors for topstitching to add visual interest and highlight the pouch’s shape.
Consider enlarging or reducing the pattern to create various sizes—from tiny coin purses to larger makeup bags.
Experiment with zipper styles—metal teeth for a rugged look or invisible zippers for sleekness.
Finally, gift your pouch as a set with other handmade accessories like matching fabric bookmarks or keychains for a thoughtful present.
FAQ: Mini Zipper Pouch House – Pattern
Q1: Is the Mini Zipper Pouch House pattern suitable for beginners?
Yes! The pattern is designed with straightforward steps that are perfect for beginners, especially those learning how to sew zippers.
Q2: Can I use other fabrics besides cotton?
Absolutely. Canvas, denim, and linen are great alternatives if you want a sturdier pouch. Just make sure your sewing machine can handle thicker materials.
Q3: How long does it take to sew one pouch?
Most sewists finish a mini pouch in 2-3 hours, depending on experience and added embellishments.
Q4: Can this pouch be machine washed?
Yes, if you use washable fabrics and thread. Close the zipper before washing and use a gentle cycle to preserve shape.
Q5: Where can I find the Mini Zipper Pouch House pattern?
Many independent designers offer this pattern online, both free and paid. Always choose one with clear instructions and good reviews.
Q6: Can I sell pouches made with this pattern?
Check the pattern’s licensing terms. Some designers allow handmade sales with credit, while others may have restrictions.
Conclusion
The Mini Zipper Pouch House – Pattern is a charming and practical sewing project perfect for all skill levels. It combines creativity with function, allowing you to craft a unique accessory that is both useful and adorable. From selecting fabrics to sewing the zipper and personalizing the details, this pattern offers a fun way to sharpen your sewing skills and create a delightful pouch.
We’ve covered why this pattern is a favorite, the necessary materials, detailed sewing steps, and inspiring customization ideas. Now it’s your turn to start stitching and bring your mini house pouch to life!