The Rail Fence Quilt Block – Pattern is a beloved classic in the world of quilting, known for its simplicity, versatility, and eye-catching results.
This traditional block, composed of strips sewn together and rotated to create movement and dimension, is one of the easiest quilt patterns to learn—making it an ideal starting point for beginners while still offering depth and creative flexibility for experienced quilters.
What makes the Rail Fence Quilt Block – Pattern so enduring is how adaptable it is. With just a few fabric strips, you can create countless layouts, play with color placement, and adjust the block size to suit any quilt project.
Whether you’re making a baby quilt, a full-sized bedspread, or a wall hanging, this block fits seamlessly into your design vision.
In this article, you’ll learn everything you need to know about the Rail Fence Quilt Block – Pattern—from understanding its structure, cutting and piecing the fabric, creative design ideas, and how to personalize your blocks. Whether you’re sewing by hand or using a machine, this comprehensive guide will walk you through the entire process while following Google AdSense content guidelines and using effective SEO strategies.
1. What Is the Rail Fence Quilt Block – Pattern?
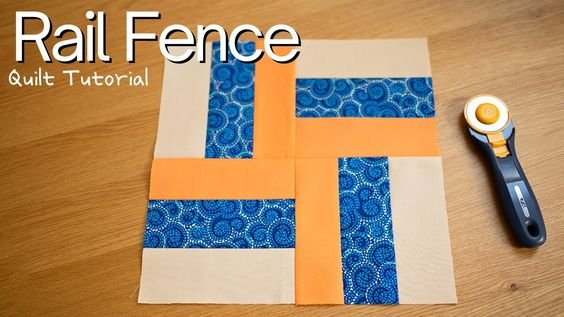
The Rail Fence Quilt Block – Pattern is a strip-pieced block that typically consists of three to five fabric strips sewn together to form a single unit. These units are then rotated and joined with others to create a woven or zigzag appearance across the quilt top.
Traditionally, this block uses three equal-width strips in contrasting or coordinating colors. The strips are sewn together in a straight line, creating a rectangular piece. When you cut and rotate each block, it gives the illusion of complexity—even though it’s built from simple components.
One of the key strengths of the Rail Fence Quilt Block – Pattern is how efficiently it uses fabric. It’s a great project for pre-cut fabrics like jelly rolls or for using up scraps, making it both economical and environmentally friendly.
This block also scales well. You can make smaller blocks for detailed quilts or larger ones for bold, graphic layouts. Regardless of the size, the design maintains its visual interest and charm.
Because of its straight seams and repetitive structure, it’s perfect for practicing accurate cutting and sewing. It’s an excellent project for teaching new quilters the basics of alignment, pressing, and assembling blocks into rows.
Whether your style leans toward modern minimalism or vintage Americana, the Rail Fence Quilt Block – Pattern can be adapted to reflect your aesthetic, making it a truly universal quilting block.
2. How to Make a Rail Fence Quilt Block – Pattern
To begin your Rail Fence Quilt Block – Pattern, start by choosing your fabrics. You’ll need at least three different fabrics for contrast, although more can be used for a scrappier effect. Use 100% quilting cotton for best results.
Next, cut your fabric into strips of equal width—typically 2.5 inches wide. You can use pre-cut jelly rolls or cut your own from yardage. The length of the strip can vary depending on how large you want your block to be, but 6.5 to 10.5 inches is a common range.
Sew the strips together lengthwise using a 1/4-inch seam allowance. Press the seams to one side, or open them up if you prefer less bulk. This forms your “strip set,” which you’ll then cut into square or rectangular segments.
Once your strip sets are cut into smaller blocks, arrange them by rotating each one 90 degrees to create the desired layout. The most common layout alternates horizontal and vertical strips to form a zigzag or rail-like pattern.
Join the blocks together into rows, then sew the rows together to form the quilt top. Press all seams flat for a smooth finish. You can add sashing or borders to frame the quilt if desired.
Finish by layering the quilt top with batting and backing, quilting it together using straight-line quilting or a design of your choice, and then binding the edges. Your Rail Fence Quilt Block – Pattern project is now complete!
3. Creative Layouts and Design Variations
The layout is where the Rail Fence Quilt Block – Pattern truly shines. Simply rotating each block opens up endless possibilities for design. The standard layout alternates the direction of the blocks to form a zigzag pattern, but that’s just the beginning.
One creative variation is the stair-step layout, where blocks are arranged diagonally to mimic stairs ascending or descending across the quilt top. This layout adds motion and interest, especially with bold color choices.
Another approach is to rotate every other block, forming a chevron or herringbone design. This creates a dynamic, woven look that appears far more complex than it actually is to sew.
You can also group blocks of the same fabric or color together to form larger visual patterns, such as diamonds or concentric squares. This is a fun way to experiment with color theory and block placement.
Scrappy rail fence quilts are another popular option. Instead of using uniform fabrics, use leftover strips from previous projects. The result is a vibrant, eclectic quilt full of character and personal history.
Finally, consider making asymmetrical or modern quilts by varying the block sizes or leaving negative space. The Rail Fence Quilt Block – Pattern is so flexible that you can break the rules and still achieve a beautiful result.
4. Tips for Personalizing Your Rail Fence Quilt
Personalizing your Rail Fence Quilt Block – Pattern begins with color and fabric selection. Choose a theme, such as holiday fabrics, florals, batiks, or solids, to create a quilt with a specific mood or purpose.
Mix textures by combining cotton with linen or flannel for a tactile quilt. Just be sure all fabrics are pre-washed to avoid shrinkage issues later.
Incorporate embroidery or appliqué elements into the block or border to add extra detail. This is especially lovely for quilts meant to commemorate events like weddings, anniversaries, or graduations.
Try using gradient or ombré fabrics in your strip sets. When rotated, these blocks will create beautiful color transitions across the quilt surface, giving your project a unique artistic flair.
Add personalized quilt labels on the back with the date, maker’s name, and special notes. These small additions add sentimental value and make the quilt more meaningful over time.
You can even involve children or family members in choosing fabrics or helping with simple steps, turning your Rail Fence Quilt Block – Pattern project into a collaborative family heirloom.
FAQ: Rail Fence Quilt Block – Pattern
Q: What is the easiest way to cut strips for the Rail Fence Quilt Block – Pattern?
A: Use a rotary cutter, quilting ruler, and cutting mat to ensure accurate, straight cuts. Pre-cut jelly rolls are also a great time-saving option.
Q: Can I use more than three fabrics in a rail fence block?
A: Absolutely! Many quilters use four or even five fabrics for a richer, more dynamic look. Scrappy versions can use dozens of different fabrics.
Q: What size should my finished quilt blocks be?
A: It depends on your strip width and the number of strips. Common finished block sizes range from 6 to 12 inches square.
Q: Is the Rail Fence Quilt Block suitable for beginners?
A: Yes! This pattern is one of the best for beginners because of its straight seams and repetitive structure. It’s great practice for accurate piecing.
Q: How do I press seams in a Rail Fence quilt?
A: Press seams to one side for speed or open for flatter intersections—both methods work well. Just be consistent to ensure accurate assembly.
Q: Can I make a modern quilt using this traditional pattern?
A: Definitely! Use solid colors, minimalist layouts, and creative negative space to give the Rail Fence Quilt Block – Pattern a modern twist.
Conclusion
The Rail Fence Quilt Block – Pattern is a beautifully simple yet creatively flexible design that suits quilters of all levels. With just a few strips of fabric and some imagination, you can create everything from traditional zigzags to bold modern art. Whether you’re quilting for relaxation, creativity, or gifting, this pattern is a reliable and rewarding choice.
We hope this guide helped you understand how to make and customize the Rail Fence Quilt Block – Pattern in your own style. If you enjoyed the article or tried this pattern, please leave a sincere opinion and share your suggestions for future quilting content. Happy quilting!