The Swoon Sixteen Block – Tutorial is exactly what you need if you are looking to elevate your quilting game with a project that blends classic aesthetics with a modern, vibrant flair. This specific pattern has taken the quilting world by storm because it offers a perfect balance of geometric precision and creative freedom, allowing makers to experiment with various fabric combinations. Whether you are a seasoned quilter or a motivated beginner, mastering the Swoon Sixteen Block – Tutorial will provide you with a versatile foundation for creating stunning quilts, throw pillows, or even wall hangings that command attention.
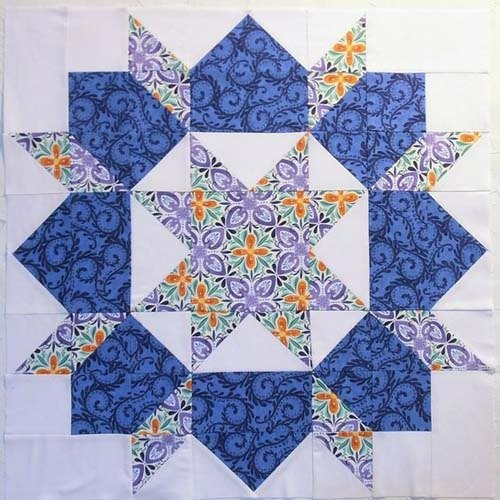
In this comprehensive guide, we will dive deep into every aspect of the Swoon Sixteen Block – Tutorial, ensuring that you understand the underlying structure and the best techniques for assembly. The beauty of this block lies in its “star-within-a-star” appearance, which creates a sense of depth and movement across the fabric. By following this Swoon Sixteen Block – Tutorial, you will learn how to manage multiple seams and points with ease, resulting in a professional-grade finish that looks far more complex than it actually is to sew.
Quilting is an art form that thrives on detail, and the Swoon Sixteen Block – Tutorial is designed to highlight those details through careful color selection and precise cutting. As we progress through this article, we will explain the essential terminology and the step-by-step process required to bring this block to life. Our goal is to provide you with a high-quality Swoon Sixteen Block – Tutorial that not only teaches you the “how-to” but also inspires you to infuse your personal style into every stitch you make.
1 Understanding the Anatomy of the Swoon Sixteen Block – Tutorial
The Swoon Sixteen Block – Tutorial centers around a large-scale quilt block that typically measures 16 inches square when finished, hence the name. This size is particularly advantageous for quilters who want to complete a project quickly, as it covers more surface area than traditional 12-inch blocks. The Swoon Sixteen Block – Tutorial is essentially a variation of the classic Star Block, utilizing Half-Square Triangles (HSTs) and Flying Geese units to create its signature pointed petals.
To start your journey with the Swoon Sixteen Block – Tutorial, you must first grasp the importance of Fabric Contrast. Because the design relies on interlocking shapes, choosing a bold Focal Fabric for the stars and a neutral Background Fabric is vital for making the pattern “pop.” Without sufficient contrast, the intricate geometry of the Swoon Sixteen Block – Tutorial might get lost, leading to a muddy appearance that hides your hard work.
Precision cutting is the backbone of the Swoon Sixteen Block – Tutorial. Since this block involves many intersecting seams, being off by even a fraction of an inch can lead to misaligned points. We recommend using a high-quality Rotary Cutter and an Acrylic Ruler to ensure every square and triangle is uniform. In this Swoon Sixteen Block – Tutorial, we emphasize that taking your time during the cutting phase will save you hours of frustration at the sewing machine.
Another key component mentioned in this Swoon Sixteen Block – Tutorial is the Seam Allowance. In the world of quilting, the Quarter-Inch Seam (1/4″) is the gold standard. When assembling the Swoon Sixteen Block – Tutorial, maintaining a consistent seam allowance ensures that all sixteen units fit together perfectly like a puzzle. If your seams are too wide, your block will shrink; if they are too narrow, the block will be oversized and unstable.
The Swoon Sixteen Block – Tutorial also introduces the concept of Unit Construction. Rather than sewing the entire block at once, you will create sub-units like HSTs and Square-in-a-Square components. This modular approach makes the Swoon Sixteen Block – Tutorial much more manageable for beginners. By focusing on one unit at a time, you can ensure each piece is squared up before moving on to the final assembly of the large block.
Finally, the Swoon Sixteen Block – Tutorial encourages the use of Directional Prints with caution. If you are using fabric with a specific orientation (like stripes or floral vines), you need to pay close attention to how they are rotated within the block. This Swoon Sixteen Block – Tutorial suggests that beginners stick to Tonals or Non-Directional Prints for their first attempt to keep the process stress-free and enjoyable.
2 Essential Materials and Tools for the Swoon Sixteen Block – Tutorial
Before sitting down at your sewing machine for the Swoon Sixteen Block – Tutorial, you need to gather the right supplies. You will need at least two contrasting fabrics, but many quilters prefer a Scrappy Look using multiple colors for the star points. For a standard Swoon Sixteen Block – Tutorial project, high-quality 100% Cotton Fabric is recommended because it holds its shape well and is easy to press, which is crucial for sharp points.
A reliable Sewing Machine is obviously a must, but the type of foot you use matters significantly. For the Swoon Sixteen Block – Tutorial, using a Quarter-Inch Foot will help you maintain that perfect seam allowance we discussed earlier. Additionally, ensure you have a fresh Microtex or Universal Needle (size 80/12) to prevent skipped stitches while working through the multiple layers of fabric common in the Swoon Sixteen Block – Tutorial.
Thread choice is an often overlooked aspect of the Swoon Sixteen Block – Tutorial. We suggest using a 50wt Cotton Thread in a neutral color like grey, tan, or white. This weight is thin enough to prevent bulk in the seams but strong enough to hold the quilt together for years to come. In this Swoon Sixteen Block – Tutorial, we remind you that the thread should disappear into the fabric rather than stand out, unless you are purposefully using it for decorative quilting later.
Pressing tools are your best friends in the Swoon Sixteen Block – Tutorial. A good Steam Iron and a solid Ironing Board are essential for “setting” your seams. Many professional quilters featured in Swoon Sixteen Block – Tutorials also use a Tailor’s Clapper, which is a wooden tool used to flatten seams immediately after ironing. This technique ensures your Swoon Sixteen Block – Tutorial stays incredibly flat, making the final quilting process much smoother.
Organization is a hidden “tool” for success in the Swoon Sixteen Block – Tutorial. Because there are many small pieces, using Design Boards or labeled bins can keep you from getting confused. This Swoon Sixteen Block – Tutorial recommends laying out your pieces in the final grid pattern before you start sewing. This “dry run” allows you to visualize the color placement and ensures you haven’t accidentally flipped a triangle the wrong way.
Lastly, don’t forget the Marking Tools. In the Swoon Sixteen Block – Tutorial, you will often need to draw diagonal lines on the back of your fabric squares to create HSTs. A Water-Soluble Pen or a Frixion Pen (which disappears with heat) is perfect for this. Accuracy in marking leads to accuracy in sewing, which is the ultimate secret to a beautiful result in the Swoon Sixteen Block – Tutorial.
3 Step-by-Step Assembly of the Swoon Sixteen Block – Tutorial
Now we move into the heart of the Swoon Sixteen Block – Tutorial: the actual construction. The first step involves creating the Half-Square Triangles (HSTs). You will place two squares right sides together, draw a diagonal line, and sew a quarter inch away from both sides of that line. In this Swoon Sixteen Block – Tutorial, we emphasize trimming these HSTs to the exact size specified in your pattern to ensure they align with the other units.
The second phase of the Swoon Sixteen Block – Tutorial is constructing the Flying Geese units. These are the rectangular pieces that look like a triangle within a rectangle, representing the “points” of the star. Many variations of the Swoon Sixteen Block – Tutorial use the Four-at-a-Time Method for Flying Geese to save time and reduce fabric waste. This method is highly efficient and is a favorite among those who follow this Swoon Sixteen Block – Tutorial regularly.
Once your units are prepped, it is time for the Center Square assembly. The center of the Swoon Sixteen Block – Tutorial is often a solid square or a Square-in-a-Square unit. This serves as the anchor for the entire design. As you follow this Swoon Sixteen Block – Tutorial, make sure the center unit is perfectly square; if the center is off-kilter, the entire star will appear skewed once the outer borders are attached.
Next, you will begin joining your units into rows. A standard Swoon Sixteen Block – Tutorial is typically organized into a 4×4 grid. You will sew the first four units together to create Row 1, then the next four for Row 2, and so on. This Swoon Sixteen Block – Tutorial advises Pressing Seams in Opposite Directions for each row. For example, press Row 1 to the right and Row 2 to the left. This technique, known as Nesting Seams, helps the corners lock together perfectly.
After the rows are complete, you will sew the rows together to finalize the Swoon Sixteen Block – Tutorial. This is the most exciting part, as the star pattern finally emerges. Use plenty of Pins at the intersection points to prevent the fabric from shifting. In this Swoon Sixteen Block – Tutorial, we suggest “pinning like a pro” by placing pins on both sides of every seam junction to maintain total control over the fabric.
The final step in this section of the Swoon Sixteen Block – Tutorial is the final press. Lay your finished block face down on a soft towel and press from the back first, then flip it over and press the front. This Swoon Sixteen Block – Tutorial technique ensures that you don’t accidentally create “tucks” or folds in the fabric. Your Swoon Sixteen Block – Tutorial should now be a perfect 16.5-inch square (including seam allowances), ready to be joined with other blocks.
4 Troubleshooting and Expert Tips for the Swoon Sixteen Block – Tutorial
Even with a detailed Swoon Sixteen Block – Tutorial, challenges can arise. One common issue is “chopped off points.” This happens when your seam allowance is slightly too deep, cutting off the tip of your star. To avoid this in your Swoon Sixteen Block – Tutorial, always look for the “X” created by previous seams on the back of your fabric. If you sew directly through the center of that “X,” your points will remain sharp and visible on the front.
If your block is coming out “wavy” or doesn’t lay flat, you might be stretching the fabric as you sew. Because the Swoon Sixteen Block – Tutorial involves many diagonal cuts (bias edges), the fabric is prone to stretching. This Swoon Sixteen Block – Tutorial recommends using Fabric Starch or a sizing spray before cutting your fabric. Starching makes the cotton feel more like paper, which significantly reduces stretching and improves the accuracy of your Swoon Sixteen Block – Tutorial.
Another expert tip for the Swoon Sixteen Block – Tutorial is to use a Scant Quarter-Inch Seam. A “scant” seam is just a thread’s width narrower than a true quarter inch. This accounts for the space the fabric takes up when it is folded over the seam. Many quilters find that using a scant seam in the Swoon Sixteen Block – Tutorial results in blocks that are exactly the right size, rather than being slightly too small.
Color value is also a critical factor in the success of your Swoon Sixteen Block – Tutorial. If you’re unsure if your fabrics work together, take a photo of them on your phone and turn on the “Mono” or “Black and White” filter. This helps you see the Value Contrast without being distracted by the colors. If the fabrics look the same shade of grey, your Swoon Sixteen Block – Tutorial won’t have the visual impact you desire.
Don’t be afraid to Unpick Stitches if something looks wrong. We’ve all been there! This Swoon Sixteen Block – Tutorial is a learning process, and sometimes the Seam Ripper is your most important tool. It is much better to fix a misaligned point now than to look at it for the next twenty years on your bed. The Swoon Sixteen Block – Tutorial is about the journey of creation as much as the final product.
Finally, consider the Scale of the Prints you choose for the Swoon Sixteen Block – Tutorial. Large-scale prints can look beautiful, but they can also “break up” the geometric lines of the star. This Swoon Sixteen Block – Tutorial suggests mixing one large print with several smaller prints or solids to provide “resting places” for the eye. This balance is what makes a quilt made with the Swoon Sixteen Block – Tutorial look professionally designed.
FAQ – Frequently Asked Questions
What is the finished size of a block in the Swoon Sixteen Block – Tutorial? The standard finished size for this block is 16 inches by 16 inches. However, when you are finished sewing it but before it is joined to other blocks, it should measure 16.5 inches to account for the outer seam allowances.
Is the Swoon Sixteen Block – Tutorial suitable for beginners? Yes, it is! While it looks complex, it is composed of basic quilting units like squares and triangles. If you can sew a straight line and maintain a consistent seam allowance, you can successfully complete this tutorial.
How much fabric do I need for one Swoon Sixteen block? Generally, you will need about 1/4 yard of a focal fabric and 1/4 yard of a background fabric per block. This can vary if you are making a “scrappy” version, in which case fat quarters are perfect.
Can I shrink the Swoon Sixteen Block – Tutorial to a smaller size? While possible, it requires recalculating all the math for the individual units. It is recommended for beginners to stick to the 16-inch scale first before attempting to resize the pattern.
Why are my points getting cut off? This is usually due to an inaccurate seam allowance. Ensure you are sewing a “scant” 1/4 inch and that you aren’t sewing past the intersection “X” on the back of your units.
Do I need to wash my fabric before starting the Swoon Sixteen Block – Tutorial? This is a personal preference. Some quilters pre-wash to prevent color bleeding, while others prefer the stiffness of unwashed fabric for easier cutting. If you use high-quality quilting cotton, pre-washing is often unnecessary.
Conclusion
Mastering the Swoon Sixteen Block – Tutorial is a rewarding milestone for any sewing enthusiast. Throughout this guide, we have explored the essential anatomy of the block, the tools required for success, and a detailed step-by-step breakdown of how to assemble these beautiful stars.
By focusing on Precision Cutting, Nesting Seams, and Fabric Contrast, you can create a quilt that is both structurally sound and visually captivating. The Swoon Sixteen Block – Tutorial is more than just a pattern; it is an opportunity to practice foundational quilting skills that will serve you in every future project.