The French Braid Quilt – Pattern is a beloved quilting technique that blends traditional design with modern flair.
Recognized for its elegant, flowing appearance, the French braid layout resembles its namesake hairstyle, with strips of fabric interwoven in a graceful, diagonal motion.
This pattern offers both beauty and flexibility, allowing quilters of all skill levels to explore color, texture, and movement within their projects.
Whether you’re aiming for a sophisticated gradient or a vibrant mix of bold prints, the French Braid Quilt – Pattern offers endless creative possibilities. The simple construction of repeated units makes it approachable, while the final result often looks impressively intricate. This makes it a favorite among quilters who enjoy impressive visual outcomes with manageable effort.
In this article, we’ll explore the origins and appeal of the French Braid Quilt – Pattern, walk you through the basic construction method, share inspiring project ideas, and offer essential tips to help you succeed. We’ll also include a helpful FAQ section to answer common questions about this classic quilt design.
1. The Allure of the French Braid Quilt – Pattern
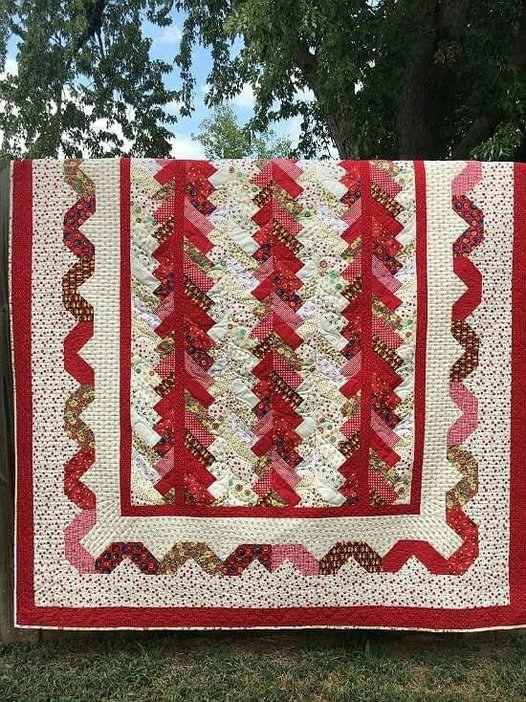
The French Braid Quilt – Pattern gets its name from the traditional hair braiding style, and much like its namesake, it’s all about creating a smooth, flowing structure from simple components. The design consists of long vertical strips arranged to resemble a braid, each strip made up of fabric pieces angled to give the illusion of weaving.
What draws quilters to this pattern is its visual movement. The eye naturally follows the lines of the braid, which often produces a calming and rhythmic effect. This makes it ideal for both decorative and functional quilts, from bedspreads to wall hangings.
Color play is one of the most enjoyable aspects of the French Braid Quilt – Pattern. It works beautifully with ombre or gradient palettes, but can be just as effective with contrasting colors or even a scrappy collection of leftover fabrics. The structured layout helps balance even the boldest choices.
Another reason for the pattern’s popularity is its adaptability. It’s suitable for various quilt sizes, and you can adjust the width and length of your braids to suit your design. This flexibility means you can create anything from narrow table runners to full-sized quilts using the same basic structure.
Despite its sophisticated look, the French braid is quite beginner-friendly. You only need to master straight seams and consistent seam allowances. Because it involves repeating a single construction unit, the learning curve is gentle, and your confidence grows as you progress.
Finally, the French Braid Quilt – Pattern holds a certain timeless charm. While it fits perfectly into modern design aesthetics, it also nods to quilting traditions that span generations. It’s a bridge between past and present—something that appeals to many quilting enthusiasts.
2. How to Create a French Braid Quilt – Pattern Step by Step
To begin a French Braid Quilt – Pattern, gather your materials: a selection of fabrics (at least five to six colors or prints work well), a rotary cutter, quilting ruler, cutting mat, sewing machine, and thread. You’ll also want to choose a neutral background or separator fabric to frame the braid.
Cut your fabric strips—typically 2.5 inches wide by 6 to 8 inches long is a good starting point. Each braid is built from these rectangles, which are sewn together in diagonal rows that create the distinctive braided look. Accuracy in cutting is key to maintaining alignment and symmetry.
Start your braid with a center rectangle, placed vertically. Then, sew the next strip diagonally across one side of the bottom edge. Press the seam, then trim the strip so it aligns neatly with the center rectangle. Repeat the process on the opposite side. Continue alternating sides as you build down the braid.
Keep your angles consistent to maintain the braid shape. Press each seam as you go—this helps the block stay flat and professional-looking. The use of a consistent angle and careful pressing will create clean lines that define the braid pattern clearly.
Once you’ve completed one braid panel, square off the sides. You can add sashing (thin strips of background fabric) between braid panels to give them room to breathe visually. Sashing can also help stabilize the quilt top and make it easier to assemble.
Finally, assemble your quilt top by arranging the braid panels side by side, separated by sashing or borders. Add batting, backing, and bind your quilt using your preferred method. Quilting in the ditch (stitching along the seams) works well with this pattern, emphasizing the braided structure.
3. Project Ideas Using the French Braid Quilt – Pattern
The French Braid Quilt – Pattern is incredibly versatile, making it perfect for a wide range of quilting projects beyond traditional bed quilts. Its linear form and eye-catching design make it ideal for decorative and functional pieces alike.
A common beginner project is the French braid table runner. This smaller piece allows quilters to master the pattern without committing to a full quilt. It’s also a beautiful way to dress up a dining table or sideboard with handmade charm.
French braid panels work wonderfully as quilt borders. You can create a simple center block and use braids to frame it, adding depth and visual interest to an otherwise plain quilt. This works particularly well with holiday-themed quilts or baby quilts.
You can also make pillows or cushion covers using the French braid layout. A single braid down the center of a cushion adds a touch of elegance and handmade craftsmanship. Pair it with coordinating fabrics for a cohesive look in your home decor.
For those looking to personalize their space, consider creating wall art quilts using the braid pattern. These can be done in ombre colors to match a room’s color scheme or with prints that reflect personal style. Hung vertically or horizontally, they add a unique, artistic element to any room.
Scrap busters will love using the French Braid Quilt – Pattern to use up leftover fabric. The repeating strip structure is ideal for turning small pieces into something meaningful. The scrappy version adds a fun, whimsical twist to the traditionally polished look.
Lastly, don’t overlook the potential of baby quilts using this design. Gentle pastels arranged in a braid can create a calming, beautiful gift for a new baby. The flowing motion of the braid feels peaceful and comforting—perfect for nursery decor.
4. Tips and Tricks for a Flawless French Braid Quilt – Pattern
Success with the French Braid Quilt – Pattern starts with careful planning and consistent execution. Here are a few tips to help you avoid common mistakes and ensure your final quilt is beautiful and polished.
Start by pre-planning your fabric layout. Lay out your fabric strips in the order you plan to sew them before starting. This ensures a smooth color flow and prevents unintended duplicates or awkward combinations.
Cut with precision. Since the braid is built from repeated strips, even slight variations in size can add up over time and affect your alignment. Always use a sharp rotary blade and a quilting ruler for clean, accurate cuts.
Pressing is crucial. Press every seam after sewing—first to set the stitch, then to one side or open, depending on your preference. Avoid skipping this step, as it helps your pieces fit together better and gives a crisper finish.
Trim as you go. Once your braid grows longer, you may notice slight warping along the sides. Use your ruler to square off the edges every few rows, keeping your braid straight and ready for assembly.
Don’t be afraid to use chain piecing when possible. This technique saves time and thread, especially if you’re working on multiple braid panels. Sew several pieces in a row without cutting the thread between them, then press and continue.
Lastly, take your time during the layout process. This pattern is all about flow and rhythm. Stepping back to view your arrangement from a distance can help you spot imbalances or awkward transitions early, allowing for adjustments before sewing.
FAQ: French Braid Quilt – Pattern
Q1: Is the French Braid Quilt – Pattern suitable for beginners?
Yes! It’s very beginner-friendly because it uses straight seams and repetitive blocks. Once you master the angle of sewing strips, it’s smooth sailing.
Q2: How many fabrics should I use for a French braid quilt?
While you can use as few as five fabrics, most quilters use between six and twelve to create beautiful gradients or varied patterns. The more fabrics you use, the more depth and movement you can achieve.
Q3: What is the best size for the strips?
2.5 inches by 6-8 inches is a popular choice, but you can adjust based on your project size. Wider strips result in bolder braids, while narrower ones create a more delicate effect.
Q4: How do I keep my braid panels from warping?
Careful pressing and regular trimming help maintain straight edges. It’s also important to sew and press consistently on each side to avoid pulling the fabric unevenly.
Q5: Can I quilt over the braid, or should I stitch in the ditch?
Both options work. Stitching in the ditch highlights the braid structure, while free-motion quilting can add texture and personality. Choose based on the look you prefer.
Q6: How do I add borders or sashing to a French braid quilt?
Add sashing strips between braid panels or around the entire quilt top. Use a neutral fabric to give the braid room to breathe and prevent the pattern from feeling crowded.
Conclusion
The French Braid Quilt – Pattern is a stunning and adaptable choice for quilters of all levels. With its elegant lines and mesmerizing flow, it transforms simple fabric strips into a beautifully cohesive design. Whether you’re making a cozy throw, stylish table runner, or striking wall quilt, the French braid offers both beauty and ease.
In this article, we explored what makes this pattern so timeless
, how to create it step-by-step, creative ways to use it in projects, and practical tips to ensure quilting success. We also addressed common questions to support you on your journey.
Have you tried the French Braid Quilt – Pattern before? We’d love to hear your experience! Leave a sincere comment below sharing your tips, questions, or suggestions for future articles. Happy quilting!