The Water Bottle Holder with Cellphone Pocket – Pattern is the perfect sewing project for anyone who loves functionality and convenience while on the go.
Whether you’re hiking, walking your dog, running errands, or exploring your city, carrying a bulky bag can be inconvenient.
This clever and compact accessory allows you to stay hydrated and keep your phone close—all without needing to carry a purse or backpack.
With the growing demand for hands-free accessories, the Water Bottle Holder with Cellphone Pocket – Pattern has become increasingly popular among sewists of all levels. Not only is it practical, but it’s also a fun way to repurpose fabric scraps or customize a gift. It fits various bottle sizes, and the pocket is designed to safely hold your phone, cards, or keys.
In this article, we’ll guide you through how to create your own Water Bottle Holder with Cellphone Pocket – Pattern from scratch. You’ll learn what materials you’ll need, how to assemble each piece, and how to personalize it to suit your style. Whether you’re crafting for yourself or making thoughtful gifts, this is a project that’s as enjoyable to make as it is to use.
1. Choosing the Right Materials for Your Project
To begin your Water Bottle Holder with Cellphone Pocket – Pattern, selecting the appropriate materials is key to both functionality and appearance. Your goal is to create something durable, washable, and comfortable to wear.
Start with sturdy fabric like canvas, cotton duck, denim, or outdoor nylon. These materials can support the weight of a full water bottle without stretching or tearing. If you’re using quilting cotton, reinforce it with interfacing to give it the necessary structure.
For the lining, choose a lighter but strong material such as ripstop nylon or waterproof PUL. This not only makes the inside of the bottle holder easy to clean but also helps manage condensation from cold drinks.
You’ll also need webbing or fabric strips for the strap. Adjustable straps made from nylon webbing are ideal for a comfortable crossbody fit, while fabric straps give a more handmade look. Don’t forget D-rings, clips, and a strap adjuster if you want a removable or adjustable strap.
Velcro, snaps, or zippers can be used to secure the cellphone pocket. Consider the size and weight of the phone you intend to carry when choosing closure options. Elastic bands are also useful if you want a stretchable pocket opening.
Lastly, you’ll need standard sewing tools: scissors, pins, matching thread, a sewing machine (preferably with a walking foot), and measuring tape. A water-resistant spray is optional but can add extra protection to your finished product.
2. Cutting and Preparing the Pattern Pieces
Once your materials are gathered, it’s time to cut your fabric according to your Water Bottle Holder with Cellphone Pocket – Pattern dimensions. This stage sets the foundation for a neat, well-fitting project.
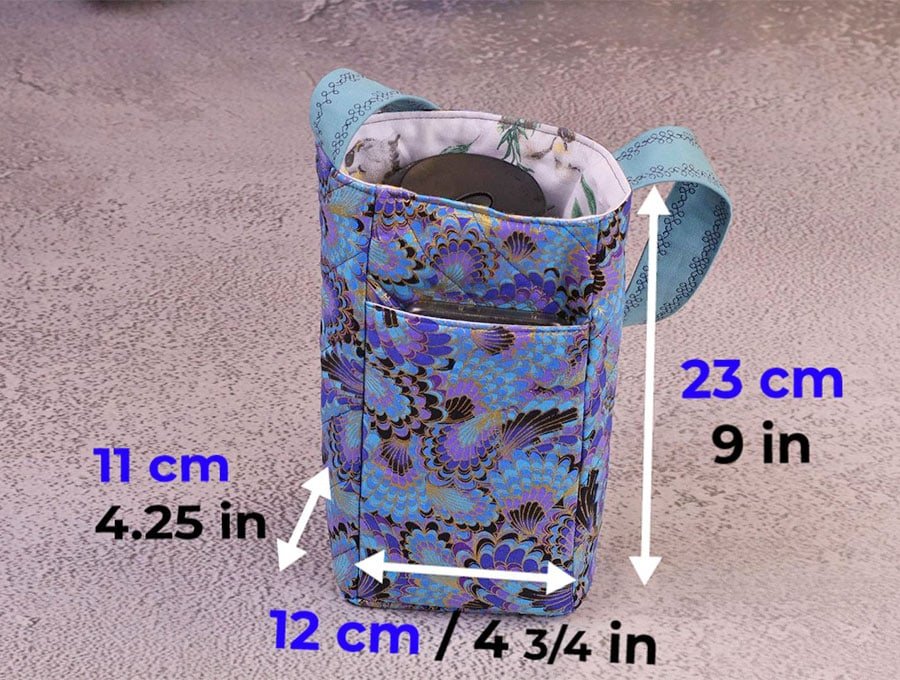
The body of the holder will be a rectangular piece, generally 10–11 inches wide and 8–10 inches tall, depending on your water bottle size. You’ll also need a circular base, around 3–4 inches in diameter, cut from the same outer and lining fabric.
For the cellphone pocket, cut a rectangular piece around 4–6 inches wide and 6–7 inches tall. This should be large enough to fit most standard smartphones, with a bit of extra room to allow for movement or a phone case.
Cut matching lining pieces for both the body and the pocket. You’ll want all fabric layers to be reinforced with interfacing, especially if using thinner cotton fabrics. Iron the interfacing onto the wrong side of the outer fabric before proceeding.
Strap pieces should be cut according to your desired length, typically 40–50 inches. If making an adjustable strap, prepare the webbing and install hardware like adjusters and clips.
Label each cut piece with chalk or removable tape to keep track. Double-check that seam allowances are included—usually ¼ to ½ inch. This ensures all your pieces will fit together during the sewing process.
3. Assembling the Bottle Holder and Pocket
With all pieces prepped, it’s time to bring your Water Bottle Holder with Cellphone Pocket – Pattern to life through sewing. Begin with the pocket, then construct the bottle holder body.
Start by folding the pocket piece’s top edge down twice and stitching it in place. Attach your closure (Velcro, snap, or zipper) at this point, depending on your design choice. Then place the pocket on the outer panel of the bottle holder, aligning it near the top or middle, and topstitch the sides and bottom.
Once the pocket is secure, create the main cylindrical body by folding the rectangle right sides together and sewing the side seam. Press the seam open and insert the circular base. Clip and sew slowly around the edge to ensure a clean fit.
Repeat the process with the lining fabric, but leave a small gap in the bottom seam to allow for turning the project right side out later. With both body and lining prepared, slip them together with right sides facing and stitch around the top opening.
Turn the entire piece right side out through the gap in the lining. Carefully push out the corners and base, then topstitch around the top edge for a polished look. Sew the lining opening closed by hand or machine.
Finally, attach your strap to the side seams using reinforced stitching. If using D-rings or clips, you may sew small tabs to hold hardware. Make sure the strap feels secure and even on both sides for comfort.
4. Customization Ideas and Practical Uses
One of the best things about the Water Bottle Holder with Cellphone Pocket – Pattern is how customizable it is. You can personalize it to suit your needs, gift recipients, or even different seasons.
Try patchwork designs using leftover fabric scraps to make a colorful, eco-friendly holder. This is a great way to use small pieces of favorite fabrics while reducing waste.
Add embroidery or fabric paint to decorate the front panel. Personalize it with initials, patterns, or motivational quotes. This gives your holder character and makes it feel one-of-a-kind.
Adjust the strap style based on your preference: crossbody, over-the-shoulder, or even a belt loop version for hikers and campers. Versatility is a huge advantage of making your own accessory.
Make a matching set for you and a friend, or create themed versions—floral for spring walks, waterproof for beach days, or insulated for long hikes. You can even add a key ring loop or sunglasses pocket for even more functionality.
For kids, use bright fabrics and consider adding a name tag or reflective strips for safety. This is a great way to encourage children to stay hydrated throughout the day.
Once you’ve made one, you’ll likely want more. These holders make fantastic handmade gifts, craft fair items, or charity donations. The practical appeal and wide usability of this Water Bottle Holder with Cellphone Pocket – Pattern means it will always be appreciated.
Frequently Asked Questions (FAQ)
Q: What size bottle does the Water Bottle Holder with Cellphone Pocket – Pattern fit?
A: The standard pattern fits most 16–24 oz bottles. You can adjust dimensions easily to fit larger or smaller bottles.
Q: Is this a beginner-friendly sewing project?
A: Yes! It involves straight stitching and basic construction techniques. With some patience, beginners can complete this project successfully.
Q: What type of closure works best for the cellphone pocket?
A: Velcro and snaps are the easiest to install and work well. Zippers are more secure but require intermediate sewing skills.
Q: Can I wash the finished holder?
A: Yes, most holders made from cotton or canvas are machine-washable. Be cautious with decorative elements like buttons or paint.
Q: How long does it take to sew one holder?
A: Around 2–3 hours for most sewists. With experience, you can finish in under 2 hours.
Q: Can I use this pattern to sell finished items?
A: Absolutely—especially if you created or adapted your own version of the pattern. Just make sure you’re not violating any commercial licensing rules if using a third-party design.
Conclusion
The Water Bottle Holder with Cellphone Pocket – Pattern is a practical, stylish, and enjoyable sewing project for anyone looking to simplify their daily carry. Whether you’re walking through the park, traveling, or just running to the store, this hands-free solution helps you stay hydrated and organized.
We hope this guide has helped you feel confident and inspired to start your own project. If you’ve made your own version, we’d love to hear about it! Please leave a sincere comment with your experience, photos, tips, or suggestions. Your feedback not only supports this creative community but also helps others bring their sewing ideas to life.